
FlipVR Official Manual

Online manual

Produced by Shiftall Inc.
Preparation / Before Using
1. Introduction
Section titled “1. Introduction”Thank you for choosing FlipVR.
Please read this manual and “Safety Precautions” before use.
And then use FlipVR properly and safely.
2. Contents
Section titled “2. Contents”- FlipVR(Left/Right) 1
- Hook-and-loop fastener 2
- Safety Precautions / Warranty 1
Name of parts
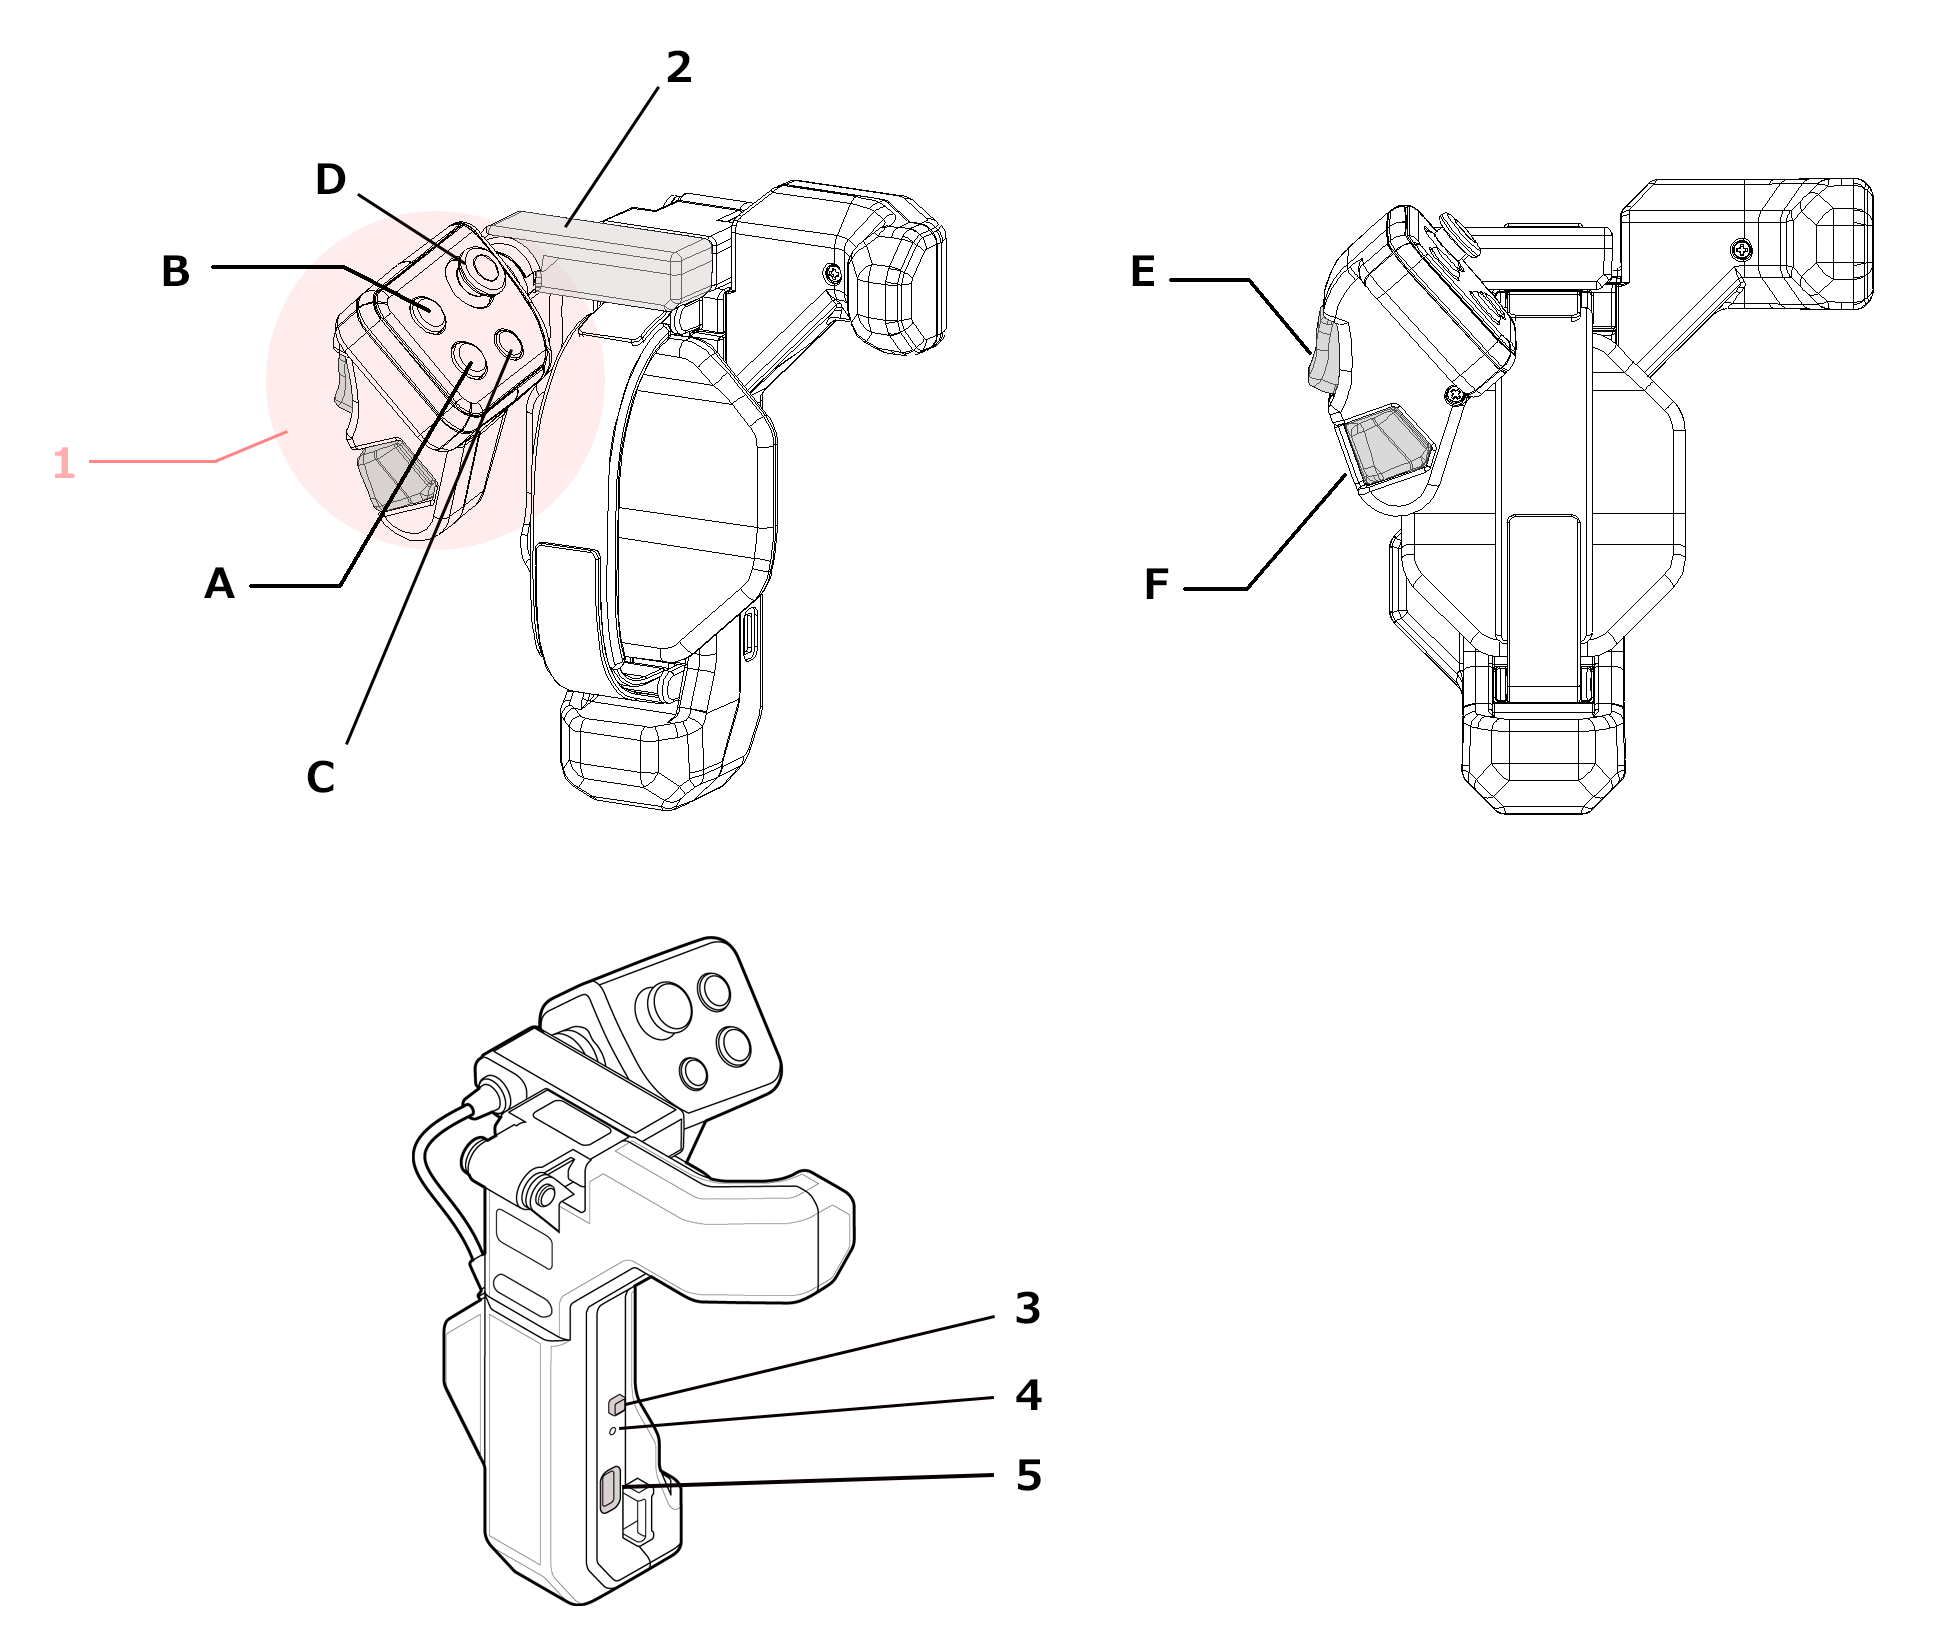
- Control unit
- Slider
- Power button
- LED
- USB Type-C port
- A button(X button on the left controller)
- B button(Y button on the left controller)
- System button
- Joystick
- Trigger
- Grip
3. Charging
Section titled “3. Charging”Charge the device before using it for the first time.
Charging should be performed in an environment with an ambient temperature of 10°C to 35°C.
- Charge the battery by connecting a PC or USB charger(not included) to the USB-C port of the GripVR with the USB cable.
- The LED indicator lights up yellowish-green during charging.
- Once charging is complete, the LED indicator will change from yellowish-green to one of the following:
White: Controller power is off
Green: Connected to SteamVR™
Blue: Not connected to SteamVR™
* Make sure the USB cable is facing the right way, and plug it in and out straight, holding the plug. Inserting the cable at an angle may cause deformation of the terminals, resulting in malfunction.
How to use FlipVR
FlipVR is a VR controller that supports the SteamVR™ standard communication protocol.
- Hardware other than the controller should be purchased individually.
- The controller has a sensor to receive light from the base station. Since these sensors are delicate, please avoid covering or damaging the exterior of the controller.
4. How to install the driver
Section titled “4. How to install the driver”To use FlipVR, you must install the dedicated “Shiftall Controller Driver” from the Steam Store.
https://store.steampowered.com/app/3036810/Shiftall_Controller_Driver/
- The Steam client application is required to run the driver installation.
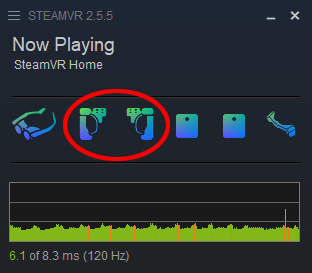
Once installed, the FlipVR-specific icon will appear in the SteamVR™ status window, and it will be ready for use.
- An internet connection is required for the download.
5. How to power on
Section titled “5. How to power on”To power on the controller, press and hold the power button until you hear a beep sound.
6. How to power off
Section titled “6. How to power off”To power off the controller, press and hold the power button for about 8 seconds until it turns off. Additionally, when you exit the SteamVR™ app, the controller will automatically power off.
- Please power off the controller using the power button when not in use.
- If FlipVR is not communicating with SteamVR™ for approximately 30 seconds, its power will automatically turn off.
7. How to pair
Section titled “7. How to pair”Pairing the controller with SteamVR™ is done using the following steps:
- Start SteamVR™ on your PC.
- With the controller powered on, press and hold the power button until the LED lights up blue, indicating it is in pairing mode.
- Launch the SteamVR™ app, click the
 hamburger menu, then select “Devices” > “Pair Controller” from the menu options.
 - On the screen where you select the controller type, choose one of the options displayed (such as Valve Index Controller).
- Following these steps will complete the pairing process. After pairing is complete, repeat the same steps to pair the controller for the other hand.
- When connecting the controller to your PC, you will need a SteamVR™ Tracking-compatible receiver.
- Please use either the receiver built into the SteamVR™ Tracking-compatible HMD (Head-Mounted Display) or the receiver included with the headset, or use the Shiftall X2 dongle for connectivity.
8. Status LED
Section titled “8. Status LED”FlipVR uses LED indicators to communicate its status.
| LED color (Status) | Controller Status | Conditions |
| Green (Solid) | Connected to SteamVR™ | ・Fully charged and connected via USB cable to an AC adapter or PC (with SteamVR running) ・Not currently charging |
| Blue (Solid) | Not connected to SteamVR™ | ・Fully charged and connected via USB cable to an AC adapter ・Not currently charging |
| Blue flashing (Flushing) | Pairing mode | Waiting for pairing settings |
| Yellow-green (Solid) | Charging | ・SteamVR™ Connected: Connected via USB cable to an AC adapter or PC while charging ・SteamVR™ Not Connected: Connected via USB cable to an AC adapter while charging |
| White (Solid) | Fully charged (Power off) | SteamVR™ is not connected, the device is connected via USB to an AC adapter, fully charged, and the controller power is OFF |
| Red (Solid) | Low battery | Battery level is 10% or less. |
| Red (Fast flashing) | Device error | An error has occurred with the device |
How to install FlipVR
Always use the included hand strap and wrist strap to securely fasten the product. Adjust the tightness to ensure it does not slip off when shaking your hand before use.
To ensure safe and comfortable use, please follow the correct attachment method outlined below.
9. Use straps
Section titled “9. Use straps”9.1 Names of parts related to straps
Section titled “9.1 Names of parts related to straps”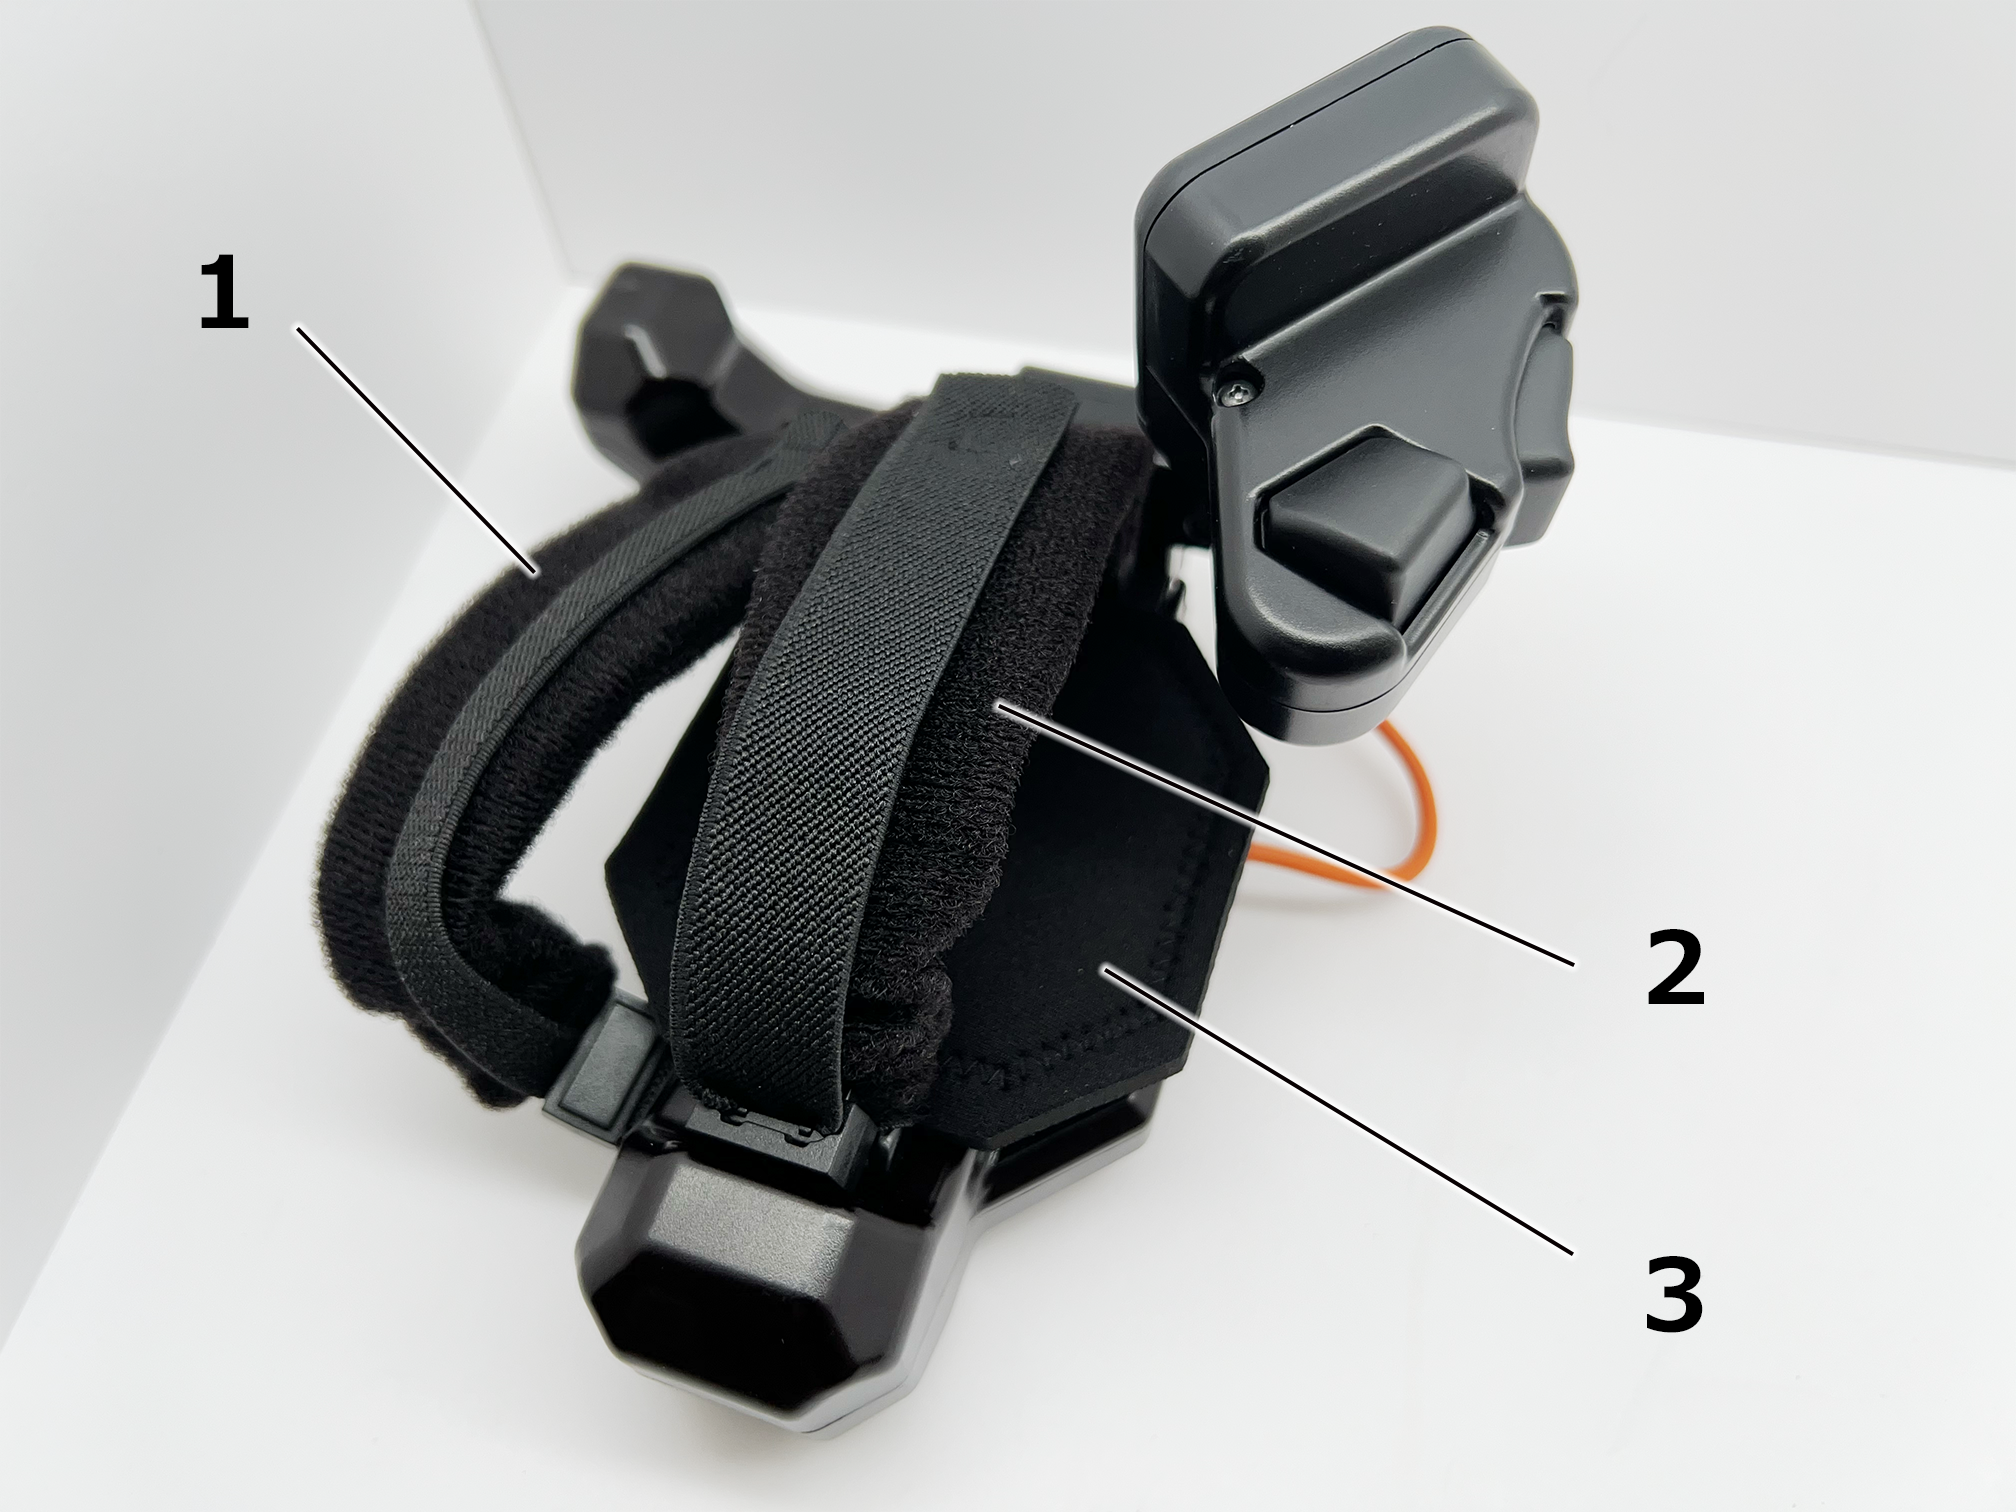
- Wrist strap
- Hand strap
- Strap cushion
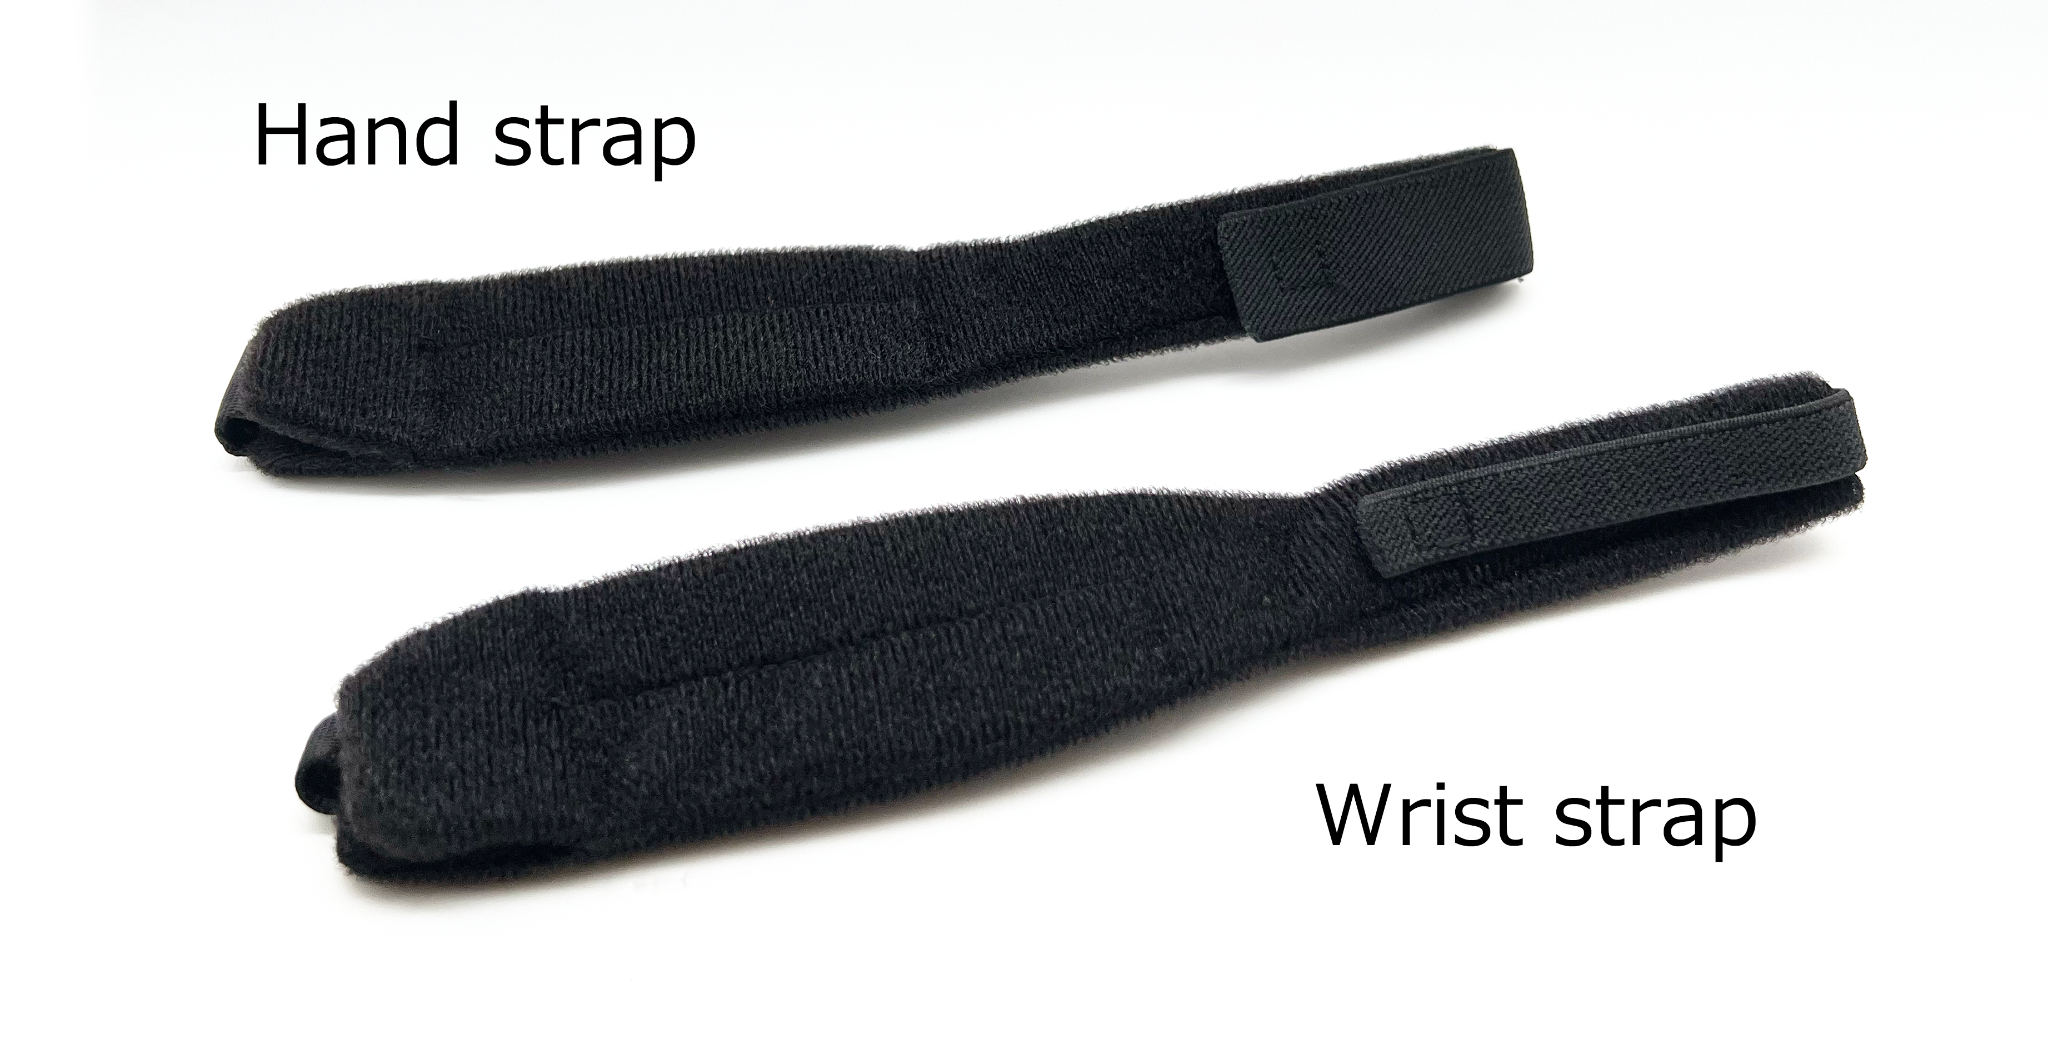
The hand strap has a hook-and-loop fastener width wider than that of the wrist strap.
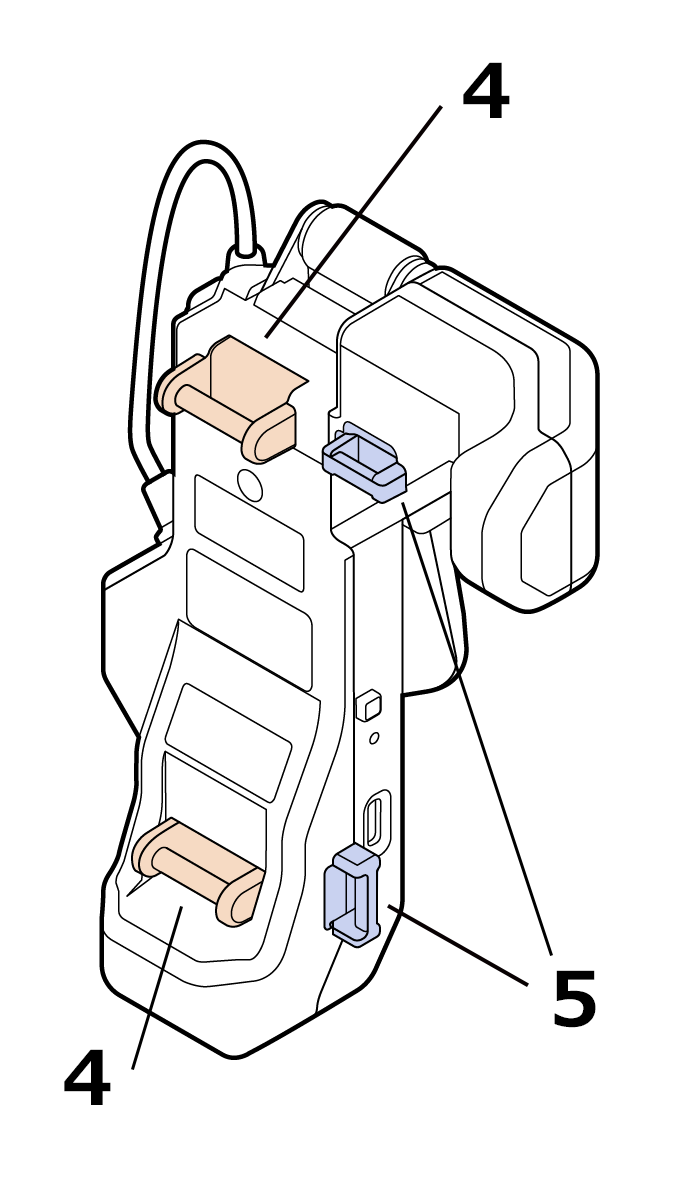
- Strap hole A(for Hand strap)
- Strap hole B(for Wrist strap)
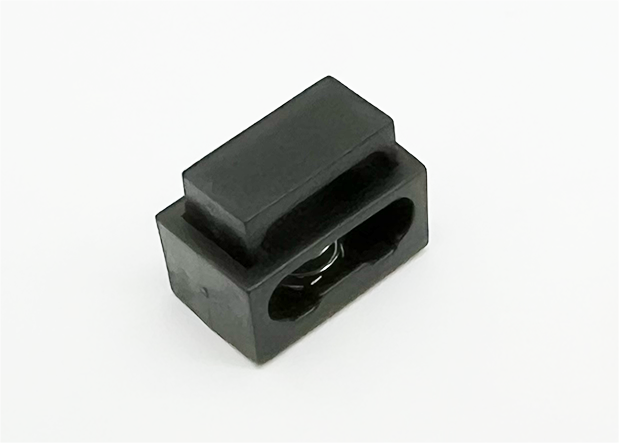
- Strap stopper (strap accessories)
9.2 How to install the straps
Section titled “9.2 How to install the straps”The controller comes with the strap pre-attached. The following instructions are for reattaching the strap if necessary.
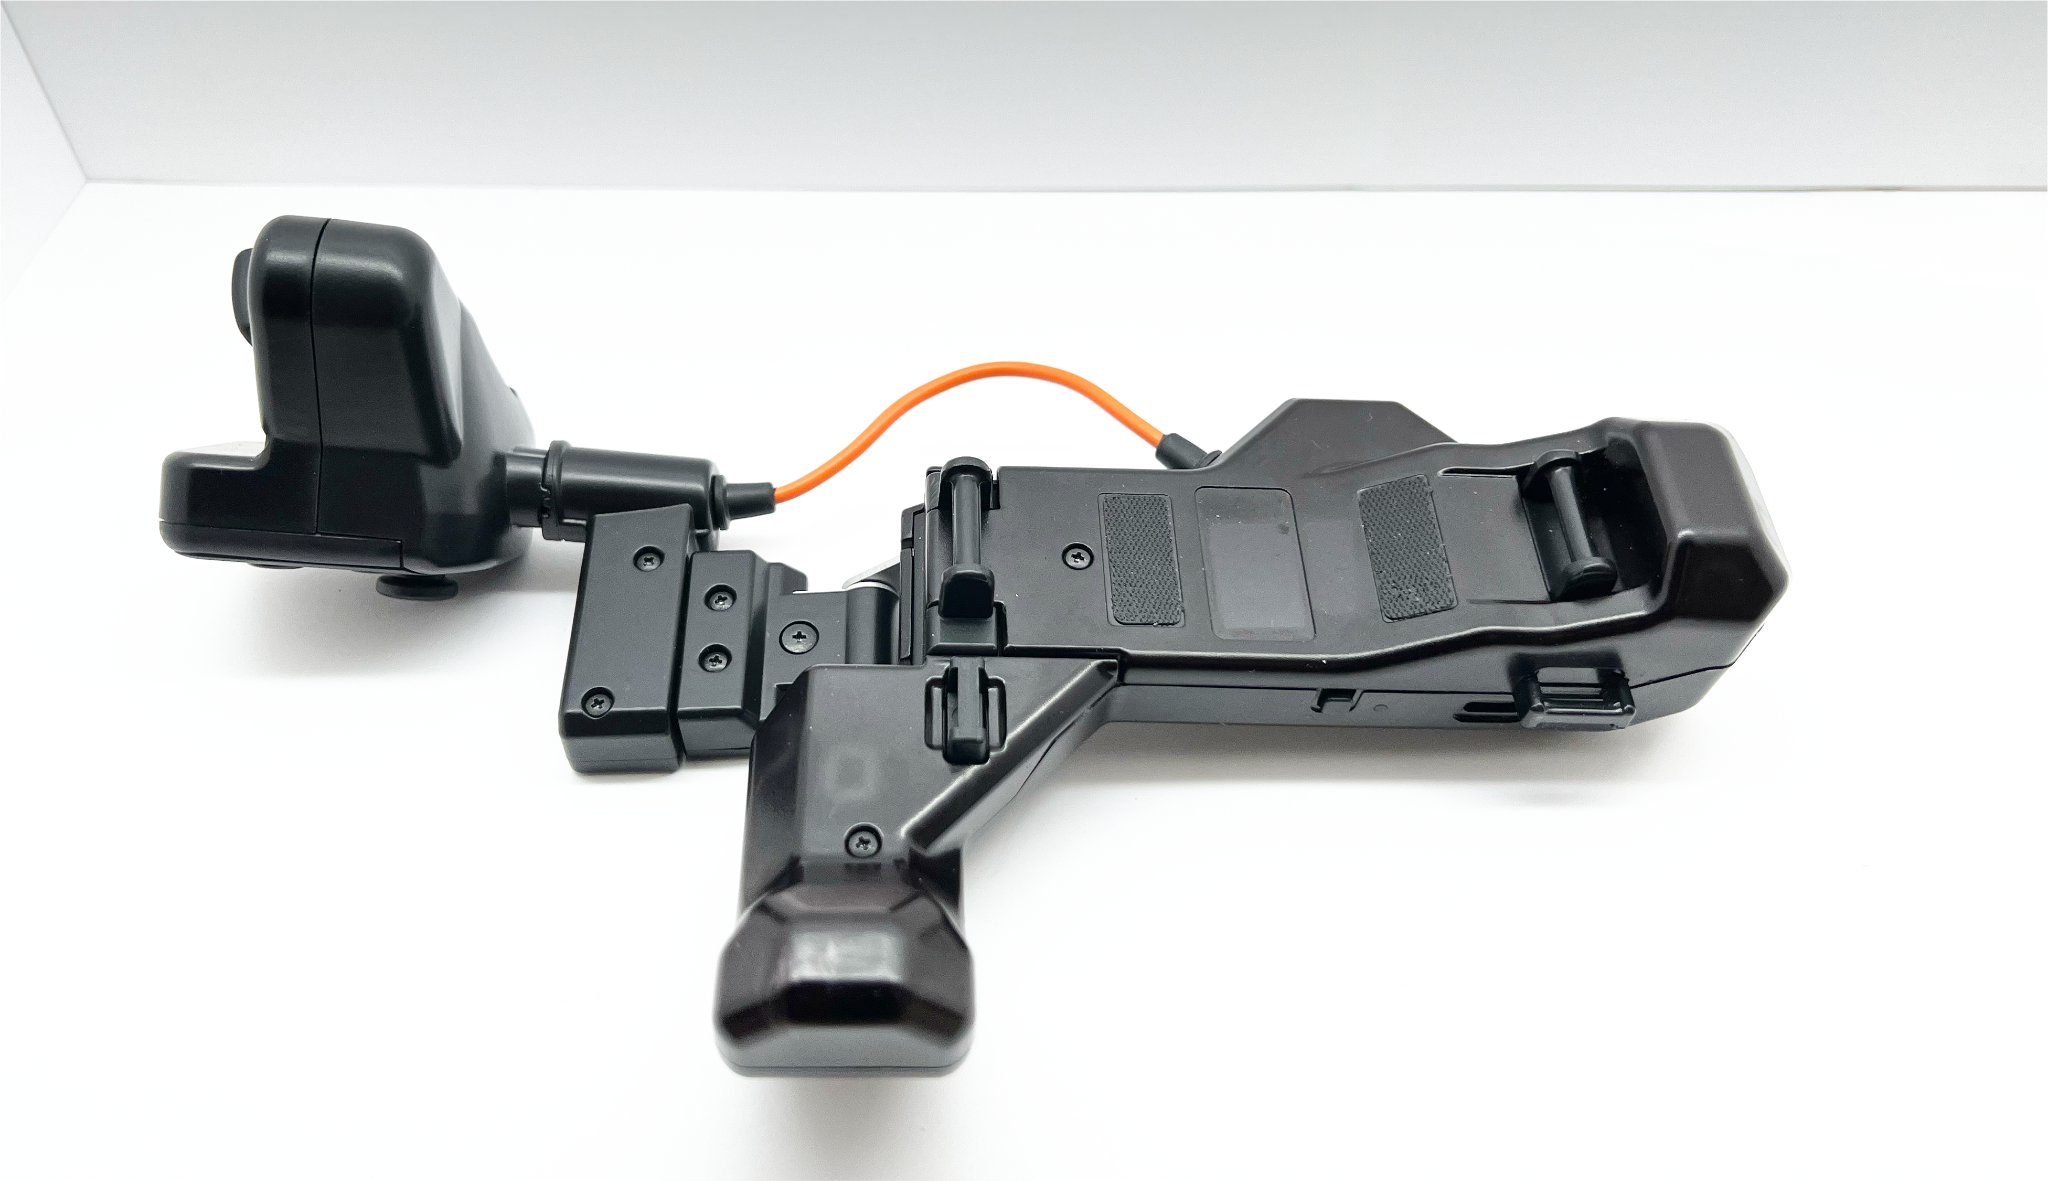
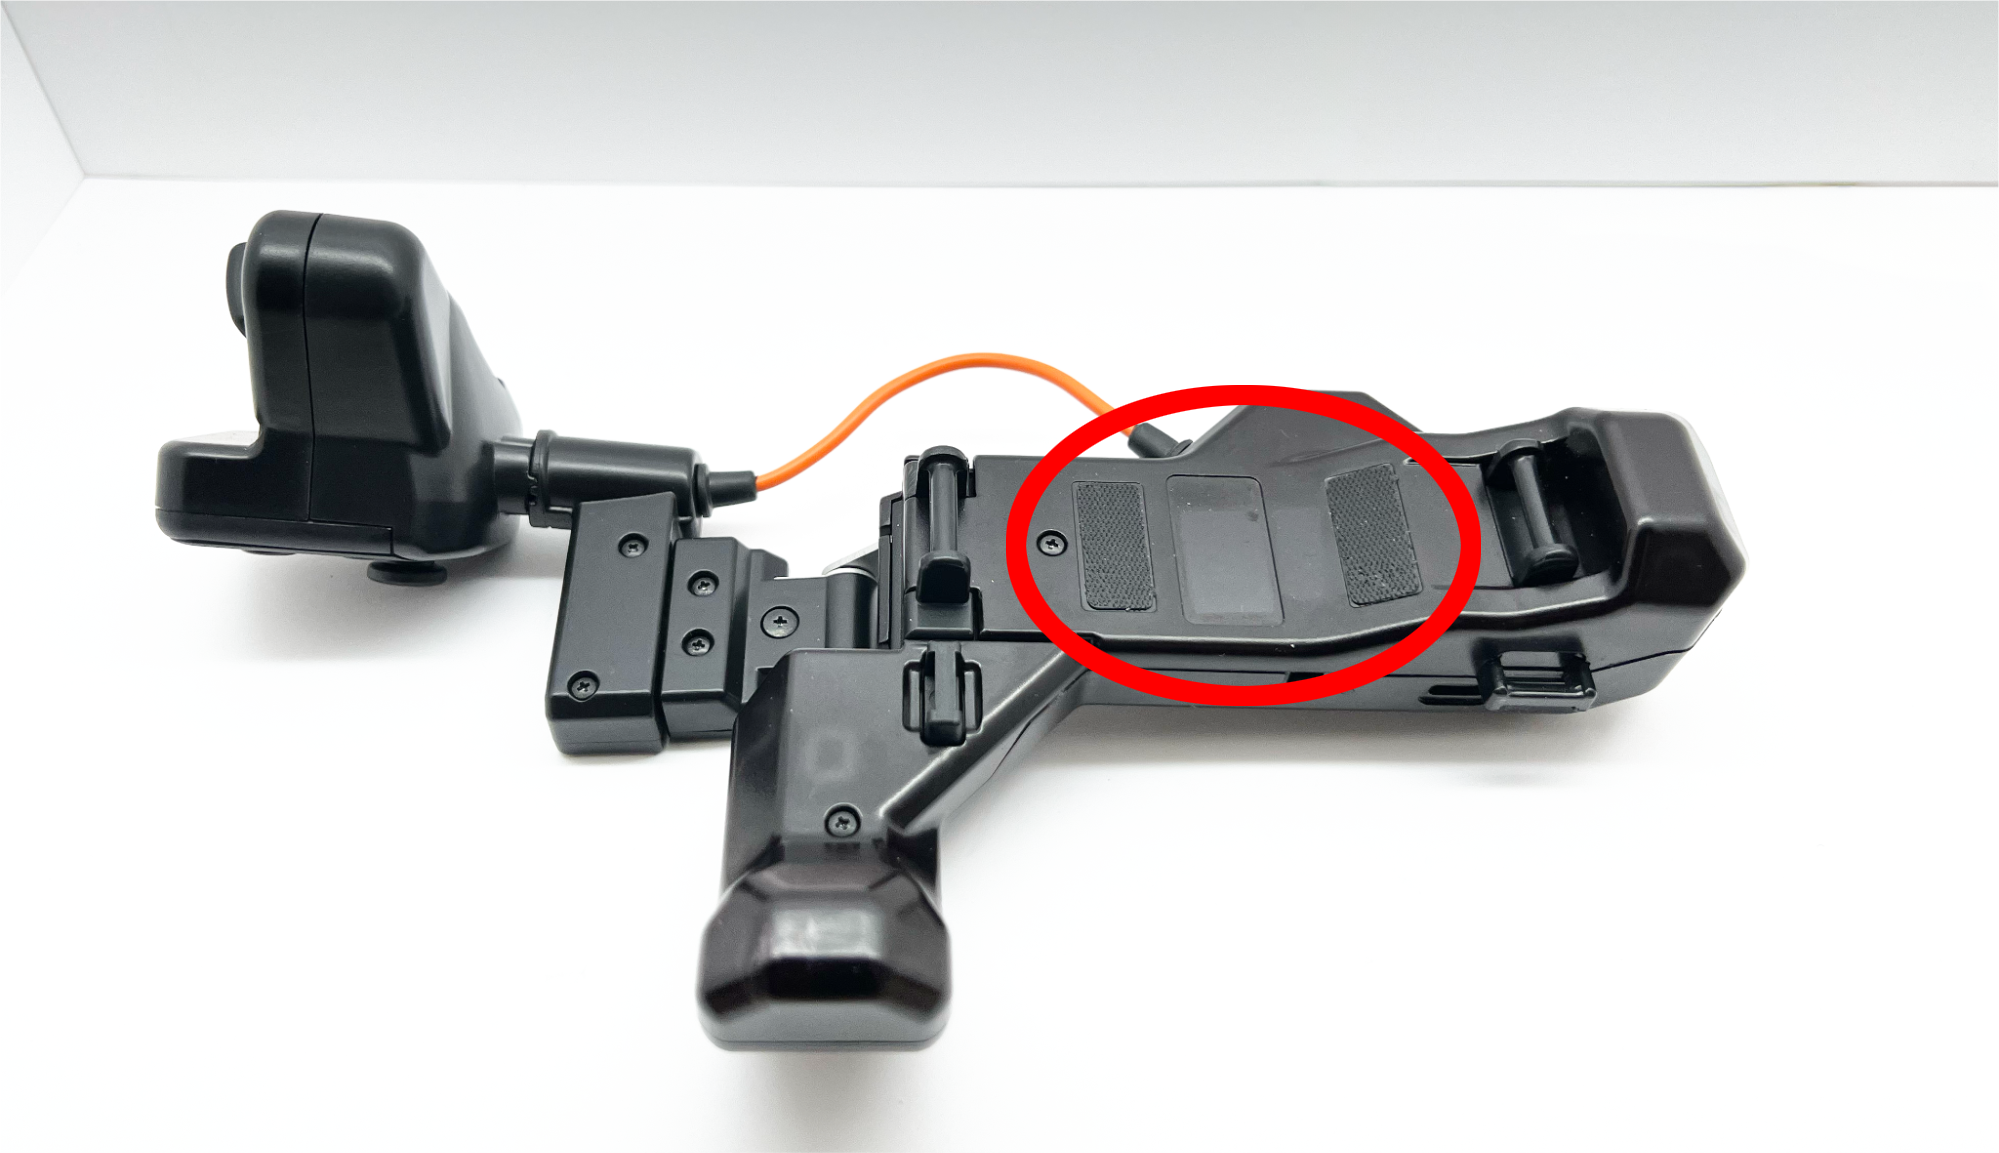
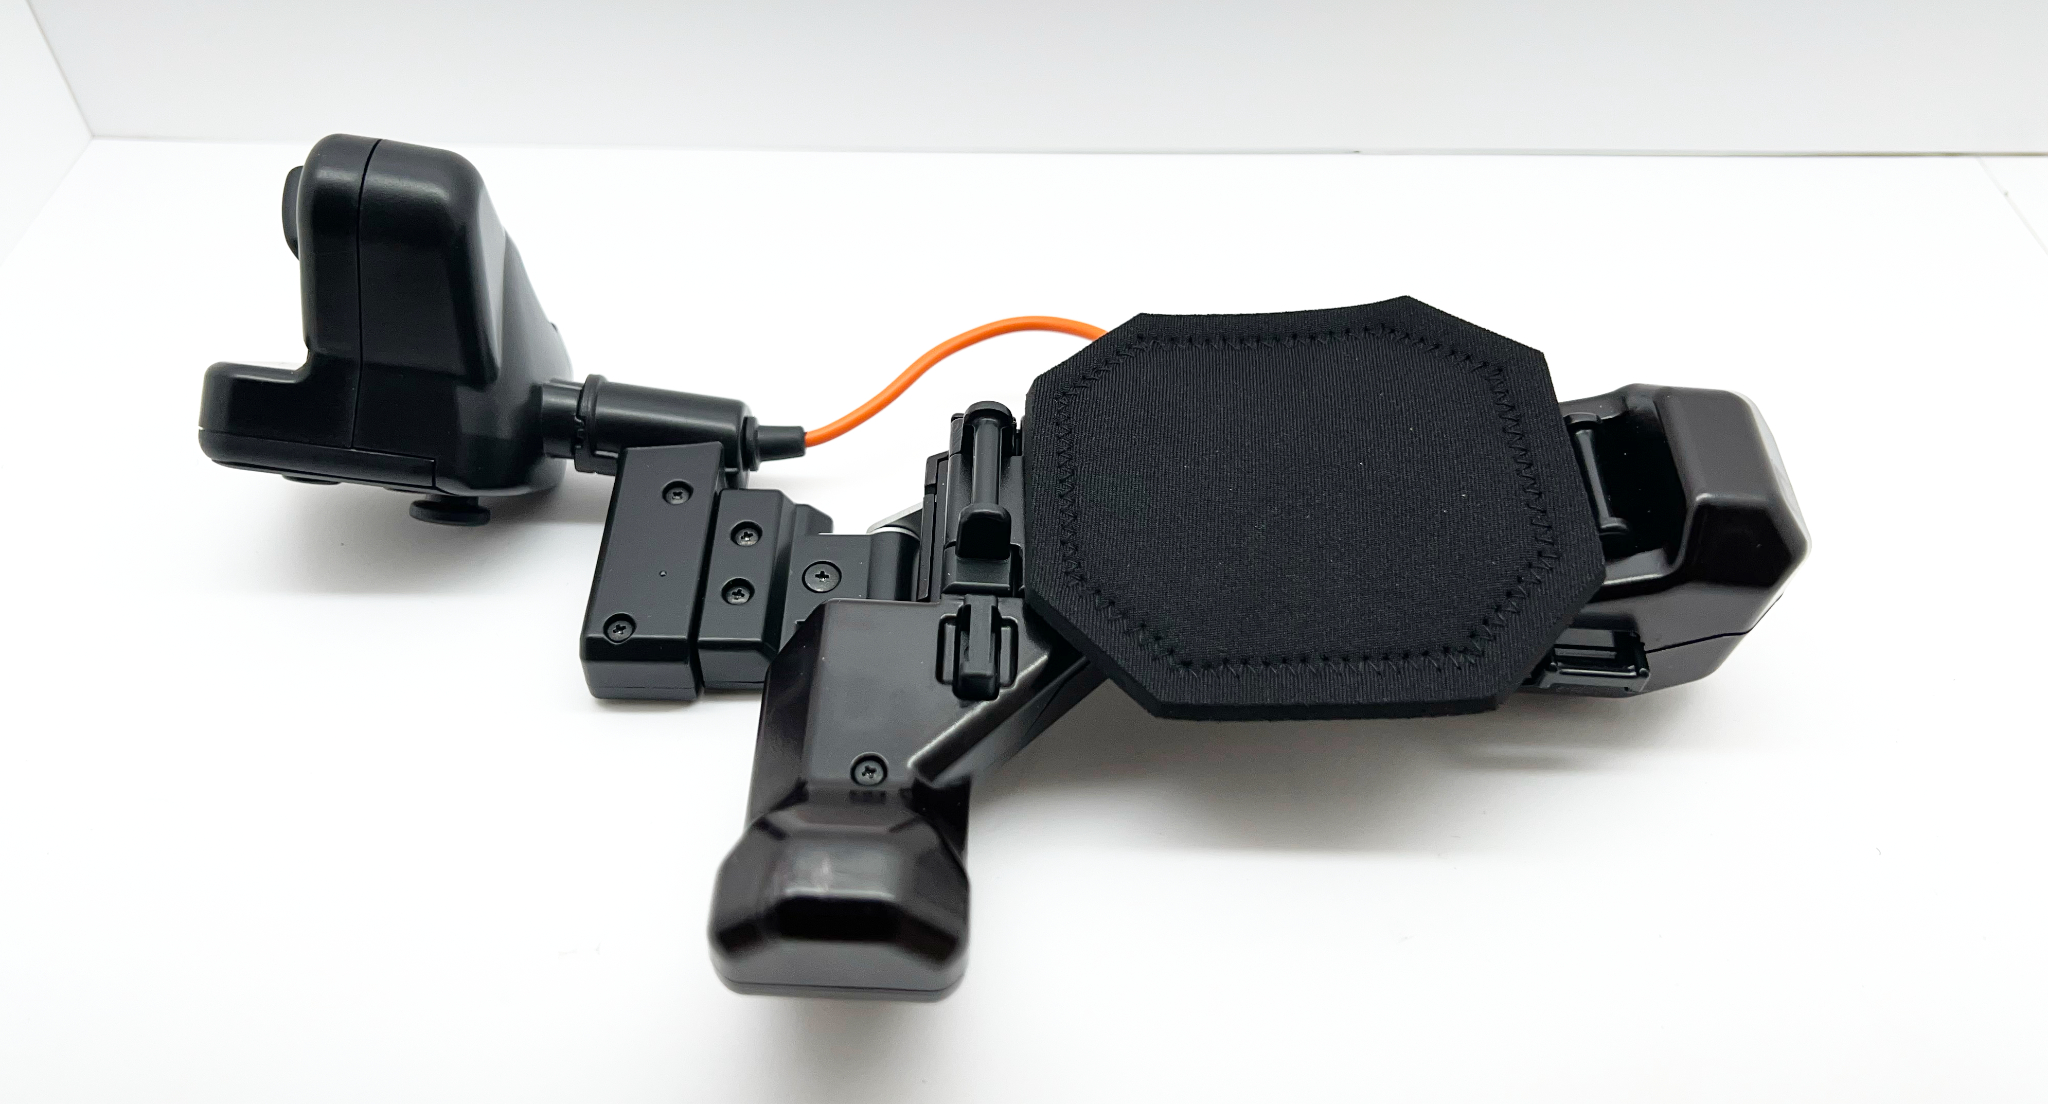
- Attach the strap cushion to FlipVR.
- Please attach the cushion carefully, paying attention to the orientation and the position of the hook-and-loop fastener.
- Attach the hand strap to FlipVR.
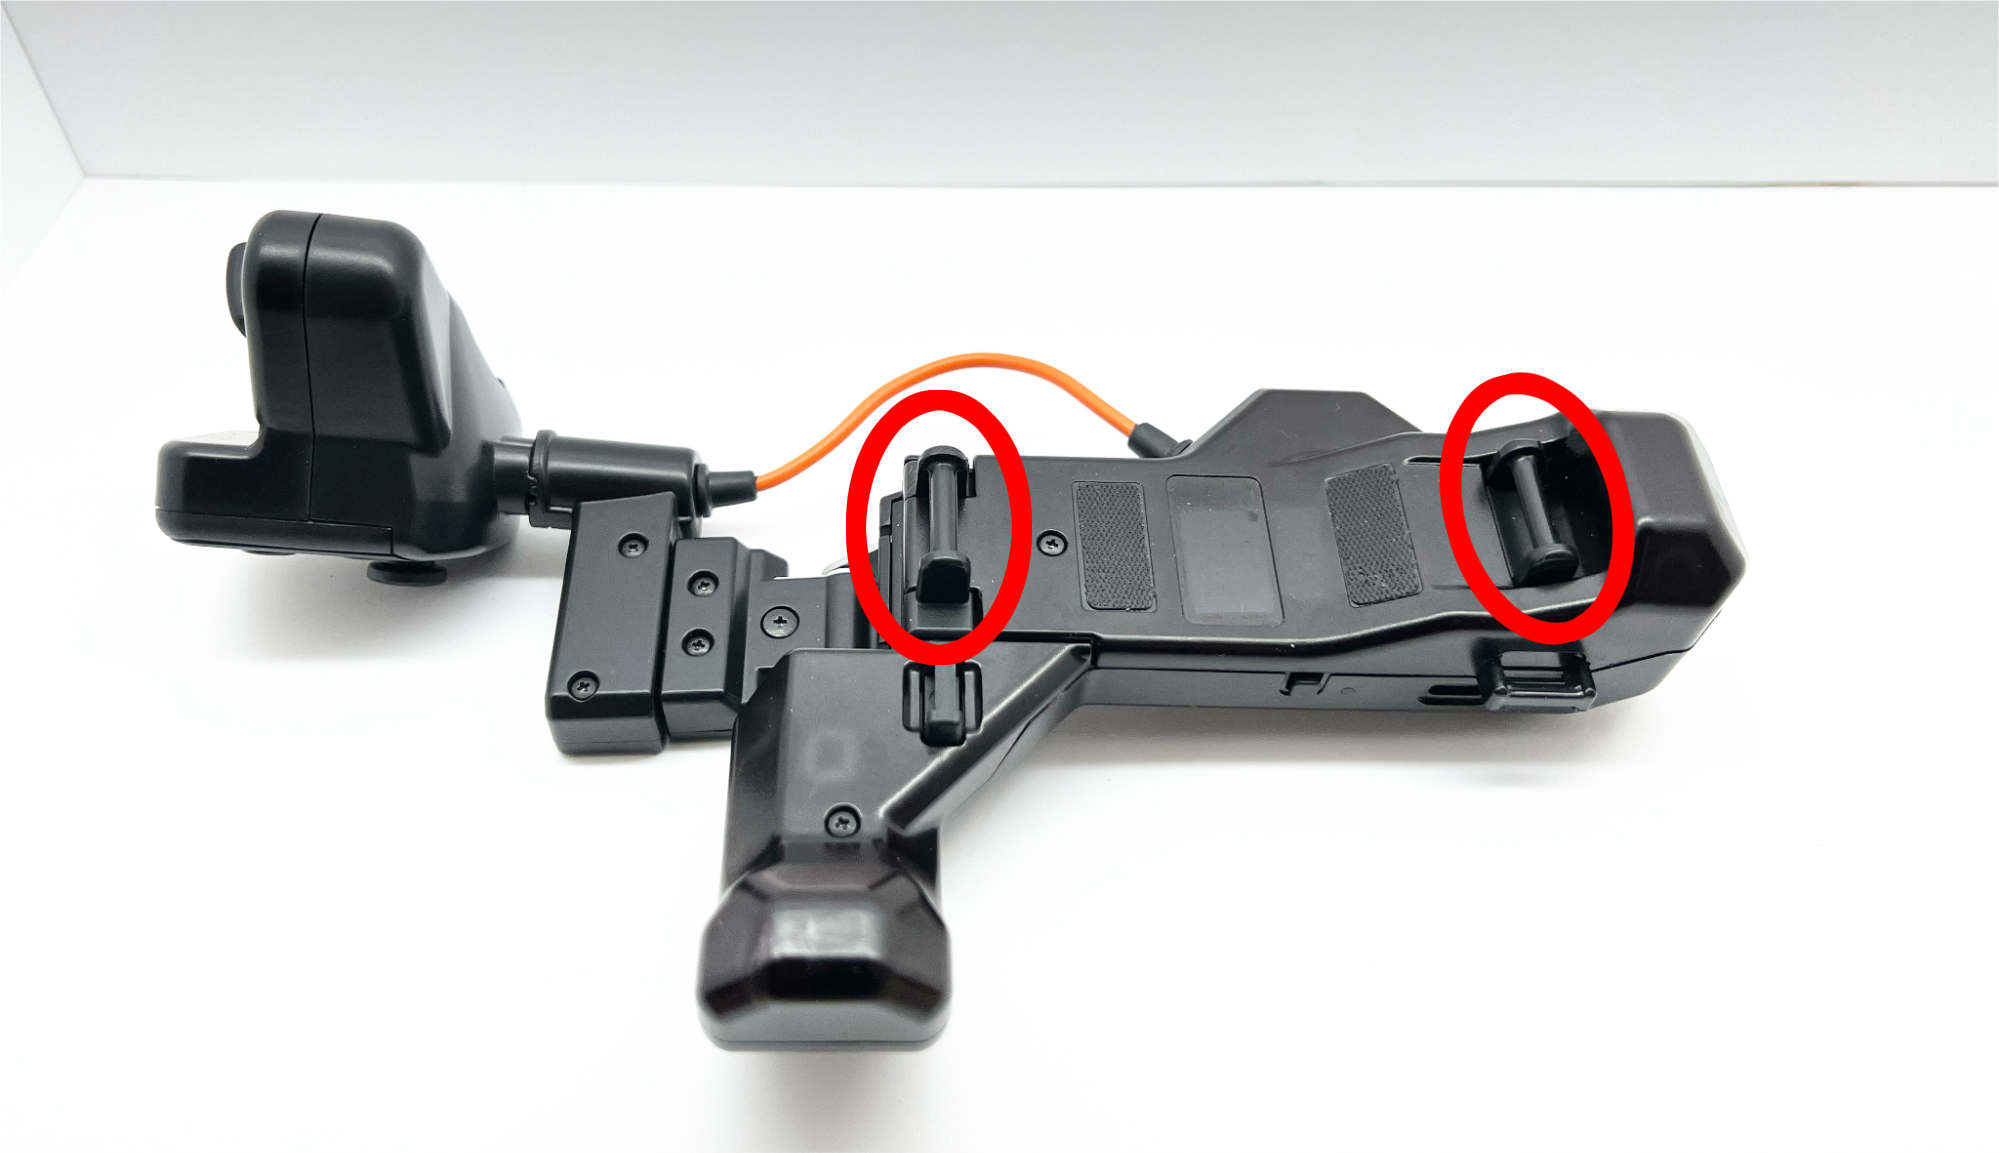
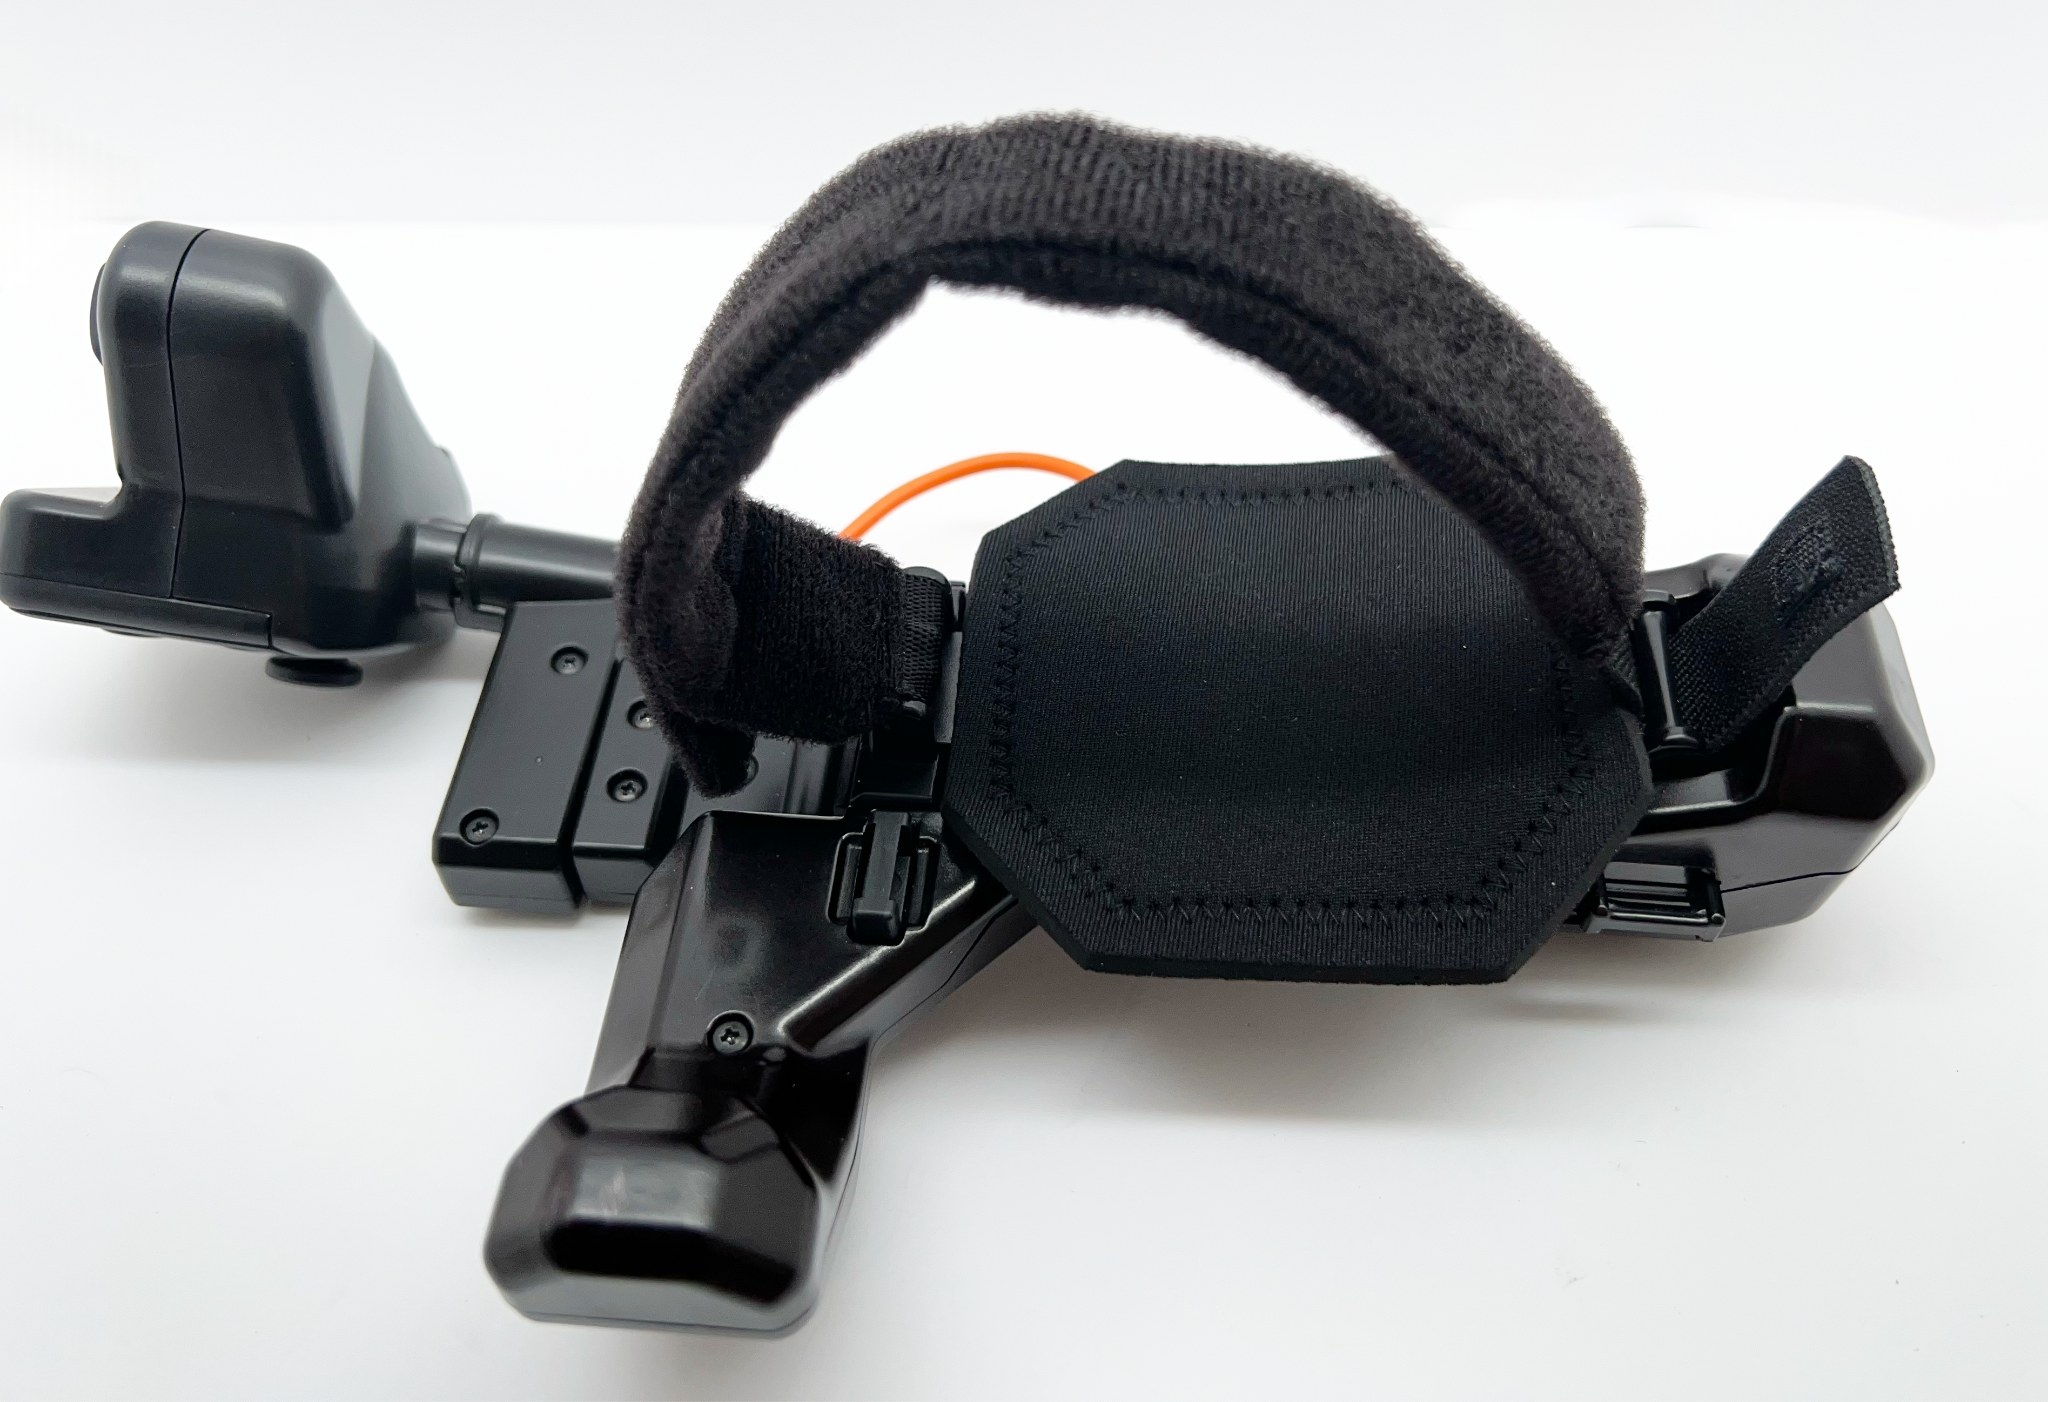
- Insert the end of the strap with the hook-and-loop fastener facing outward through strap hole A.
- Samely, thread the other side through strap hole A in the same manner.
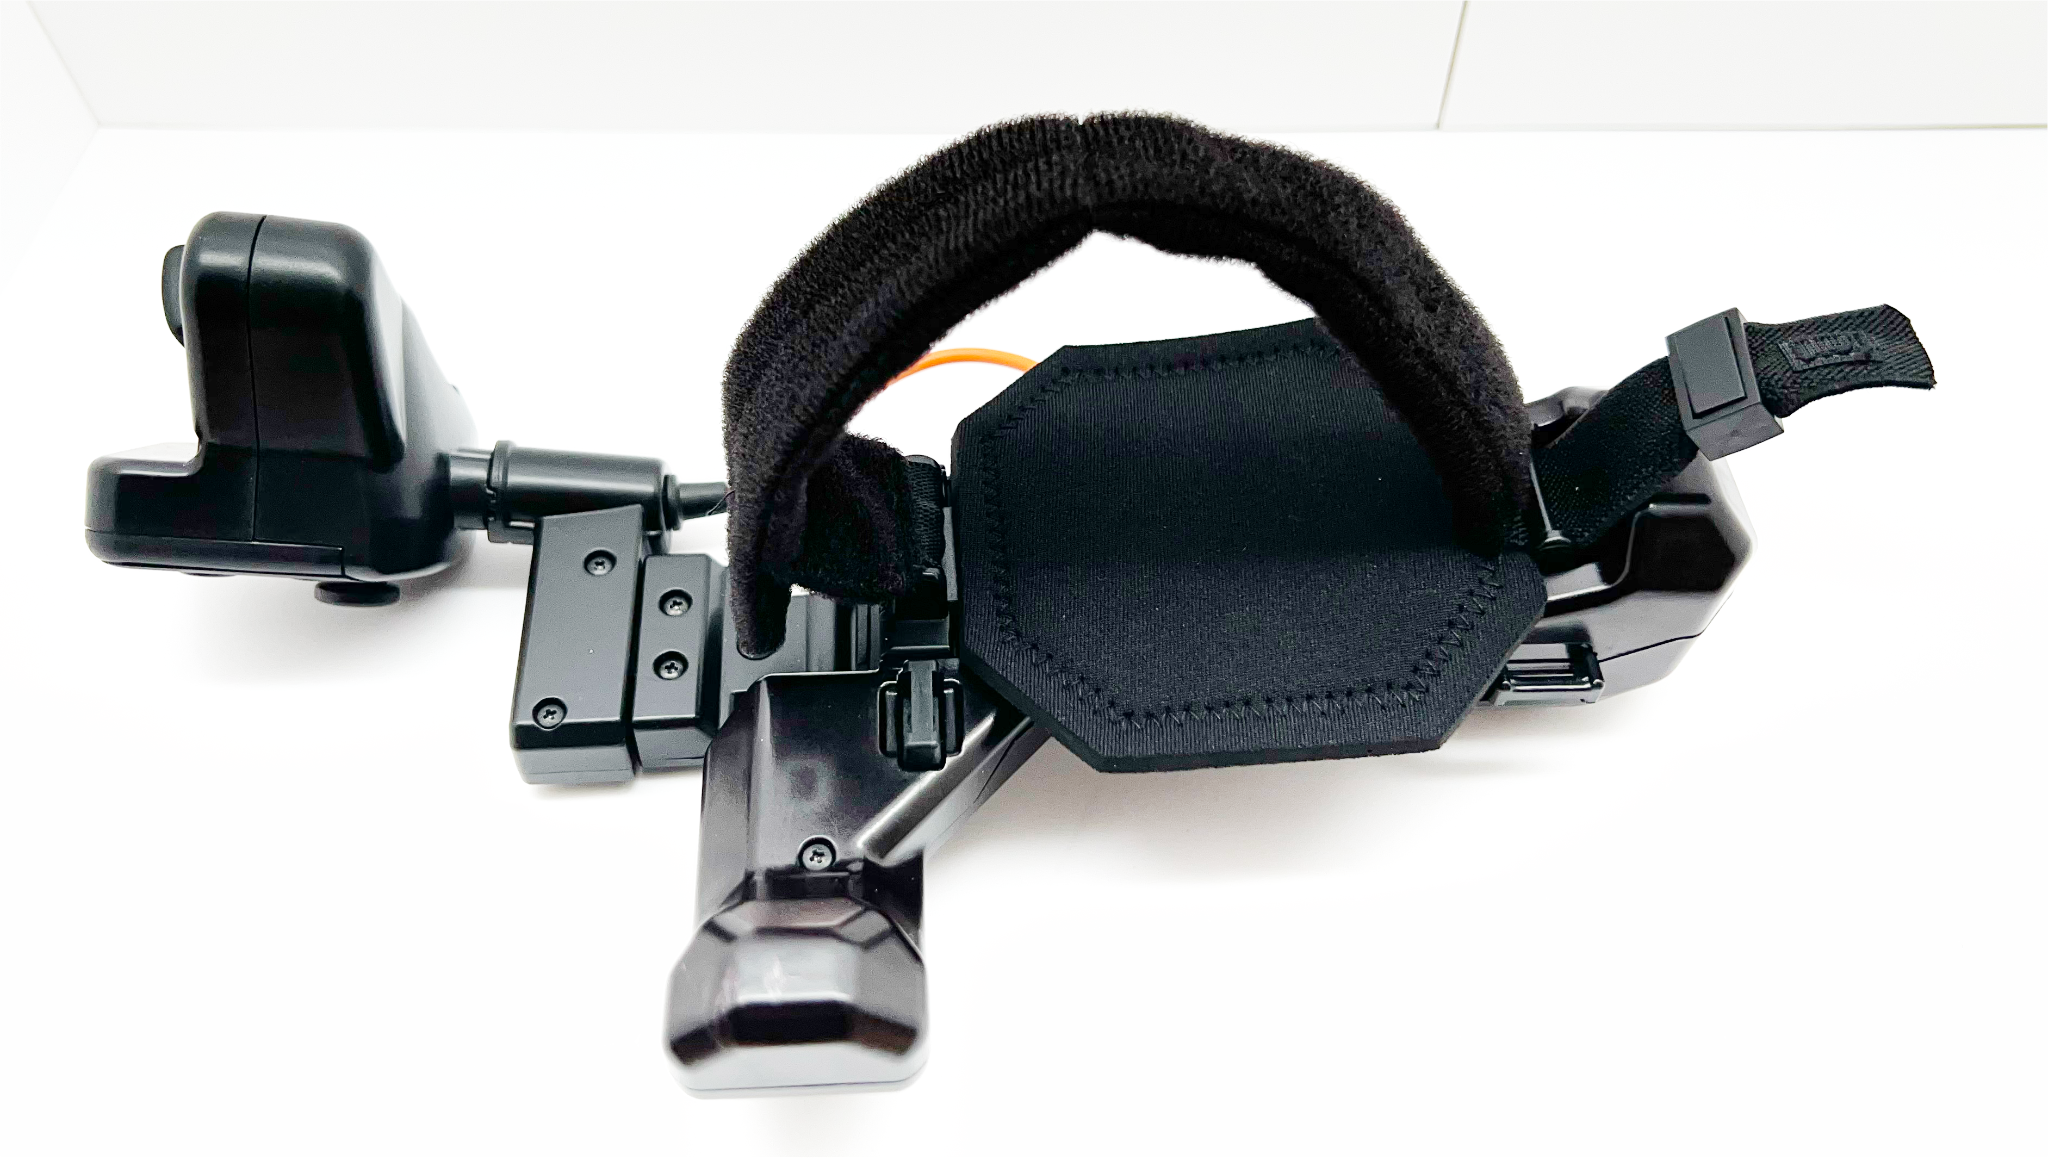
- Attach the strap stopper to the strap on the pinky finger side so that you can adjust the length of the strap.
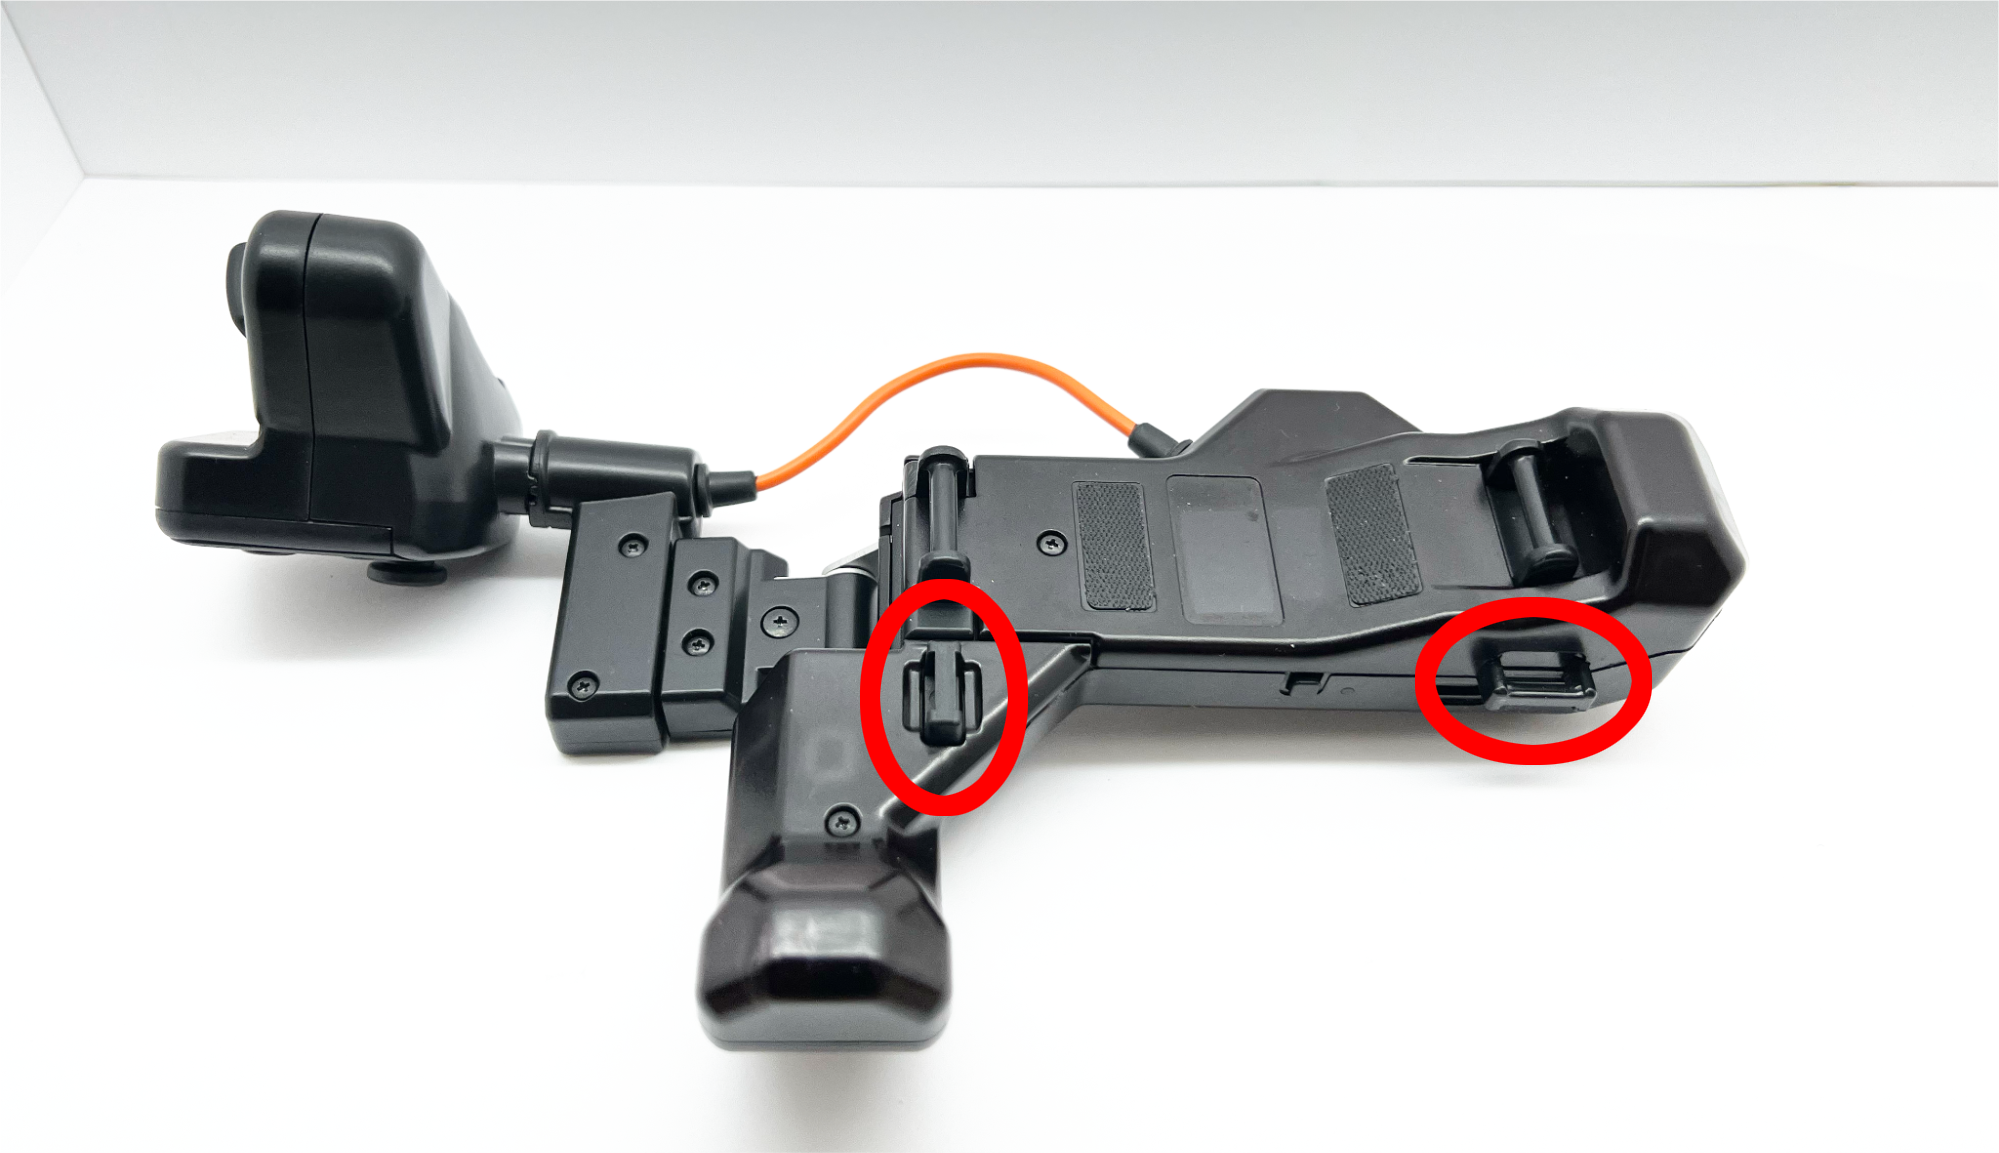
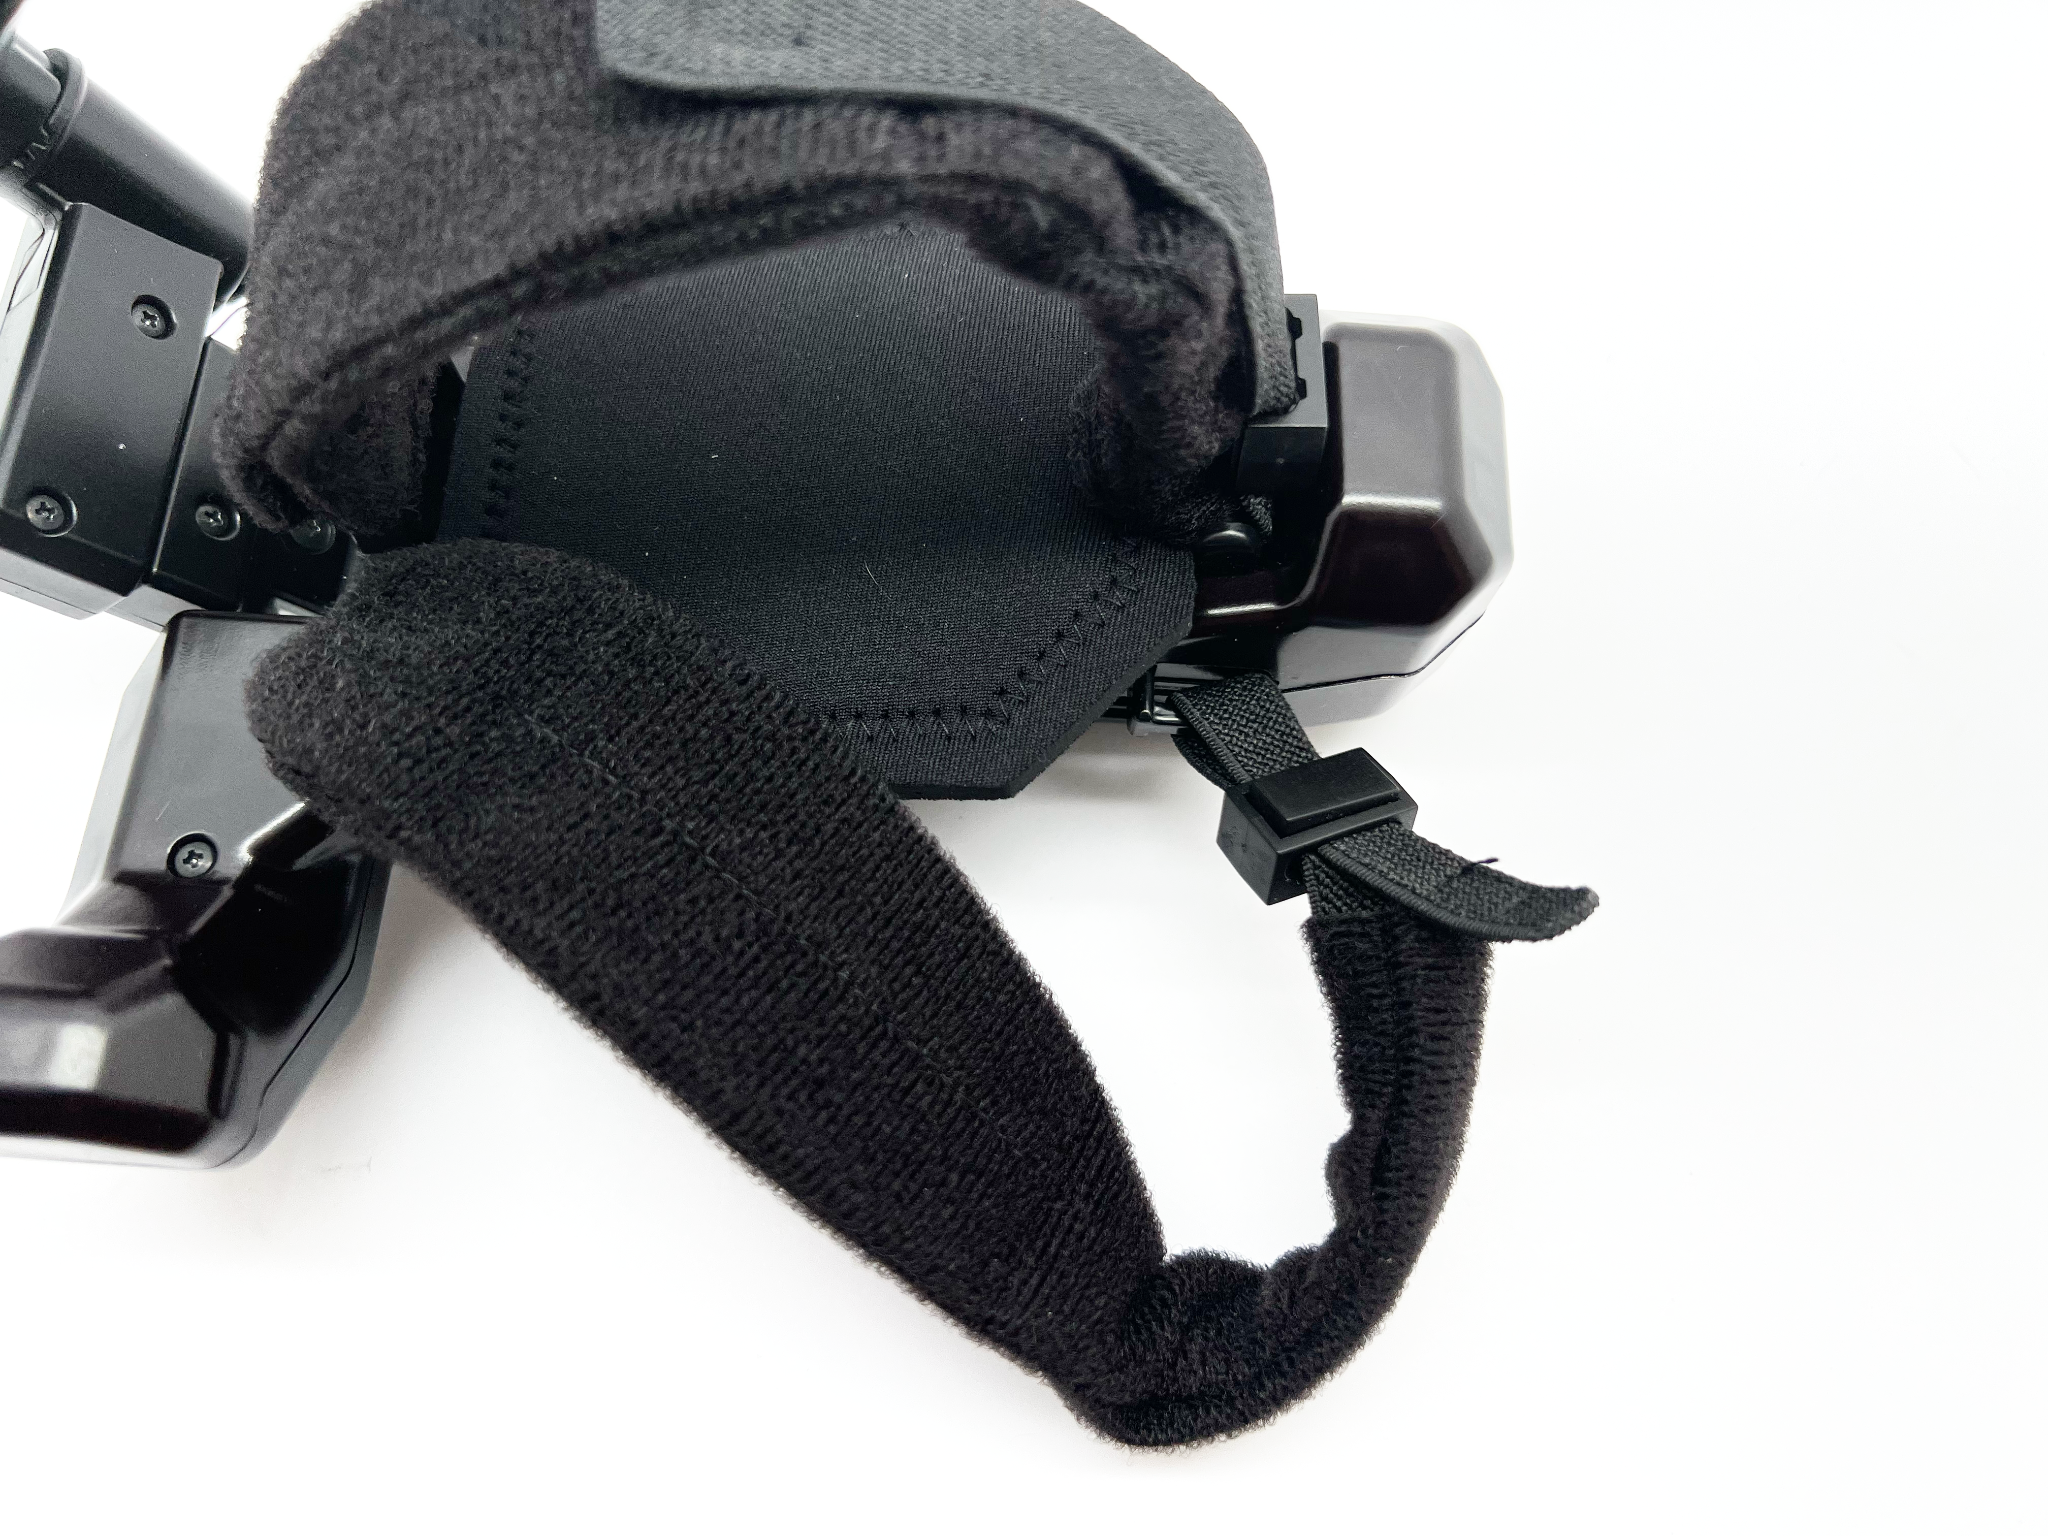
- Attach the wrist strap to FlipVR.
- Insert the end of the wrist strap with the hook-and-loop fastener facing outward through strap hole B.
- Samely, thread the other side through strap hole B in the same manner.
- Attach the strap stopper to the strap on the pinky finger side so that you can adjust the length of the strap.
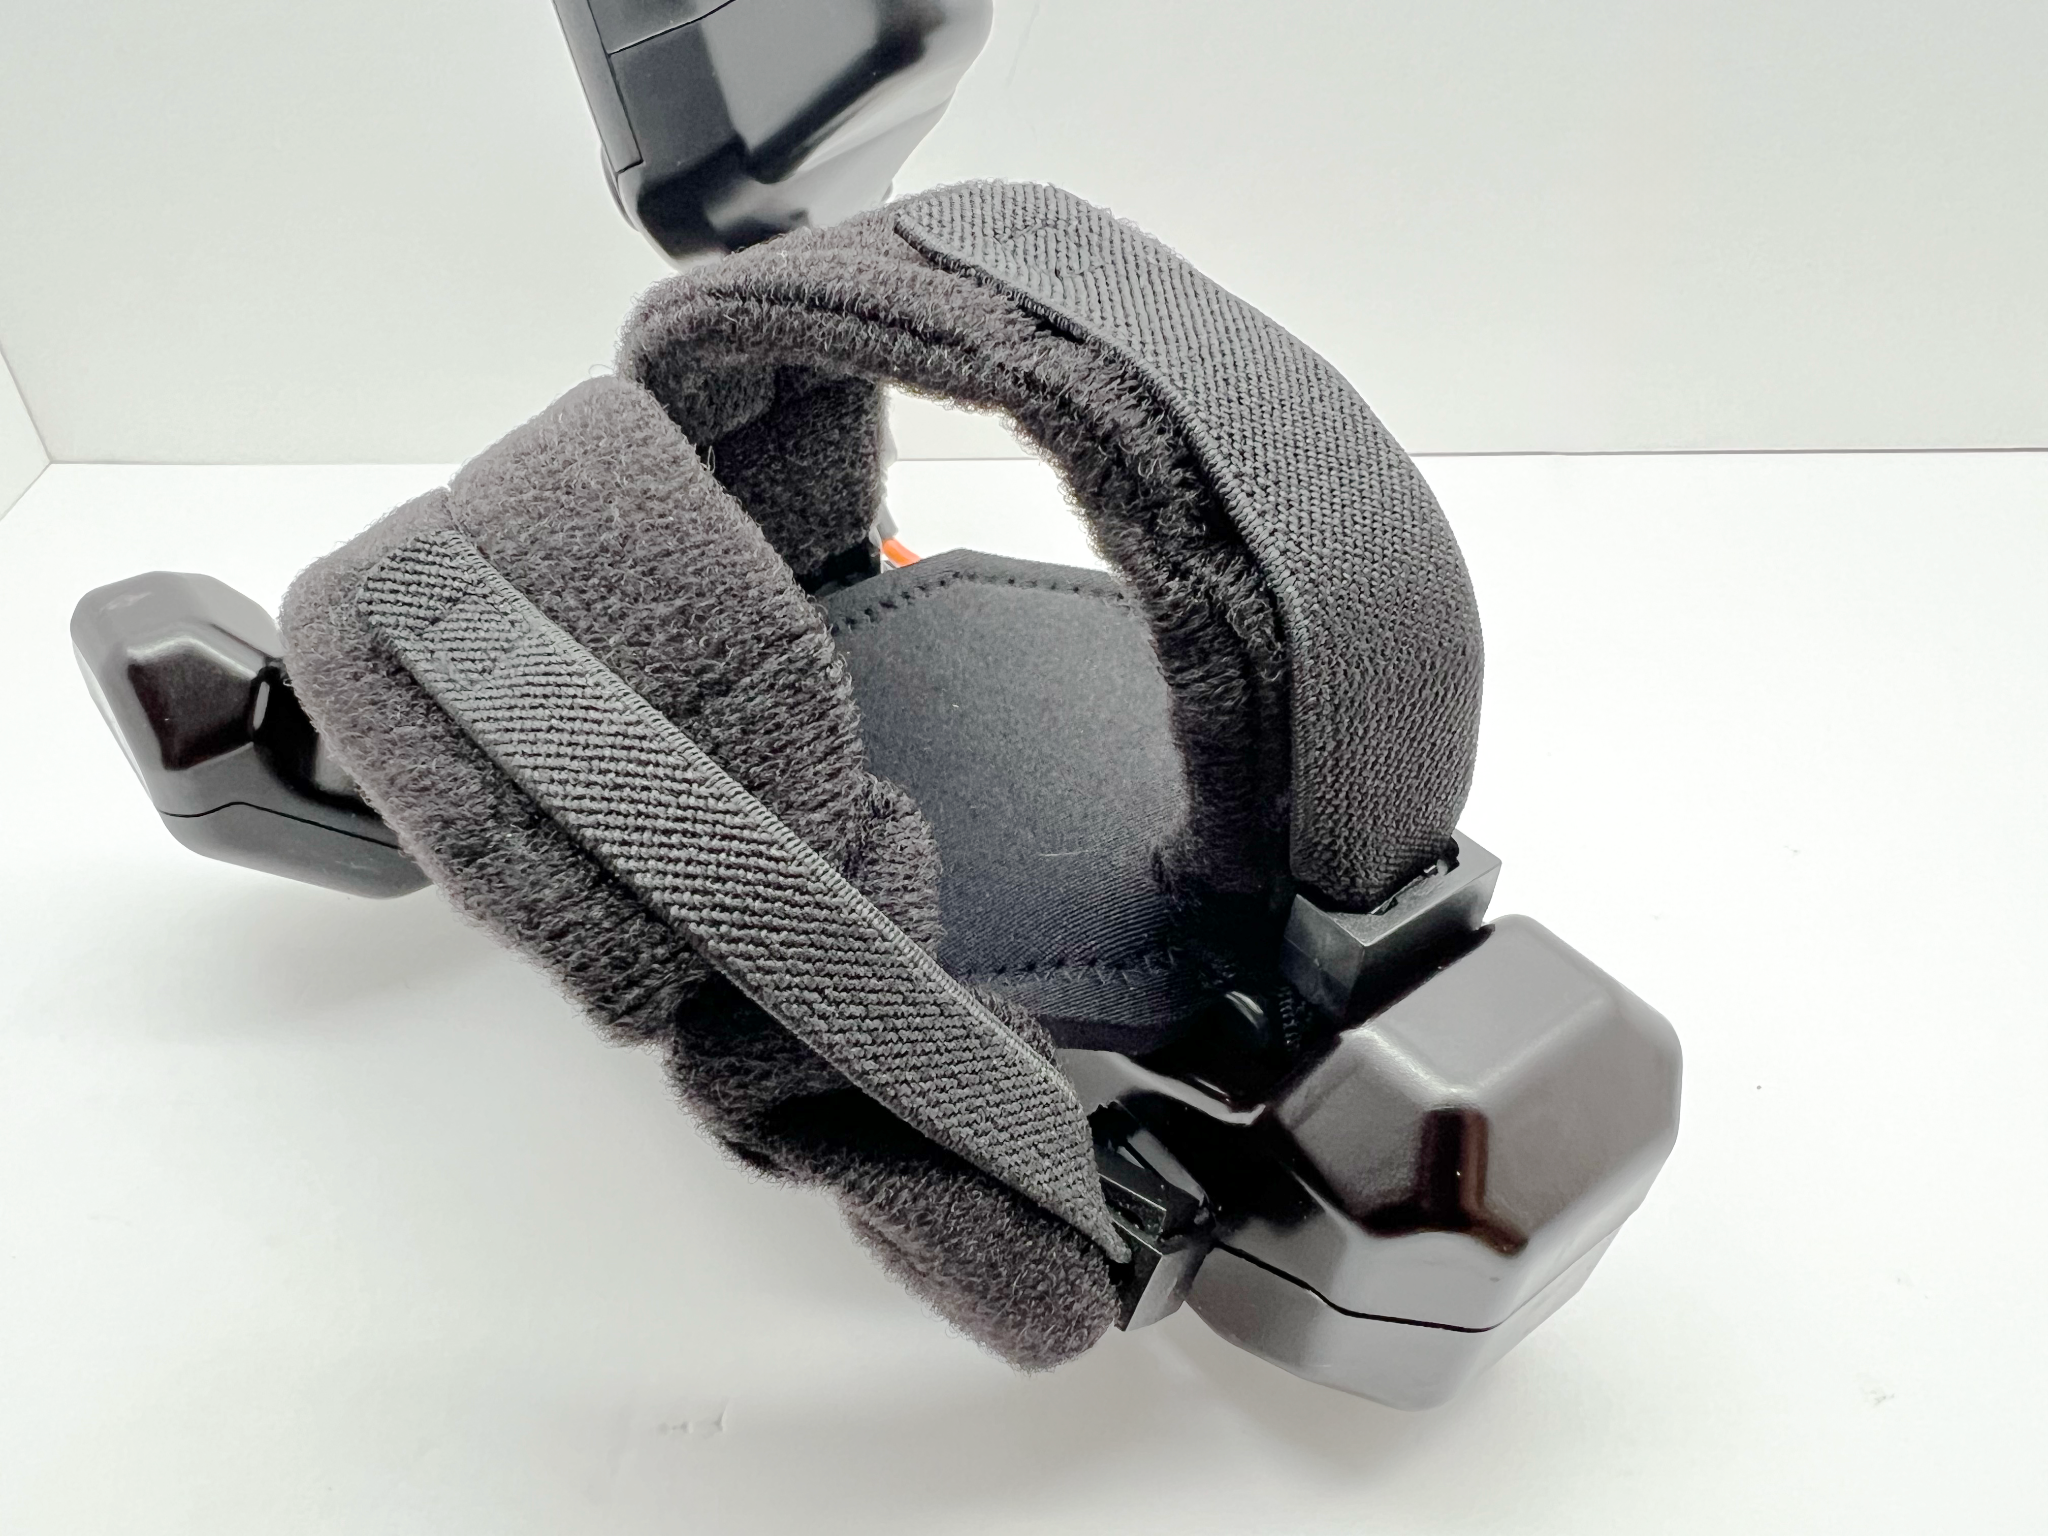
- Adjust the tightening of the hand strap and wrist strap using the strap stopper, and secure any excess strap using the hook-and-loop fastener.
9.3 How to install FlipVR
Section titled “9.3 How to install FlipVR”How to adjust the strap
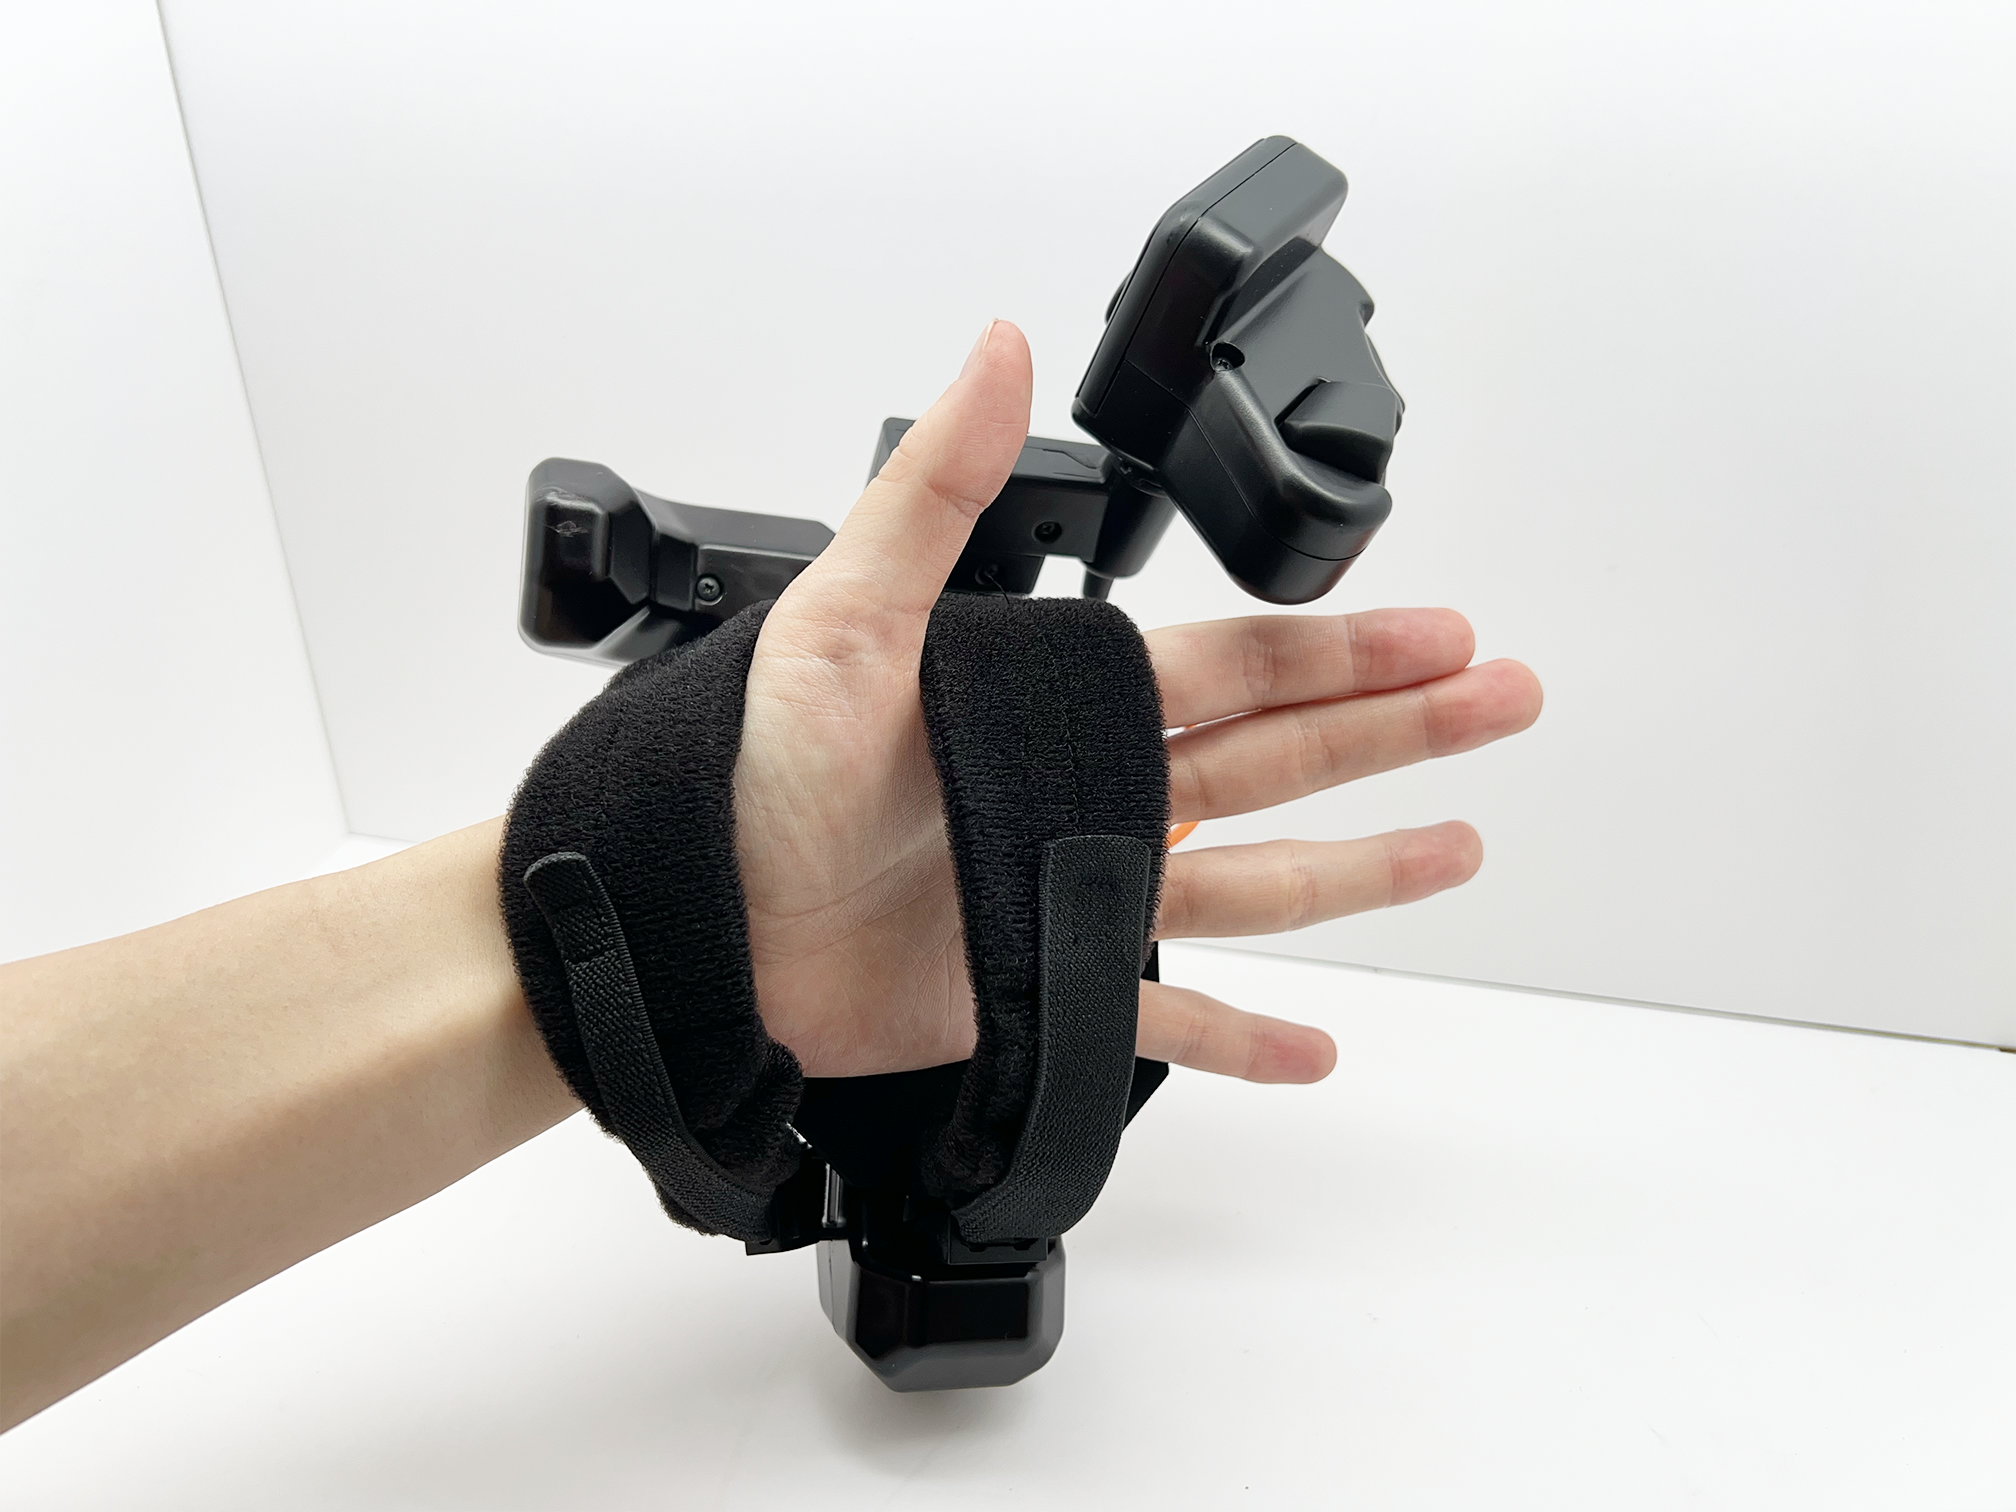
- Insert your hand through the wrist strap of the controller first, and then pass your fingers other than your thumb through the hand strap.
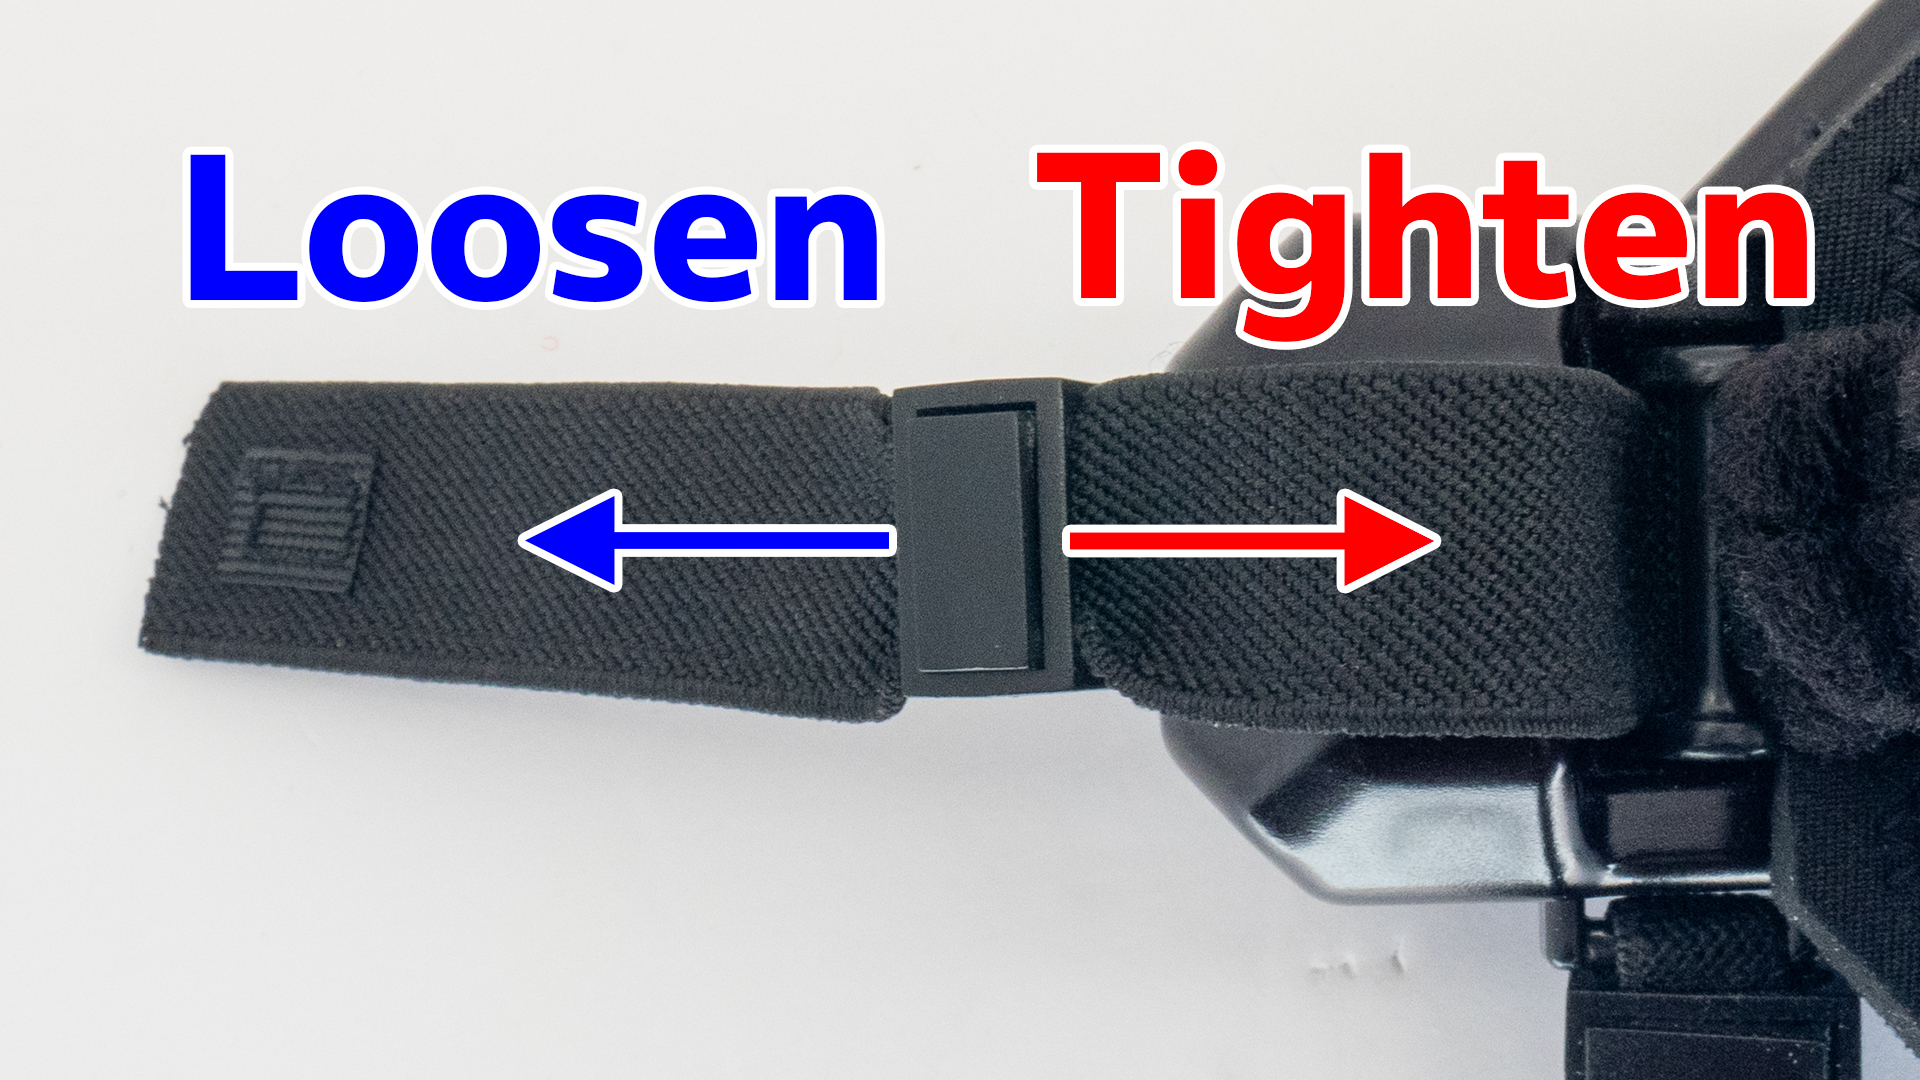
- The tightness of the wrist and hand straps is adjusted with the strap stopper. Please note that the strap will not tighten even if the strap is pulled hard, and the construction of the strap depends on the position of the strap stopper.
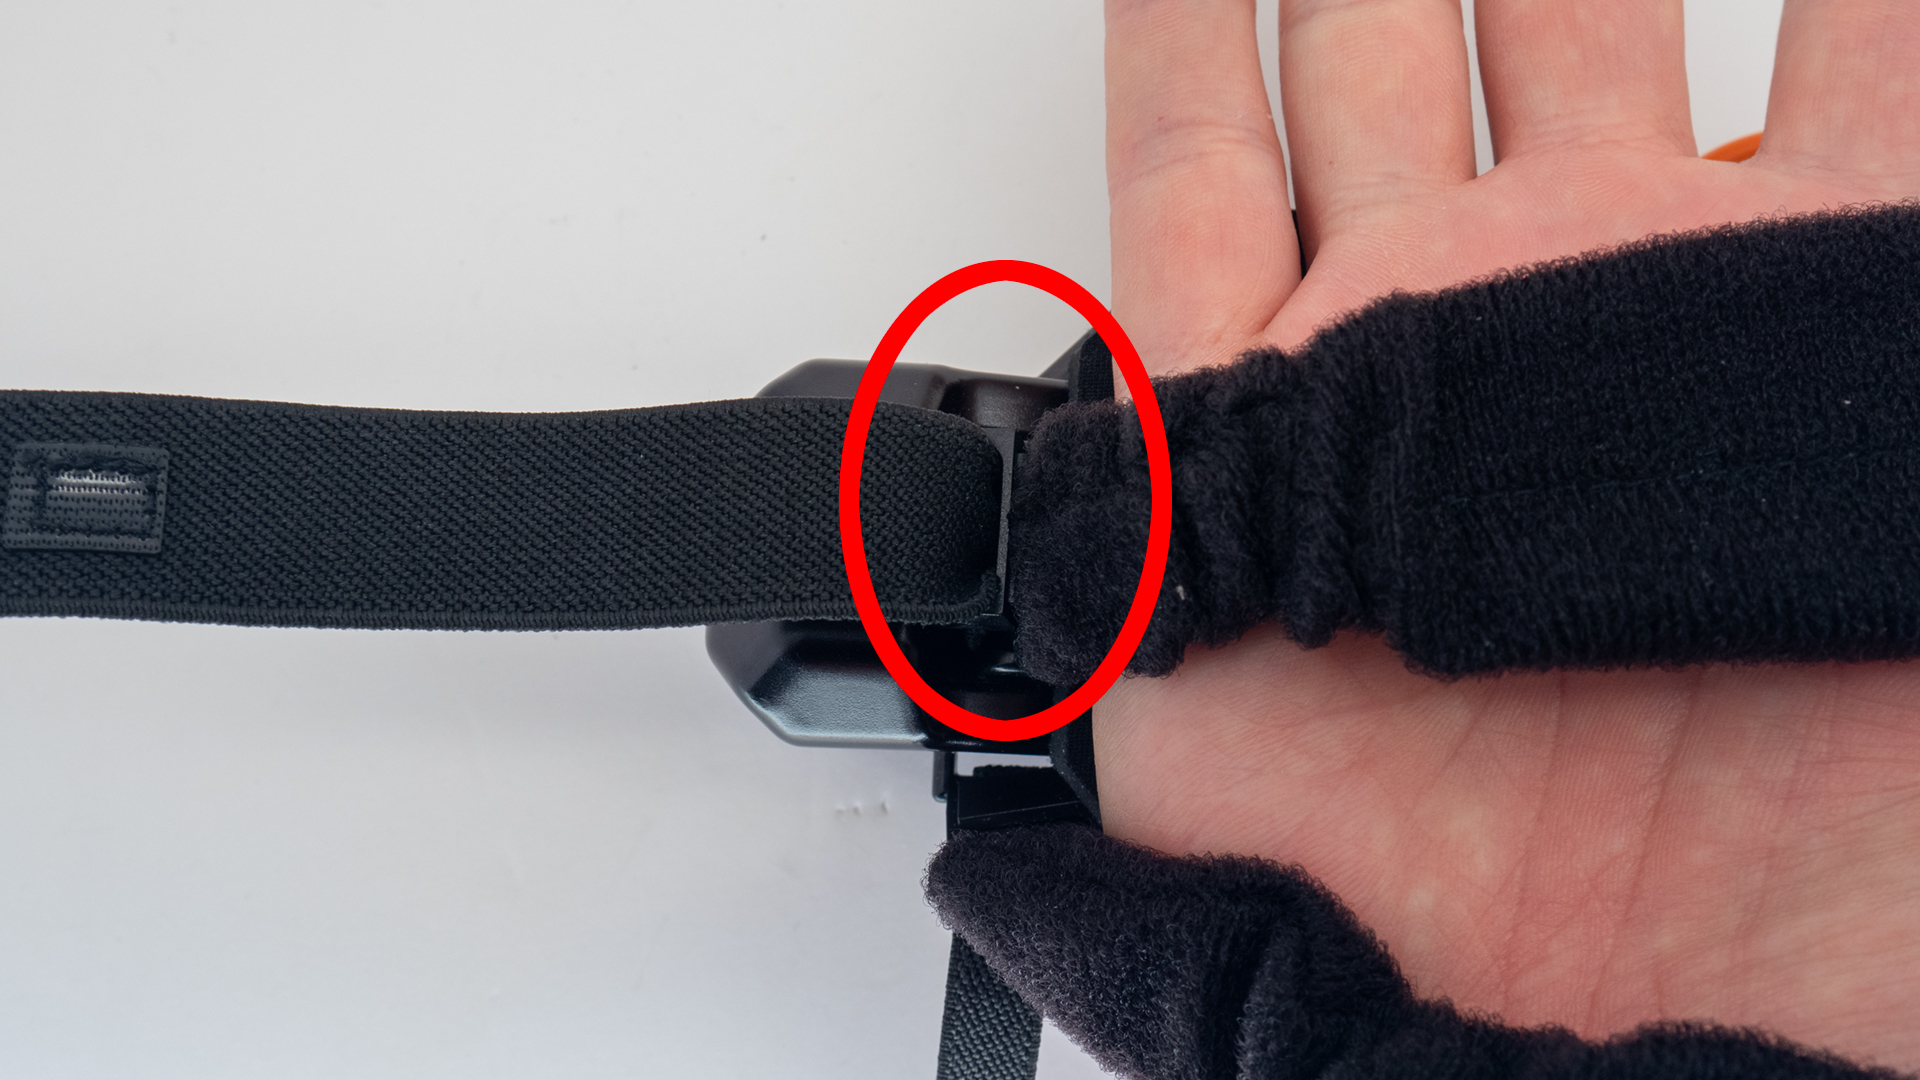
- After adjusting the position of the strap stopper, run your hand through the strap to check the hold. If it is loose or tight, go back to the previous step and adjust the strap stopper again.
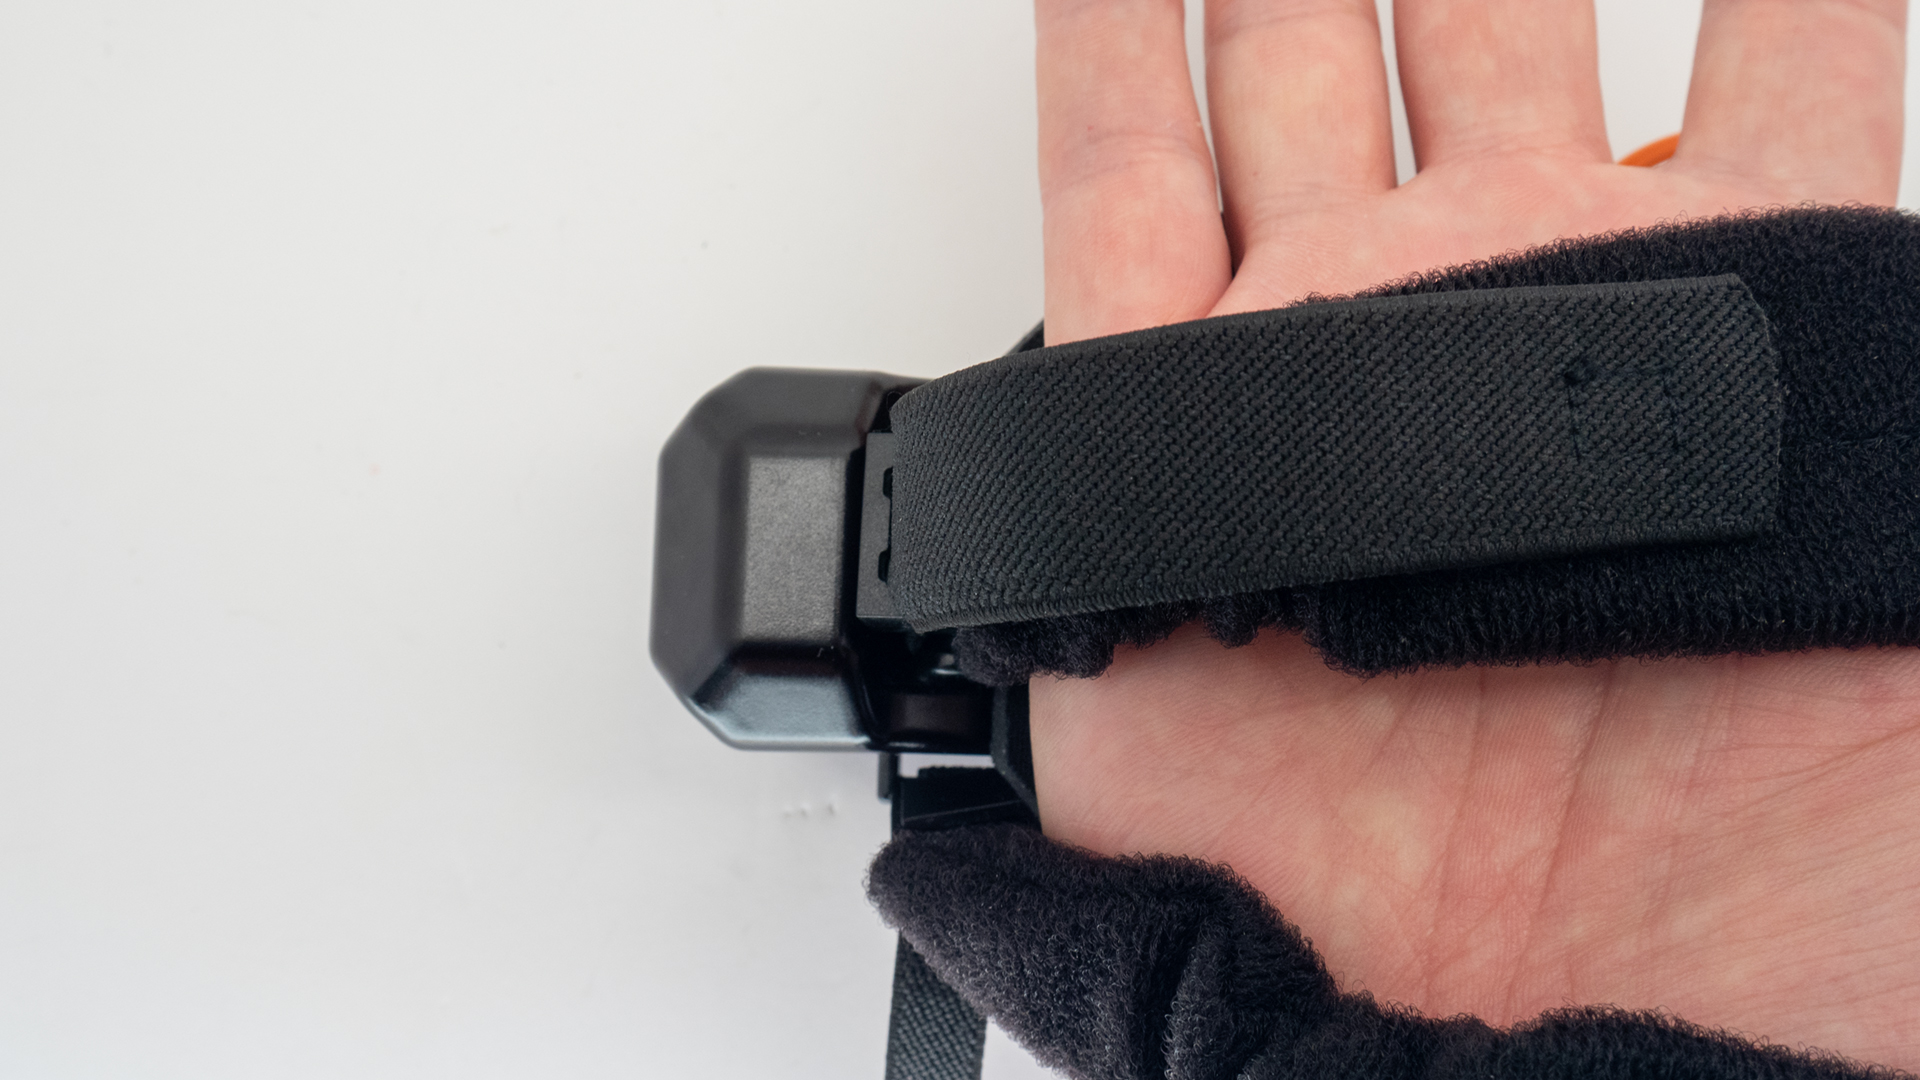
- Finally, fold back the excess strap and secure it with a hook and loop fastener. This fastener is only effective to keep the excess out of the way and the tightening strength must always be adjusted with the strap stopper.
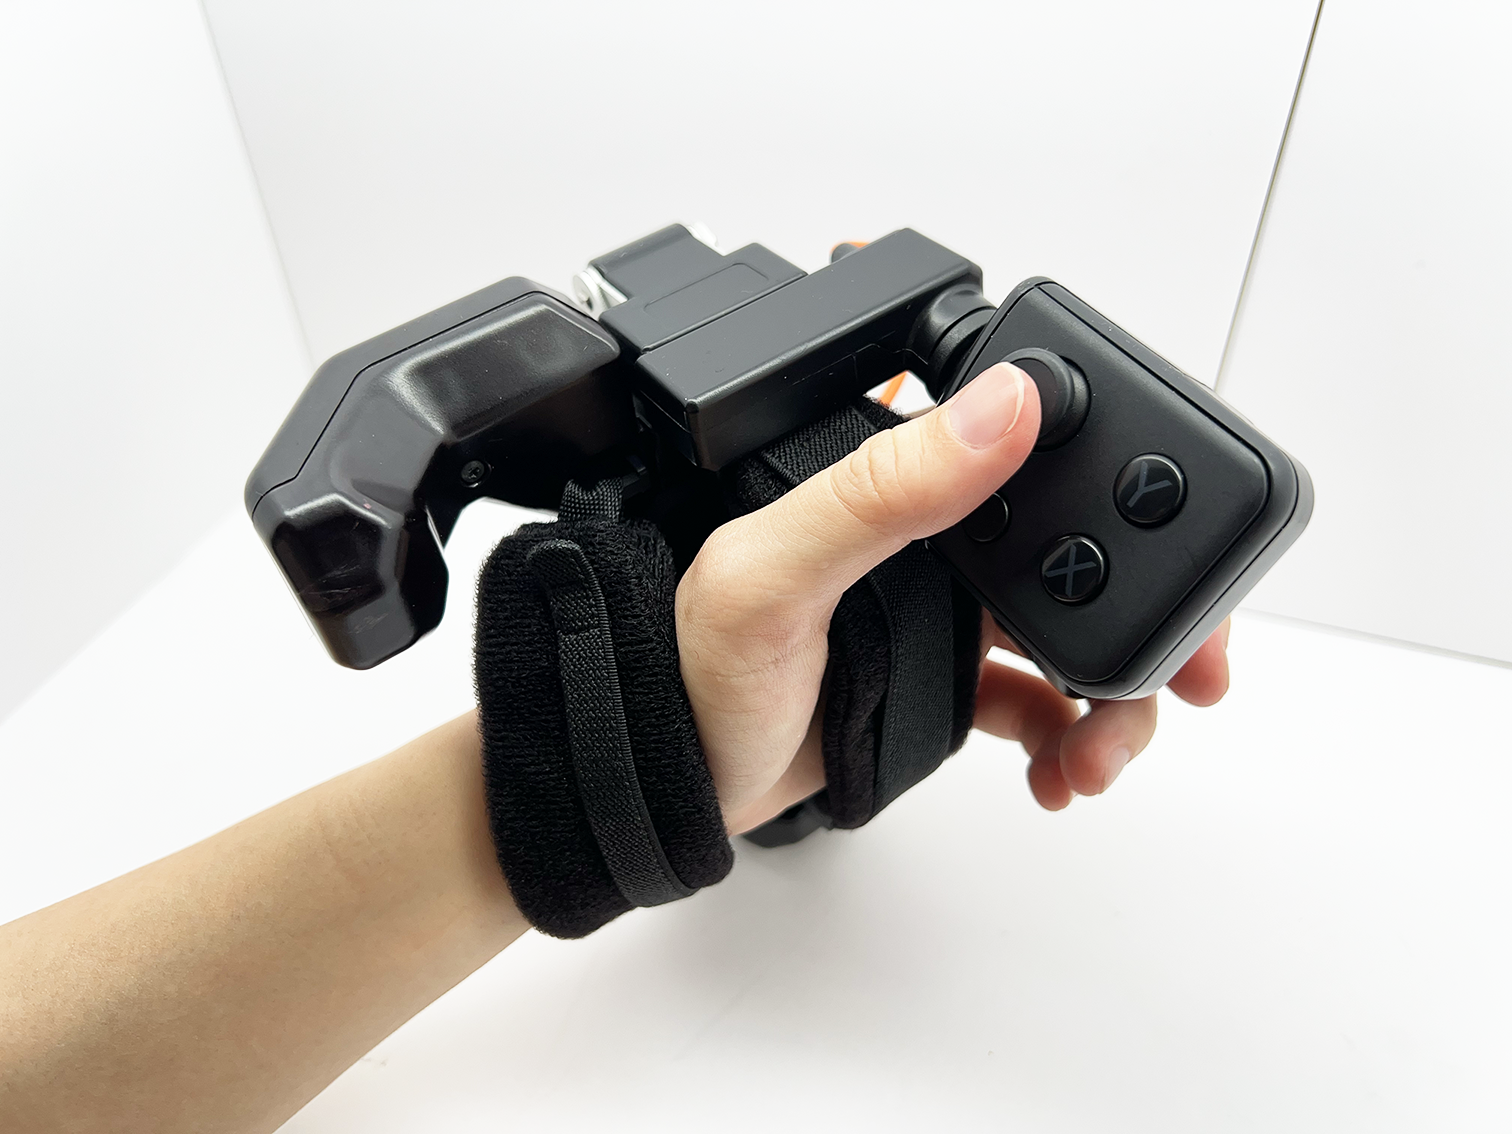
- Check that the controller does not slip off when you swing your hand.
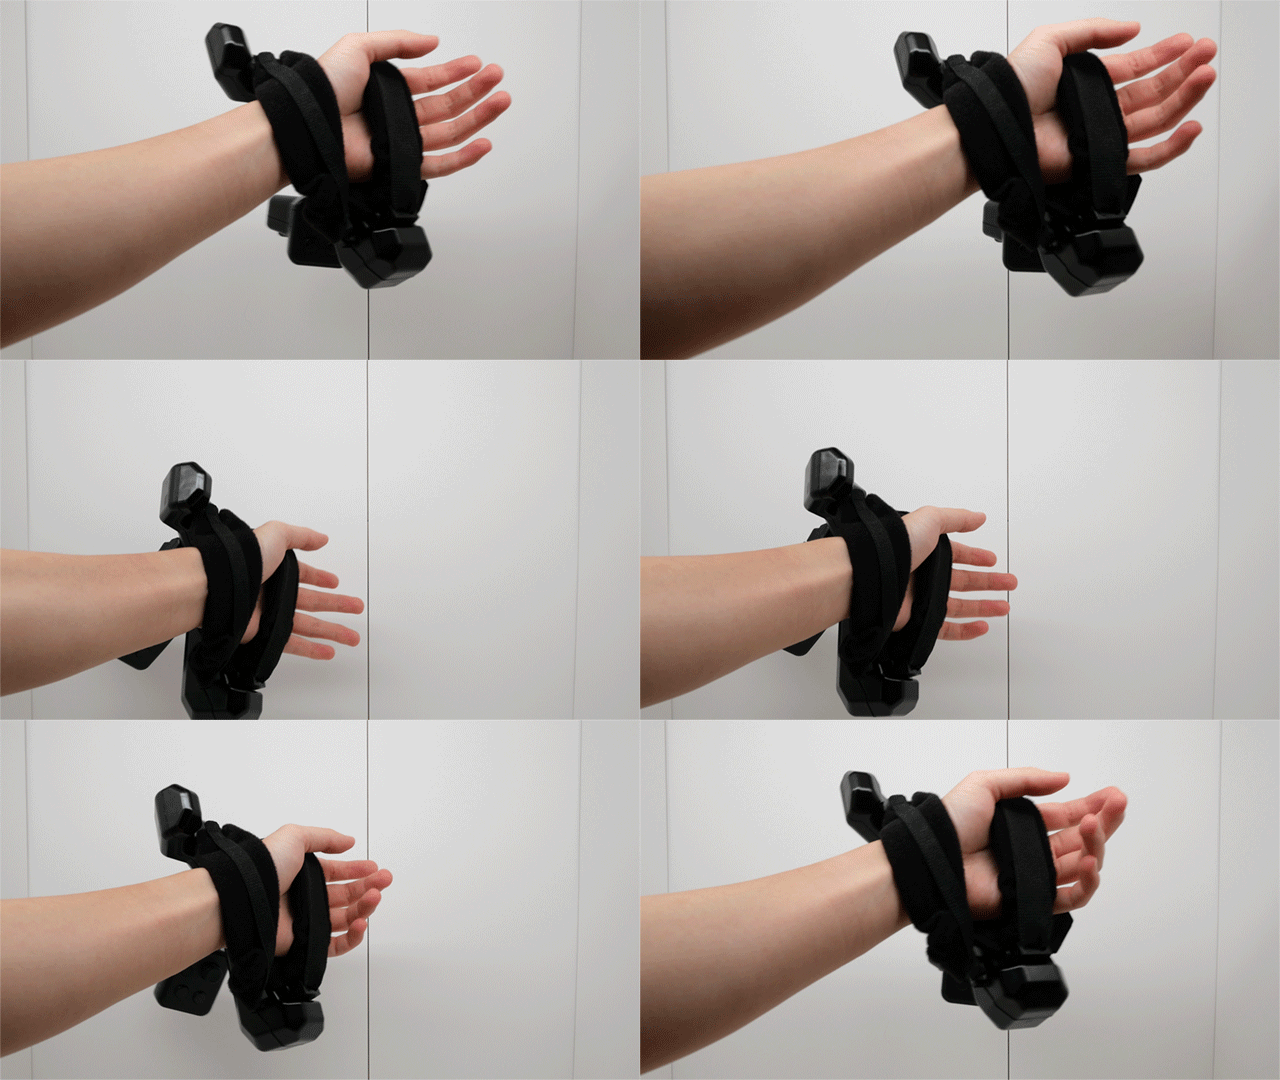
- Attach it to the other hand in the same way.
How to adjust the control unit
- Place your finger on the Control unit to check the ease of use of the joystick, trigger and buttons.
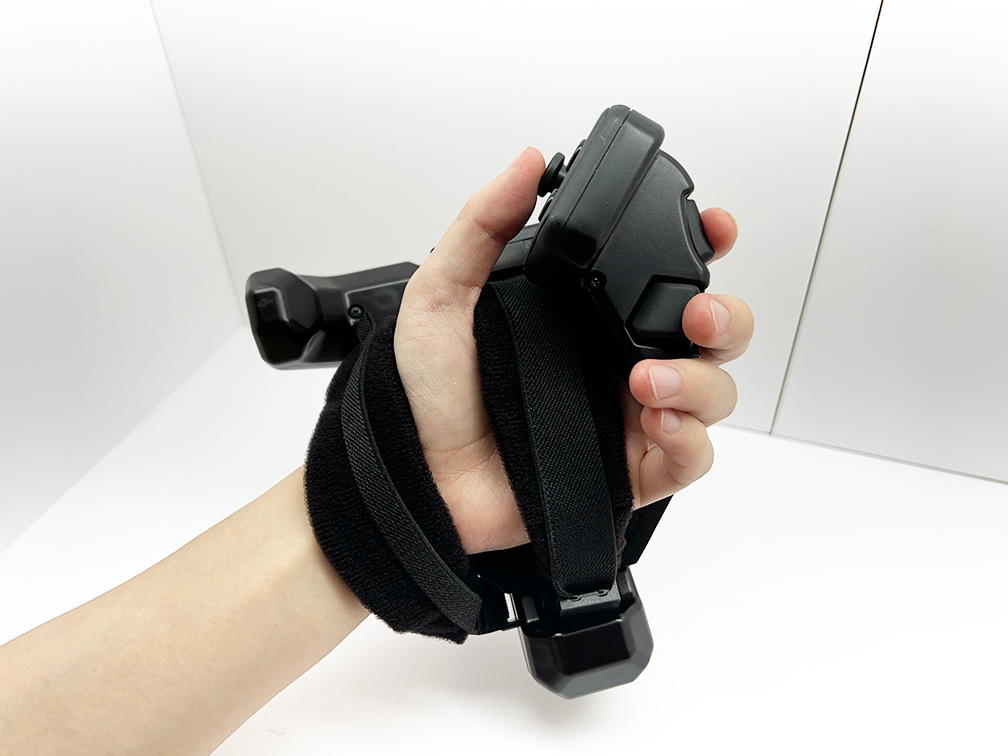
- The position and tilt of the Control unit can be adjusted using the shaft part at the base of the Control unit and the slider, as the operating feel varies depending on the size of the hand and the length of the thumb and forefinger.
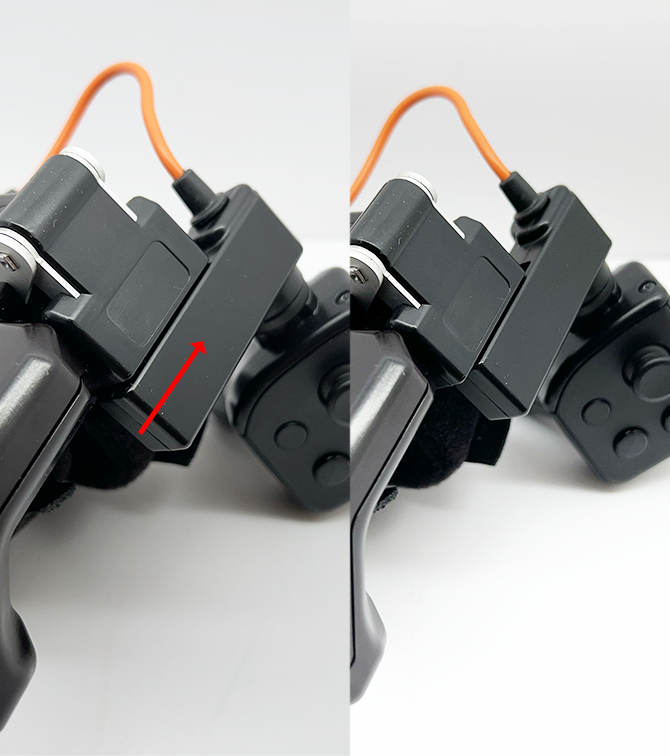
- The slider can be adjusted back and forth between the hand and the Control unit in 3 positions. Move it until it clicks into place.
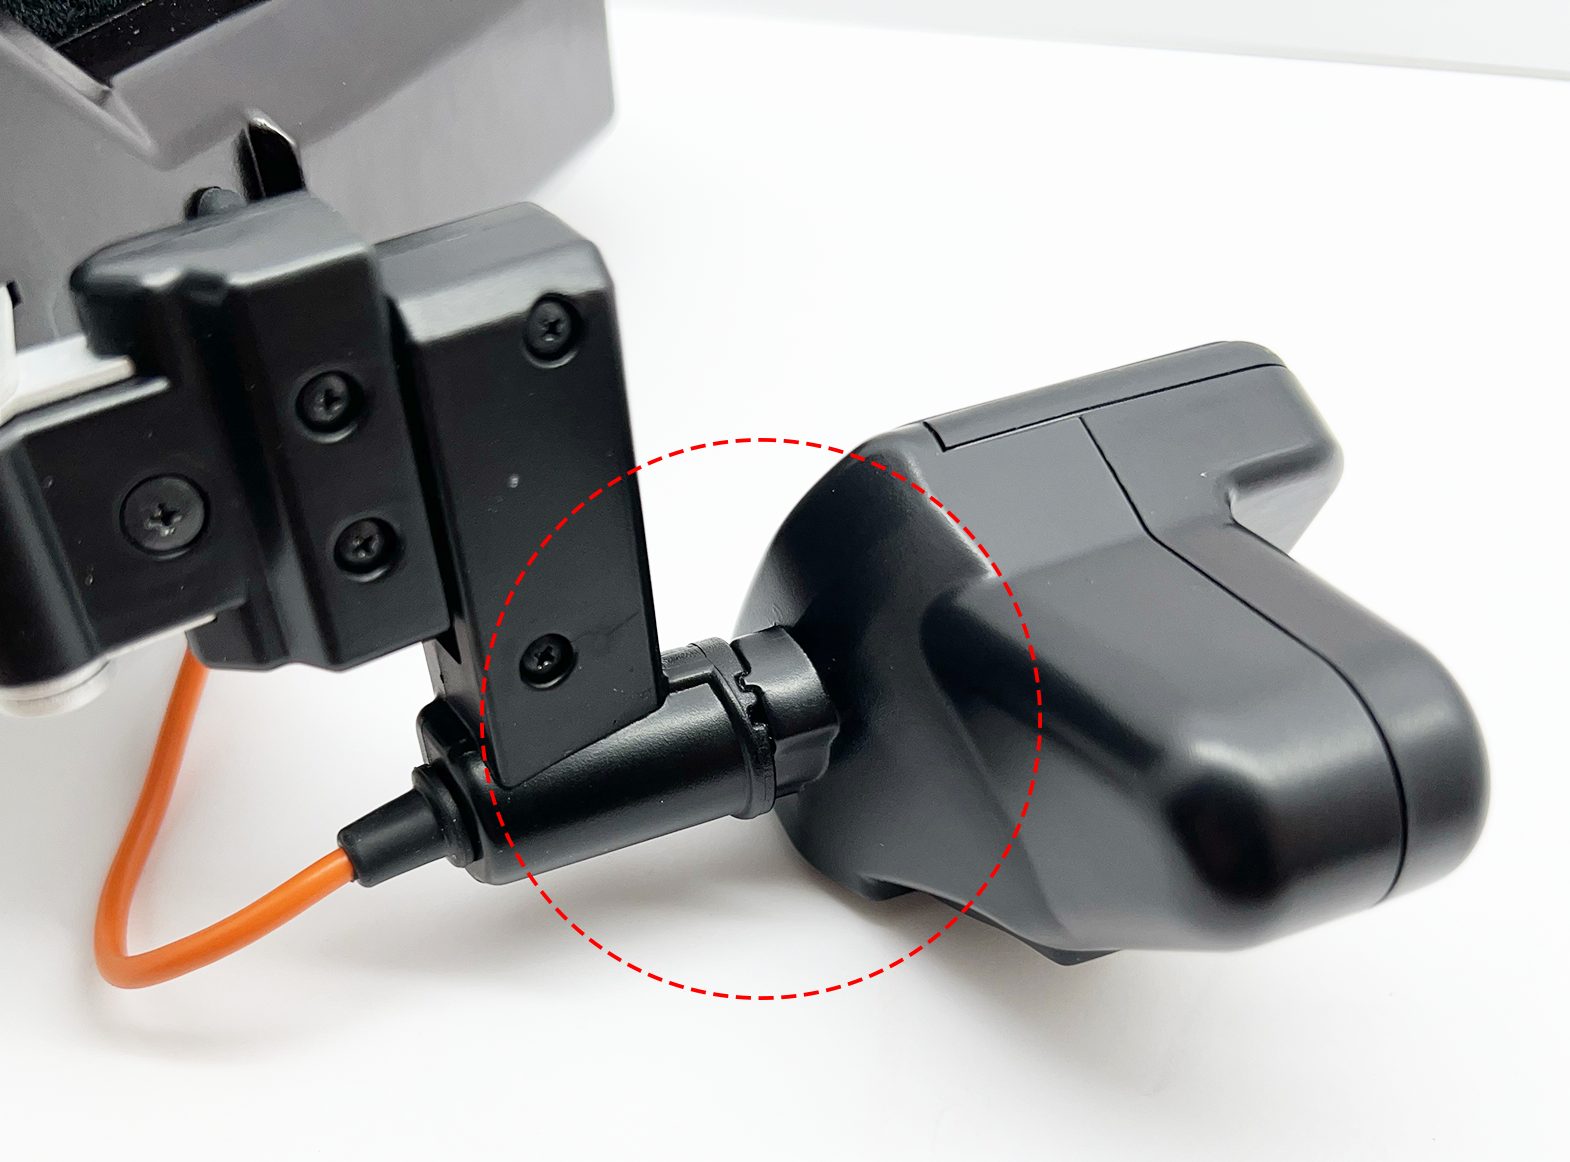
- The shaft section can be adjusted to 2 levels of Control unit tilt.
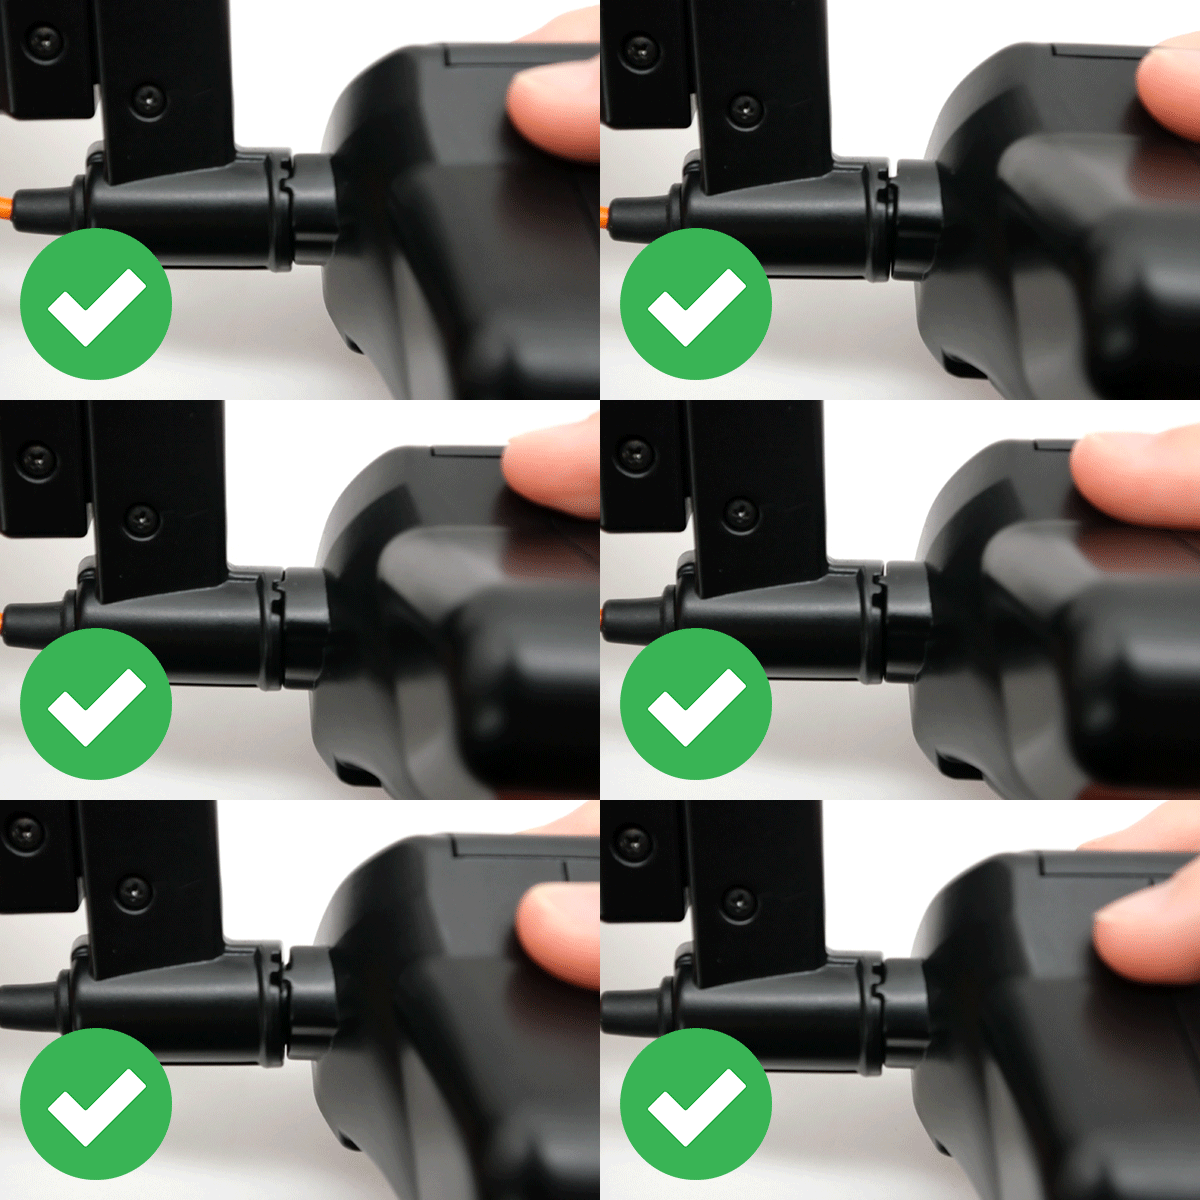
- When adjusting the shaft part, do not twist the shaft part strongly. Rotate the shaft part while pulling up the Control unit and rotate the Control unit back at the point where it clicks into place.
- The right way to adjust the shaft section.
- The wrong way to adjust the shaft section.
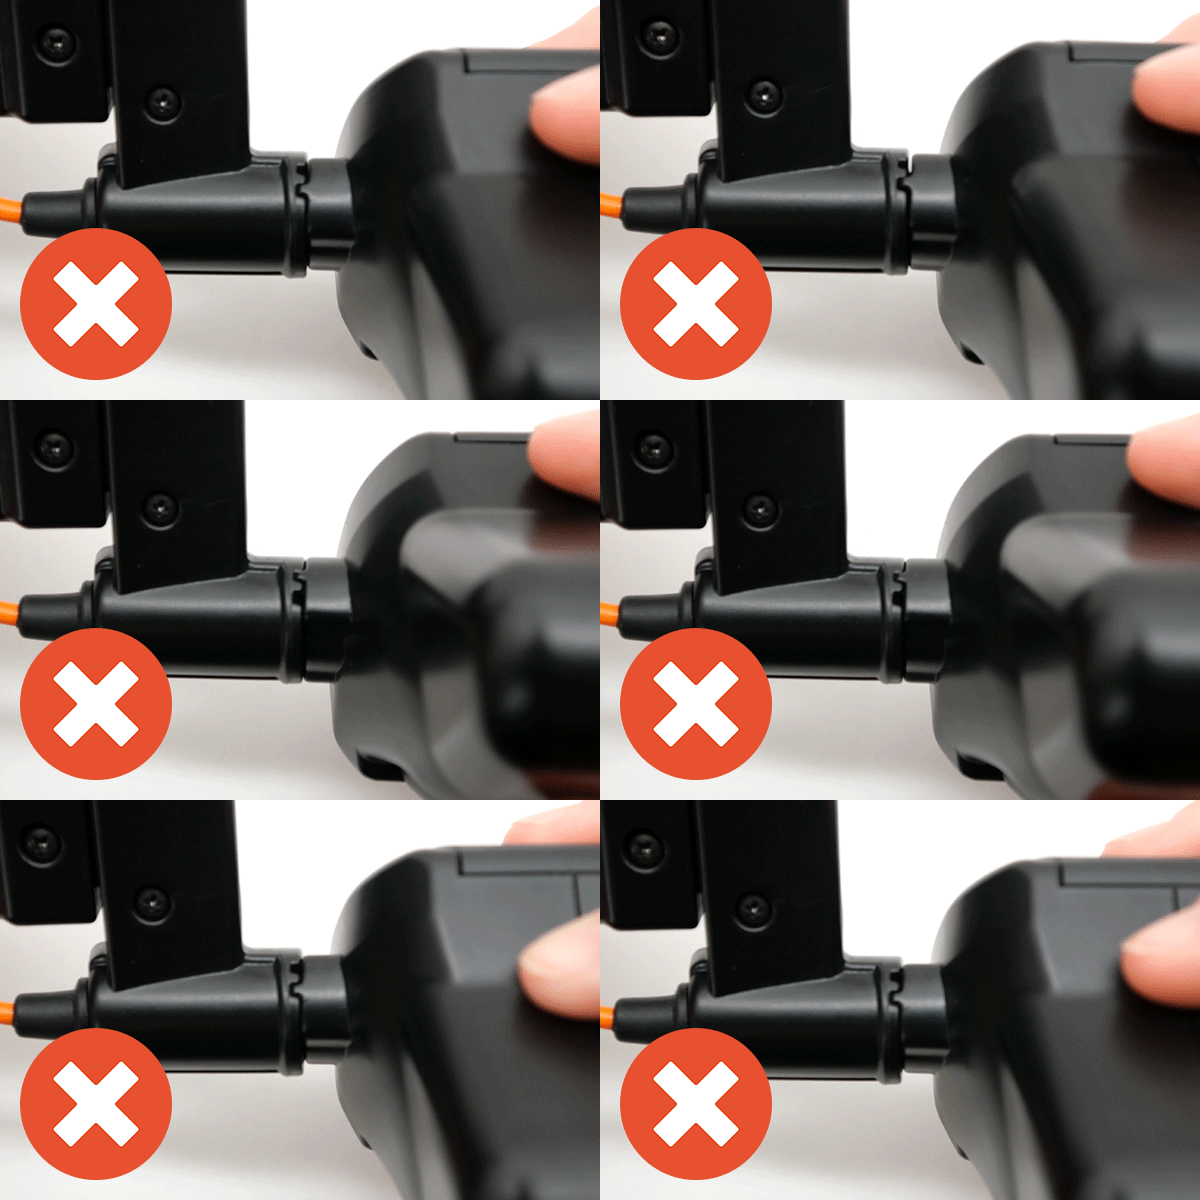
*Do not rotate without pulling out the shaft part. The jaw part will break or sharpen, resulting in damage.
9.4 How to attach hook and loop fasteners for securing the Control unit (Optional)
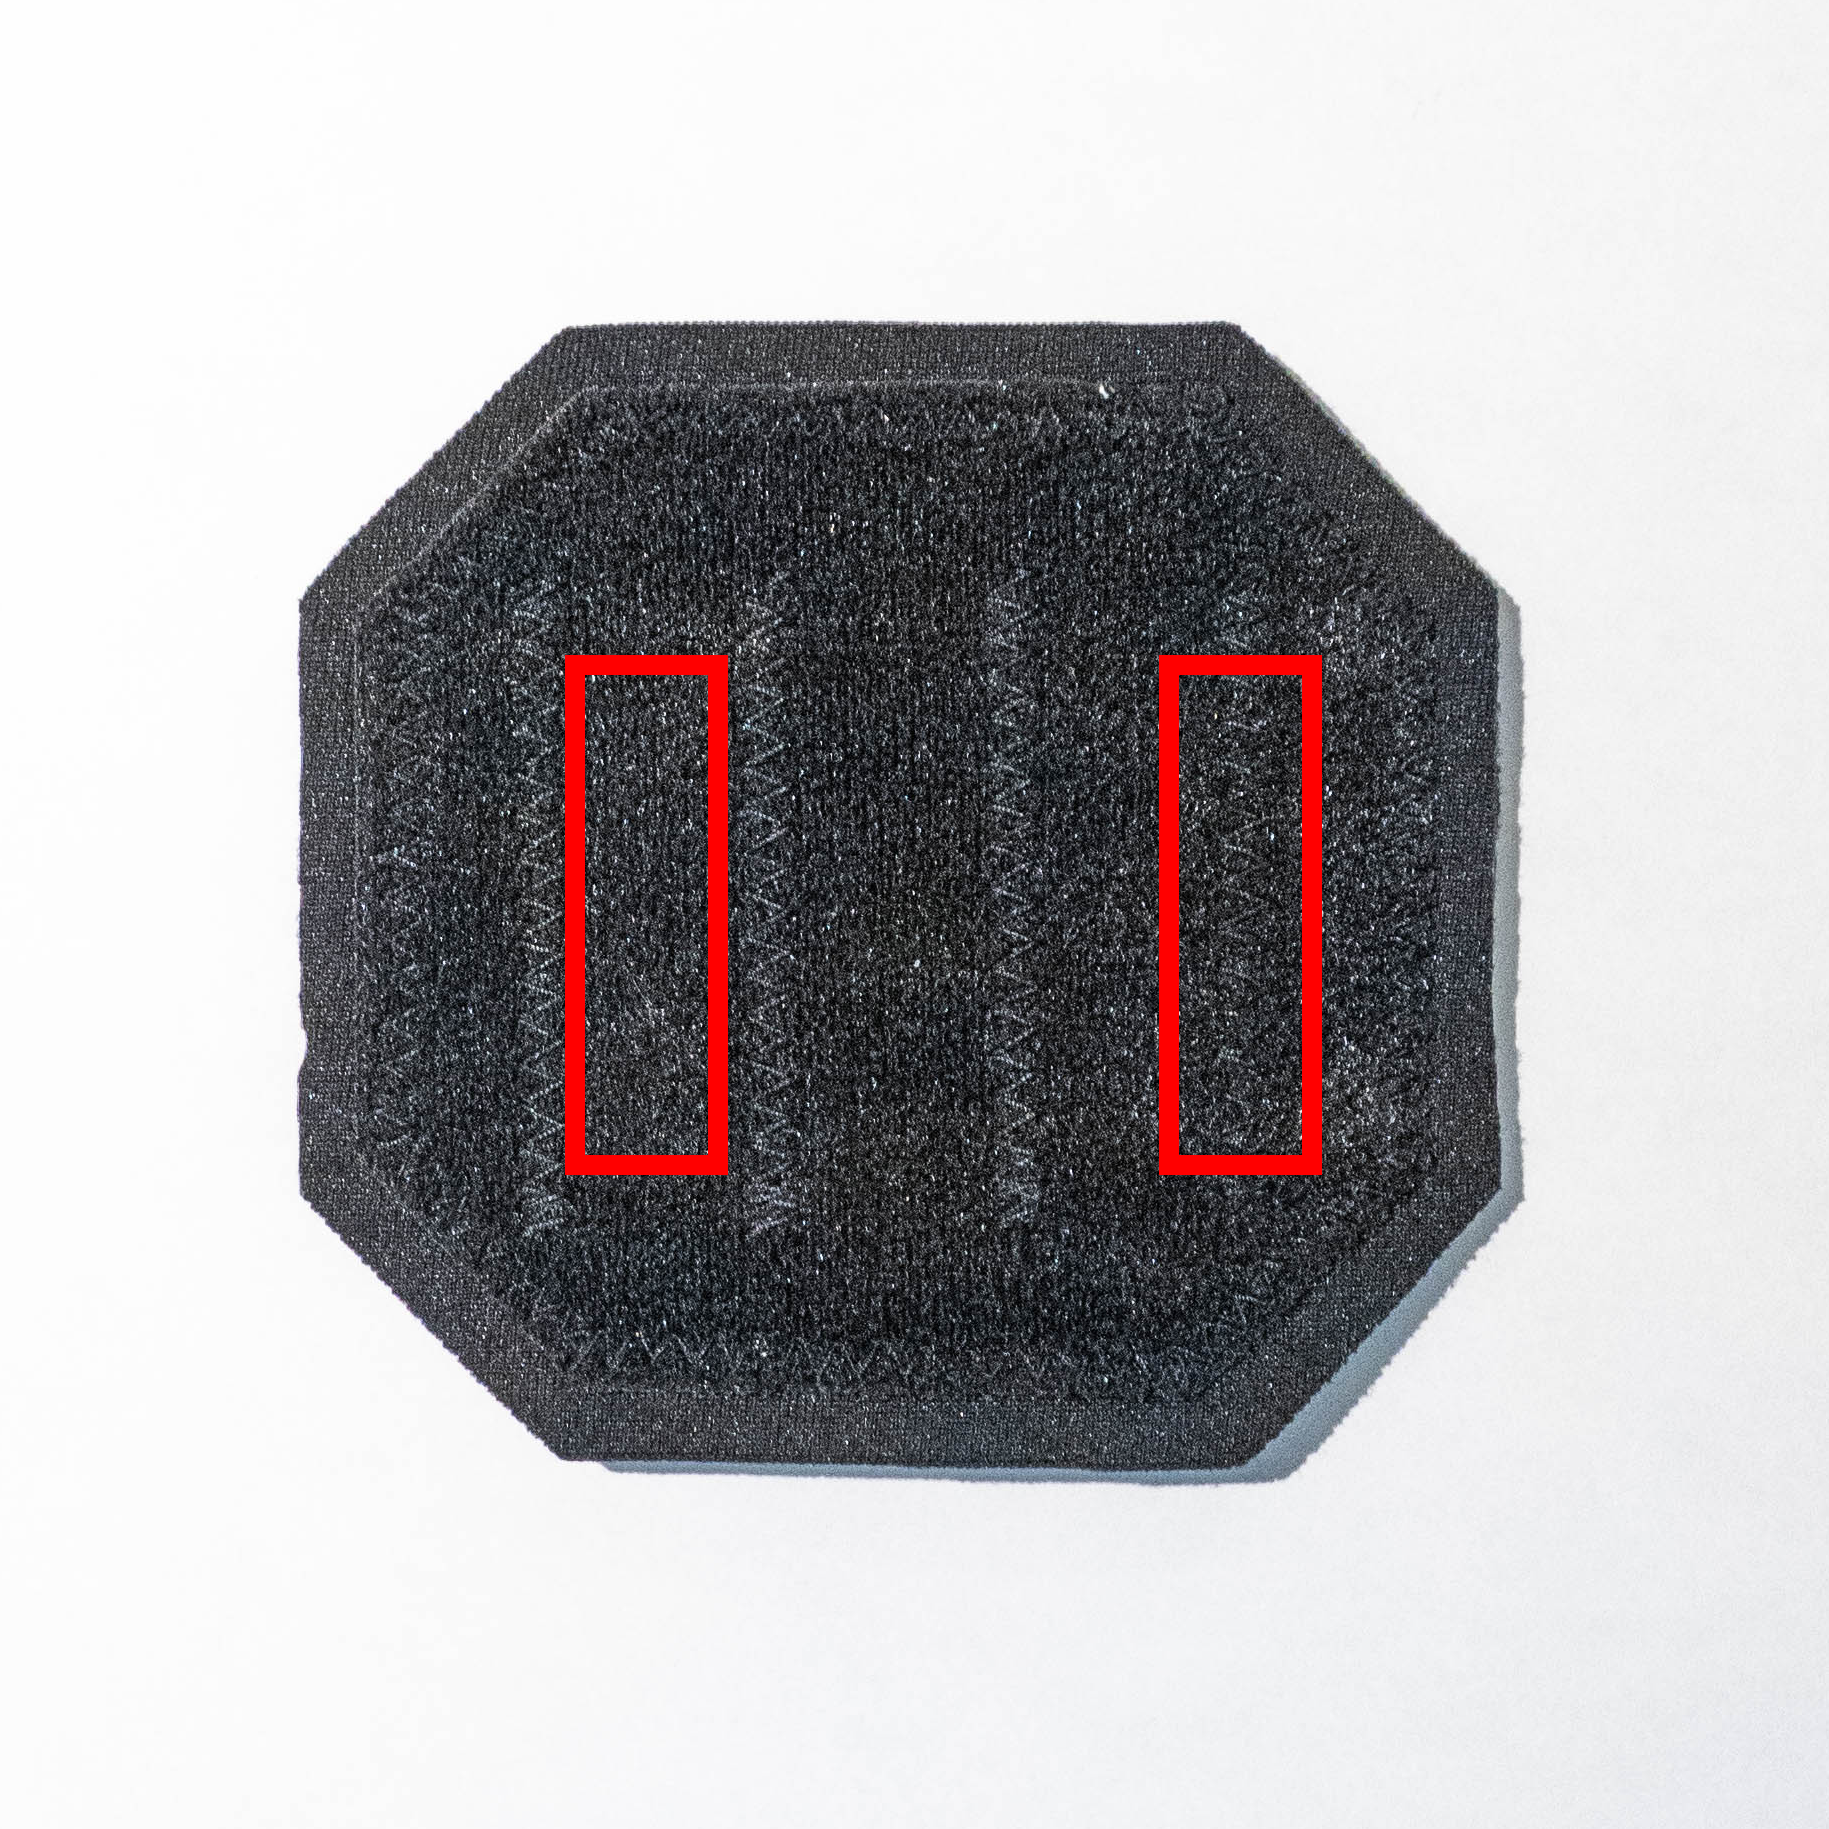
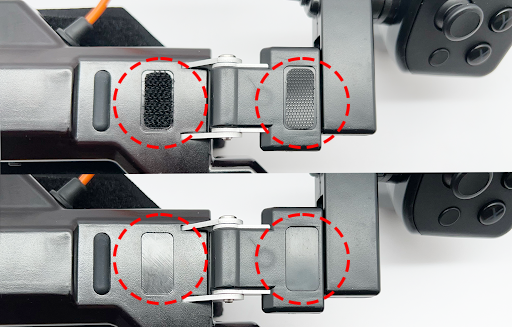
Section titled “9.4 How to attach hook and loop fasteners for securing the Control unit (Optional)”- If the controller is often used with the Control unit flipped, you can secure the Control unit by attaching the provided hook and loop fastener. This prevents the Control unit from becoming unstable when the controller is swung around in the flipped position, ensuring safe use.
- The hook and loop fasteners are attached to both sides of the metal shaft part as shown in the picture below.
- If the hook and loop fasteners are already attached and you do not want to secure the Control unit, you can place masking tape or cellophane tape on the hook side (controller side) of the fasteners to use it without securing it. Please do not remove the hook and loop fasteners once they are attached, as the adhesive will weaken.
For use
10. Care and Maintenance
Section titled “10. Care and Maintenance”- Wipe the unit with a soft, dry cloth. If the unit is very dirty, first wipe off the dirt with a slightly damp cloth, then wipe with a dry cloth.
- Do not allow contact with solvents such as paint thinner, alcohol, benzine, kitchen, or cloth detergent. Exposure to chemicals may change the quality of the unit or cause the paint to peel off.
Disclaimer and Regulatory Information
11. Disclaimers
Section titled “11. Disclaimers”- For use in Japan, and the United States only.
12. Use and storage location
Section titled “12. Use and storage location”- Do not leave the product in direct sunlight or places exposed to high-temperatures.
- Do not drop, hit, or otherwise subject the product to strong shocks. Doing so may cause a malfunction.
- If the product will not be used for a long period of time, recharge the battery approximately every 3 months.
13. Disposal
Section titled “13. Disposal”Dispose of the product according to local environmental regulations. Do not dispose of it along with normal household waste.
14. Specifications
Section titled “14. Specifications”| Product name | FlipVR |
| Part number | SVP-VC1B |
| Battery Life | Approx. 8 hours |
| Charging method | USB Type-C |
| Weight | 8.5oz (242g) *One side, body only |
| Platform | SteamVR™ *Base Station is compatible with both Valve and HTC versions 1.0 and 2.0. |
| Tracking | SteamVR™ Tracking |
| Inputs | Four buttons (AB or XY + System + Thumbstick), Thumbstick, Trigger, Grip, Touch sensors (AB or XY, Thumbstick, Trigger) |
| OS | Windows 10 or later |
15. FAQ
Section titled “15. FAQ”| Q | A |
| What is the warranty period for the product? | The warranty period is one year from the date of purchase. If you have made a pre-order, it is one year from the date of shipment of the product. |
| There is no store name or other information on the warranty card, is that OK? | If you purchased on the Shiftall website, we will know the date of purchase and will omit the warranty form. If you purchased it at a store, you can receive the warranty within the warranty period by providing a document that proves the date of purchase, even if the name of the store and the date of purchase are not written down. |
| Which Controller is Paired? | If you want to check that the controller is not being tracked, follow these steps
|
| How can I do if the touch-sensor sensitivity of the controller is too high? | Check if there is a firmware update available for the controller. Then re-calibrate the controller in the following way
|
 right-click and click 'Calibrate Controller'.
16. Troubleshooting
Section titled “16. Troubleshooting”| Phenomenon | How to deal with |
| Controller will not turn on. | Refer to the following troubleshooting guide.
|
| Controller automatically switches off. | The FlipVR will automatically switch off after approximately 30 seconds of not communicating with SteamVR™. If the phenomenon occurs despite active communication with SteamVR™, please follow the steps below to resolve the issue.
|
| Controller is not tracked. | To solve the problem, try the following.
|
| Joystick input goes in by itself. | To solve the problem, try the following.
|
For all other inquiries, please contact Shiftall Customer Support.
Shiftall Support Contact Form
https://forms.gle/WMU54Jz6RN5dU84XA
FCC CAUTION
This device complies with part 15 of the FCC Rules. Operation is subject to the following two conditions:
(1) This device may not cause harmful interference, and
(2) this device must accept any interference received, including interference that may cause undesired operation.
Any Changes or modifications not expressly approved by the party responsible for compliance could void the user’s authority to operate the equipment.
-Reorient or relocate the receiving antenna.
-Increase the distance between the equipment and receiver.
-Connect the equipment to an outlet on a circuit different from that to which the receiver is connected.
-Consult the dealer or an experienced radio/TV technician for help.
The device has been evaluated to meet general RF exposure requirements. The device can be used in portable exposure conditions without restriction.
Trademark, etc.
- Windows is a registered trademark or trademark of Microsoft Corporation in the United States and other countries.
- All other names, company names, product names, etc. mentioned herein are trademarks or registered trademarks of their respective companies.
Open source software license credit
License credits for the various open source software used in the product can be found here.
All company, system, and product names mentioned in this manual, with the exception of Shiftall and FlipVR, are registered trademarks or trademarks of the respective companies and are not the property of Shiftall. In principle, ”™” and ”®” are omitted in the text and figures.

Shiftall July 2024
Rev. 1.0