
HaritoraX 2 Pro Official Manual

HaritoraX 2 Pro Official Online Manual
This document is the official online manual for
HaritoraX 2 Pro (SVP-AF01PB)
2025-10 ©Shiftall Inc. All Rights Reserved.

1. Introduction
Section titled “1. Introduction”Thank you very much for purchasing the HaritoraX 2 Pro.
Please read this manual carefully and follow the precautions to enjoy a safe and proper full-body tracking experience.
Be sure to read the “Important Safety Information” section before use.
2. Setup Guide
Section titled “2. Setup Guide”By following the setup procedure, you can start using the HaritoraX 2 Pro right away.
-
STEP 1
Section titled “STEP 1”
First, in the section “Preparation / Before Use” check the included items as well as the names and positions of the buttons.
-
STEP 2
Section titled “STEP 2”
Install the dedicated software “Shiftall VR Manager” from Steam and connect the sensors by following the instructions in the Shiftall VR Manager Online Manual.
* Due to Bluetooth specifications, in some environments only up to six devices can be connected. Please use the GX2 dongle included with the HaritoraX 2 Pro.
-
STEP 3
Section titled “STEP 3”
Set the sensor positions as shown below, referring to “Configure the sensor unit for the intended body part.”
・CHEST
・HIP
・KNEE (R)
・KNEE (L)
・ANKLE (R)
・ANKLE (L)
・FOOT (R)
・FOOT (L)
* It does not matter which included sensor is assigned to each position.
-
STEP 4
Section titled “STEP 4”
Assemble and put on the HaritoraX 2 Pro, referring to “Assembling the HaritoraX 2 Pro.”
-
STEP 5
Section titled “STEP 5”
Complete the tracking setup by following the instructions in the “Shiftall VR Manager Online Manual.”
You are now ready to use the HaritoraX 2 Pro.
3. Preparation / Before You Use
Section titled “3. Preparation / Before You Use”3.1 Requirements
Section titled “3.1 Requirements”To use the HaritoraX 2 Pro, you will need the following:
- PC with Windows 11 OS running SteamVR 2.8.8 or later and with Bluetooth connectivity.
Click here for a list of Bluetooth adapters that have been tested for compatibility.
- A VR headset that is able to connect to SteamVR
Click here for a list of VR headsets that have been tested for compatibility. - USB charger with an output of 5V/2.0A or more per port
3.2 Included items
Section titled “3.2 Included items”| Product Name | Contents | |
| Sensors (Sensor Unit SVP-AF01UB) x 8 boxes | Sensor unit | 1 |
| Sensor name labels | 2 | |
| Safety precautions / Warranty card | 1 | |
| Standard Straps x 1 set | Chest & hip belts (shared) ×2 | 2 |
| Knee belts | 2 | |
| Ankle belts | 2 | |
| Fixing straps (for HaritoraX 2) | 2 | |
| Foot Straps x 1 set | Foot belts | 2 |
| Fixing Strap (for Foot) | 2 | |
| hook-and-loop fasteners | 4 | |
| GX2 Dongle x 1 set | GX2 Dongle | 1 |
| USB Type-A extension cable (1m) | 1 | |
| Safety precautions / Warranty card | 1 | |
| USB Charging Cables | USB Charging Cable for 6 Sensors | 1 |
| USB Charging Cable for 2 Sensors | 1 | |
| Safety Precautions/Warranty x 1 | ||
3.3 Name of sensor parts
Section titled “3.3 Name of sensor parts”This is the name of each part of the sensor attached to the body.
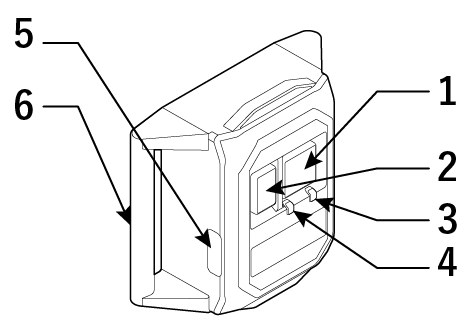
- Main button
- Sub button
- Red LED
- Green LED
- USB port for charging
- Belt loop
3.4 Important Safety Information
Section titled “3.4 Important Safety Information”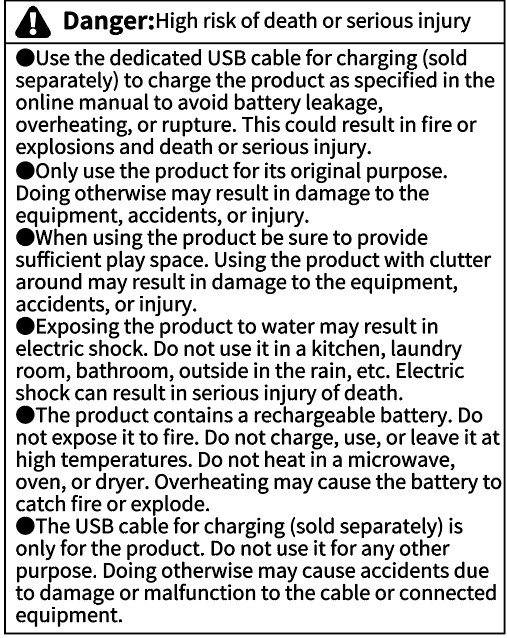
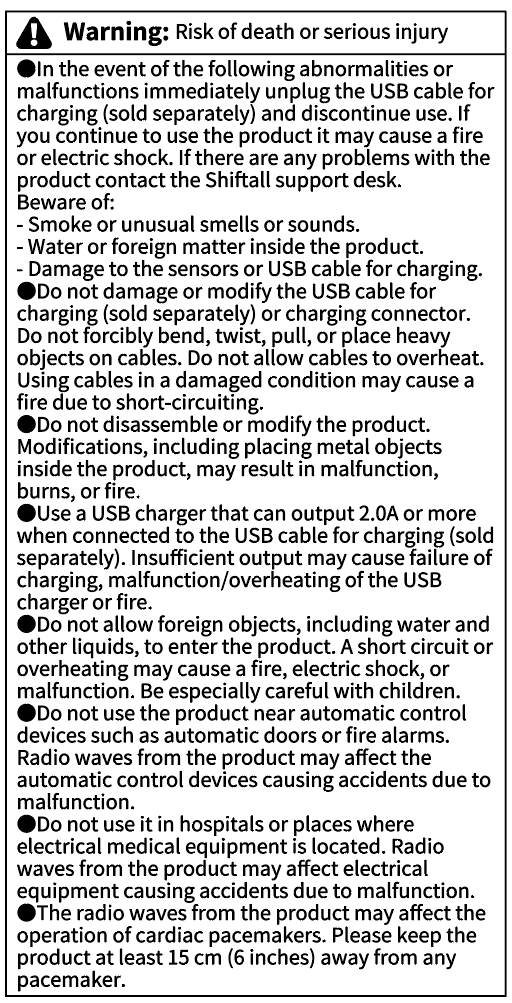
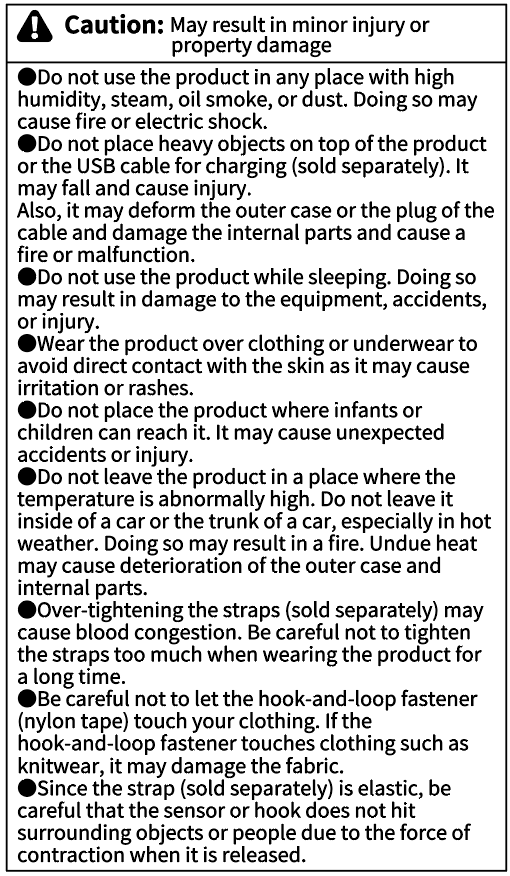
Safety Instructions(English/Français/Deutsch/Italiano/Español)
4. Configure the sensor unit for the intended body part.
Section titled “4. Configure the sensor unit for the intended body part.”Always make sure to assign each sensor to the correct body part before using this product.
4.1 Writing Body Part Settings to Sensors via Shiftall VR Manager
Section titled “4.1 Writing Body Part Settings to Sensors via Shiftall VR Manager”4.1.1 Turn on the sensor.
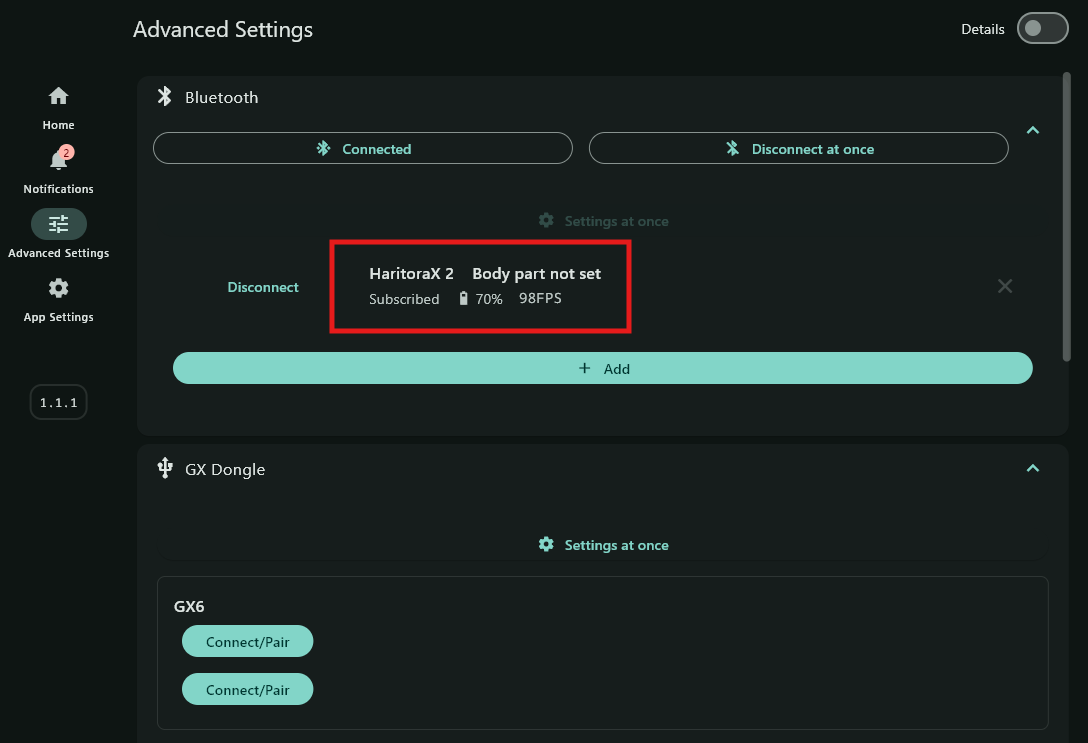
Section titled “4.1.1 Turn on the sensor.”After turning it on, confirm that the sensor is detected.
Note: If the sensor firmware is not up to date, please update it first.
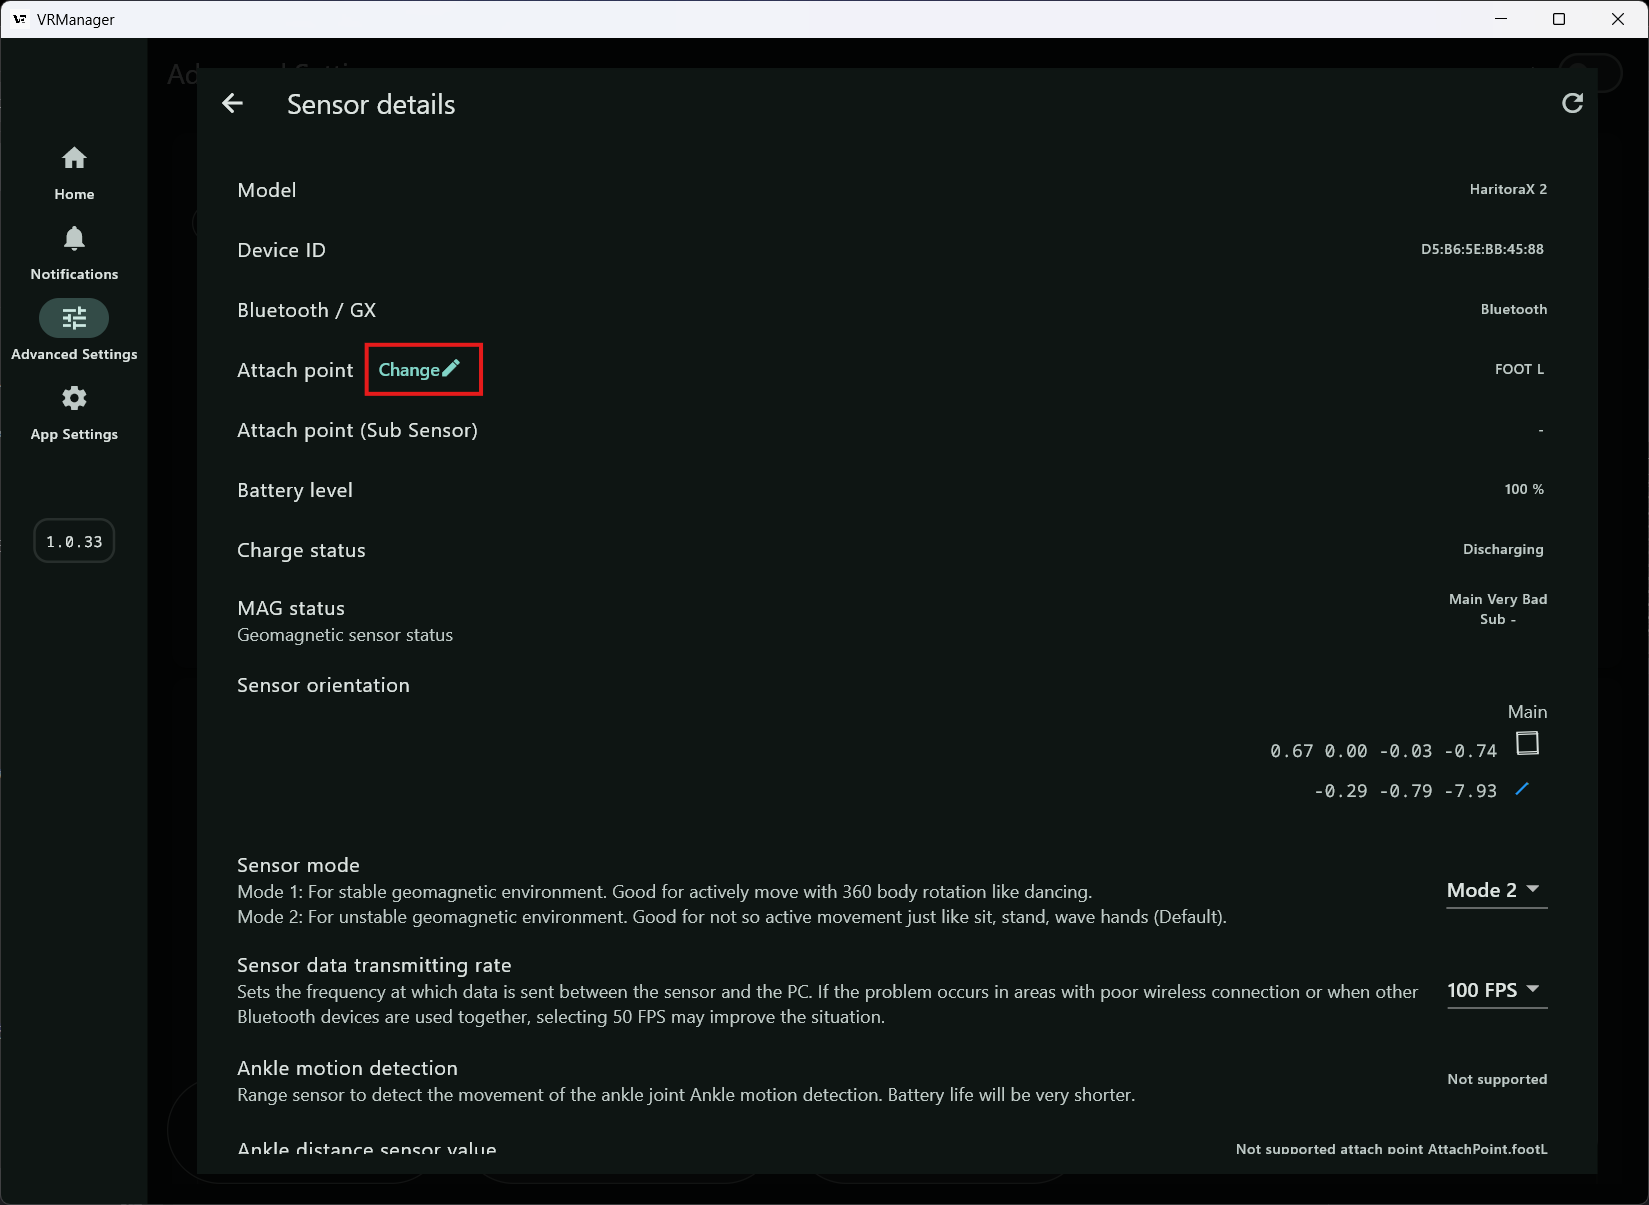
4.1.2 Select the sensor you want to reassign.
Section titled “4.1.2 Select the sensor you want to reassign.”From the Detailed Settings, select the sensor you wish to reassign and choose Change Attach Point.
* You can rewrite settings whether the sensor is connected via Bluetooth or a GX dongle.
4.1.3 Write the body part assignment
Section titled “4.1.3 Write the body part assignment”Select the desired body part from the dropdown menu to write the new body part setting.
Even if you choose the wrong part, you can reassign it as many times as needed, so please don’t worry.
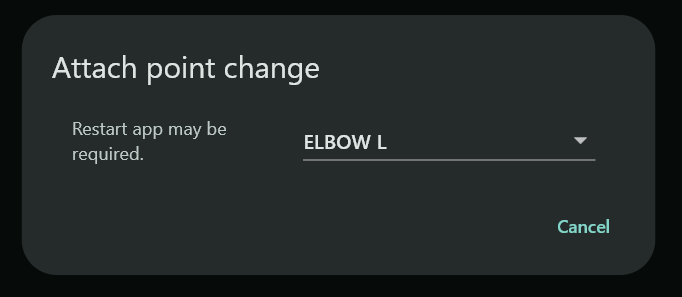
When using the HaritoraX 2 Pro, assign the sensors to the following body parts.
・CHEST
・HIP
・KNEE(R)
・KNEE(L)
・ANKLE(R)
・ANKLE(L)
・FOOT(R)
・FOOT(L)
* It does not matter which included sensor is assigned to each position.
* Instead of FOOT, you may assign a sensor to ELBOW to use it for elbow tracking.
4.2 Attach the sensor name labels. Attach the sensor name labels to the sensors for the body parts you have configured.
Section titled “4.2 Attach the sensor name labels. Attach the sensor name labels to the sensors for the body parts you have configured.”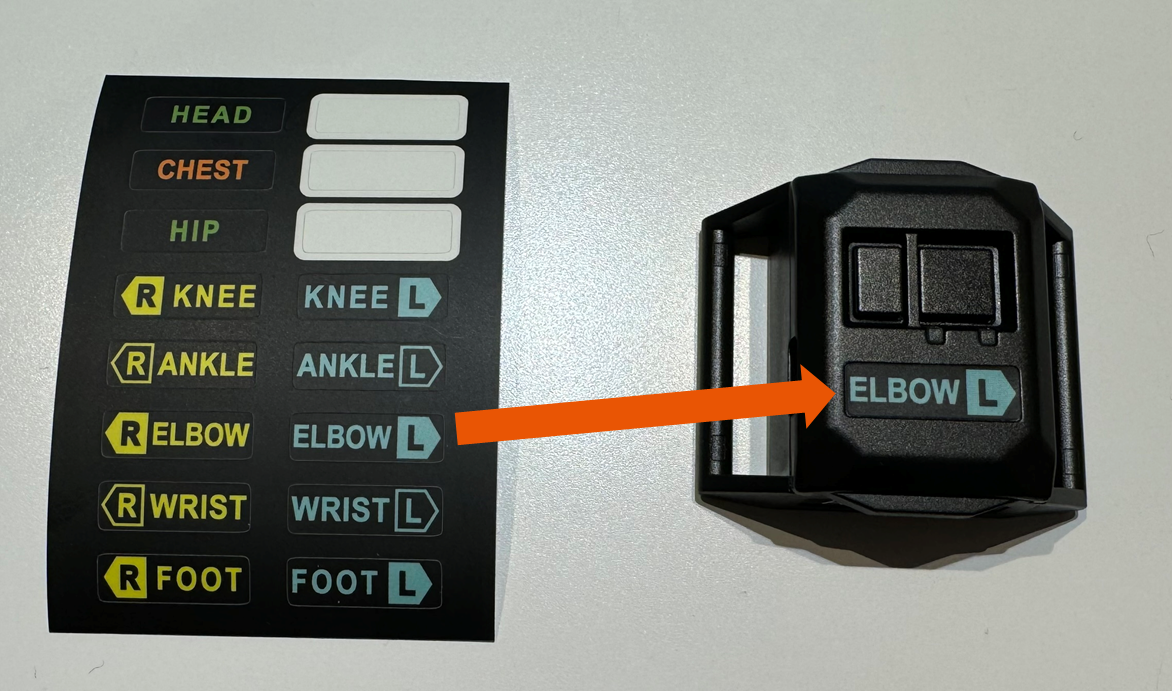
5. Assembling the “HaritoraX 2 Pro”
Section titled “5. Assembling the “HaritoraX 2 Pro””5.1 Check the included items and belts.
Section titled “5.1 Check the included items and belts.”Always attach the sensors to the belts before putting the product on your body.
This chapter explains how to assemble the belts and how to wear them.
・Sensor Unit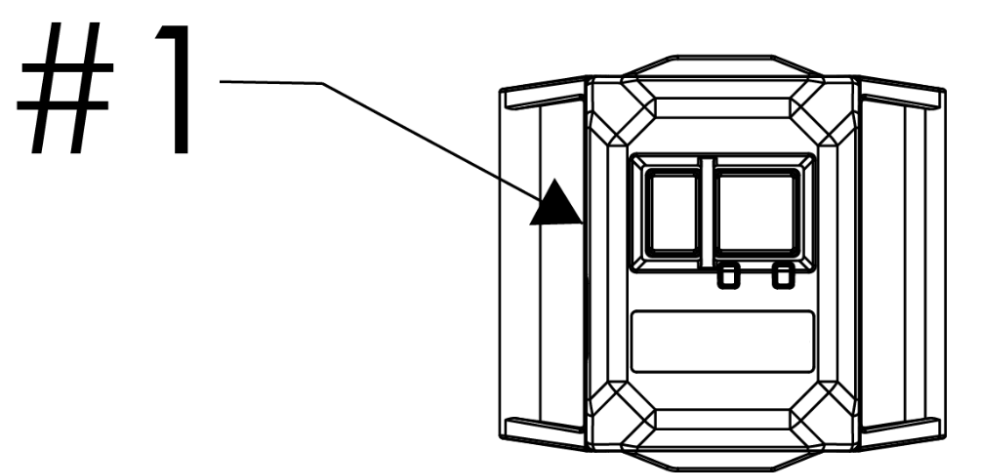
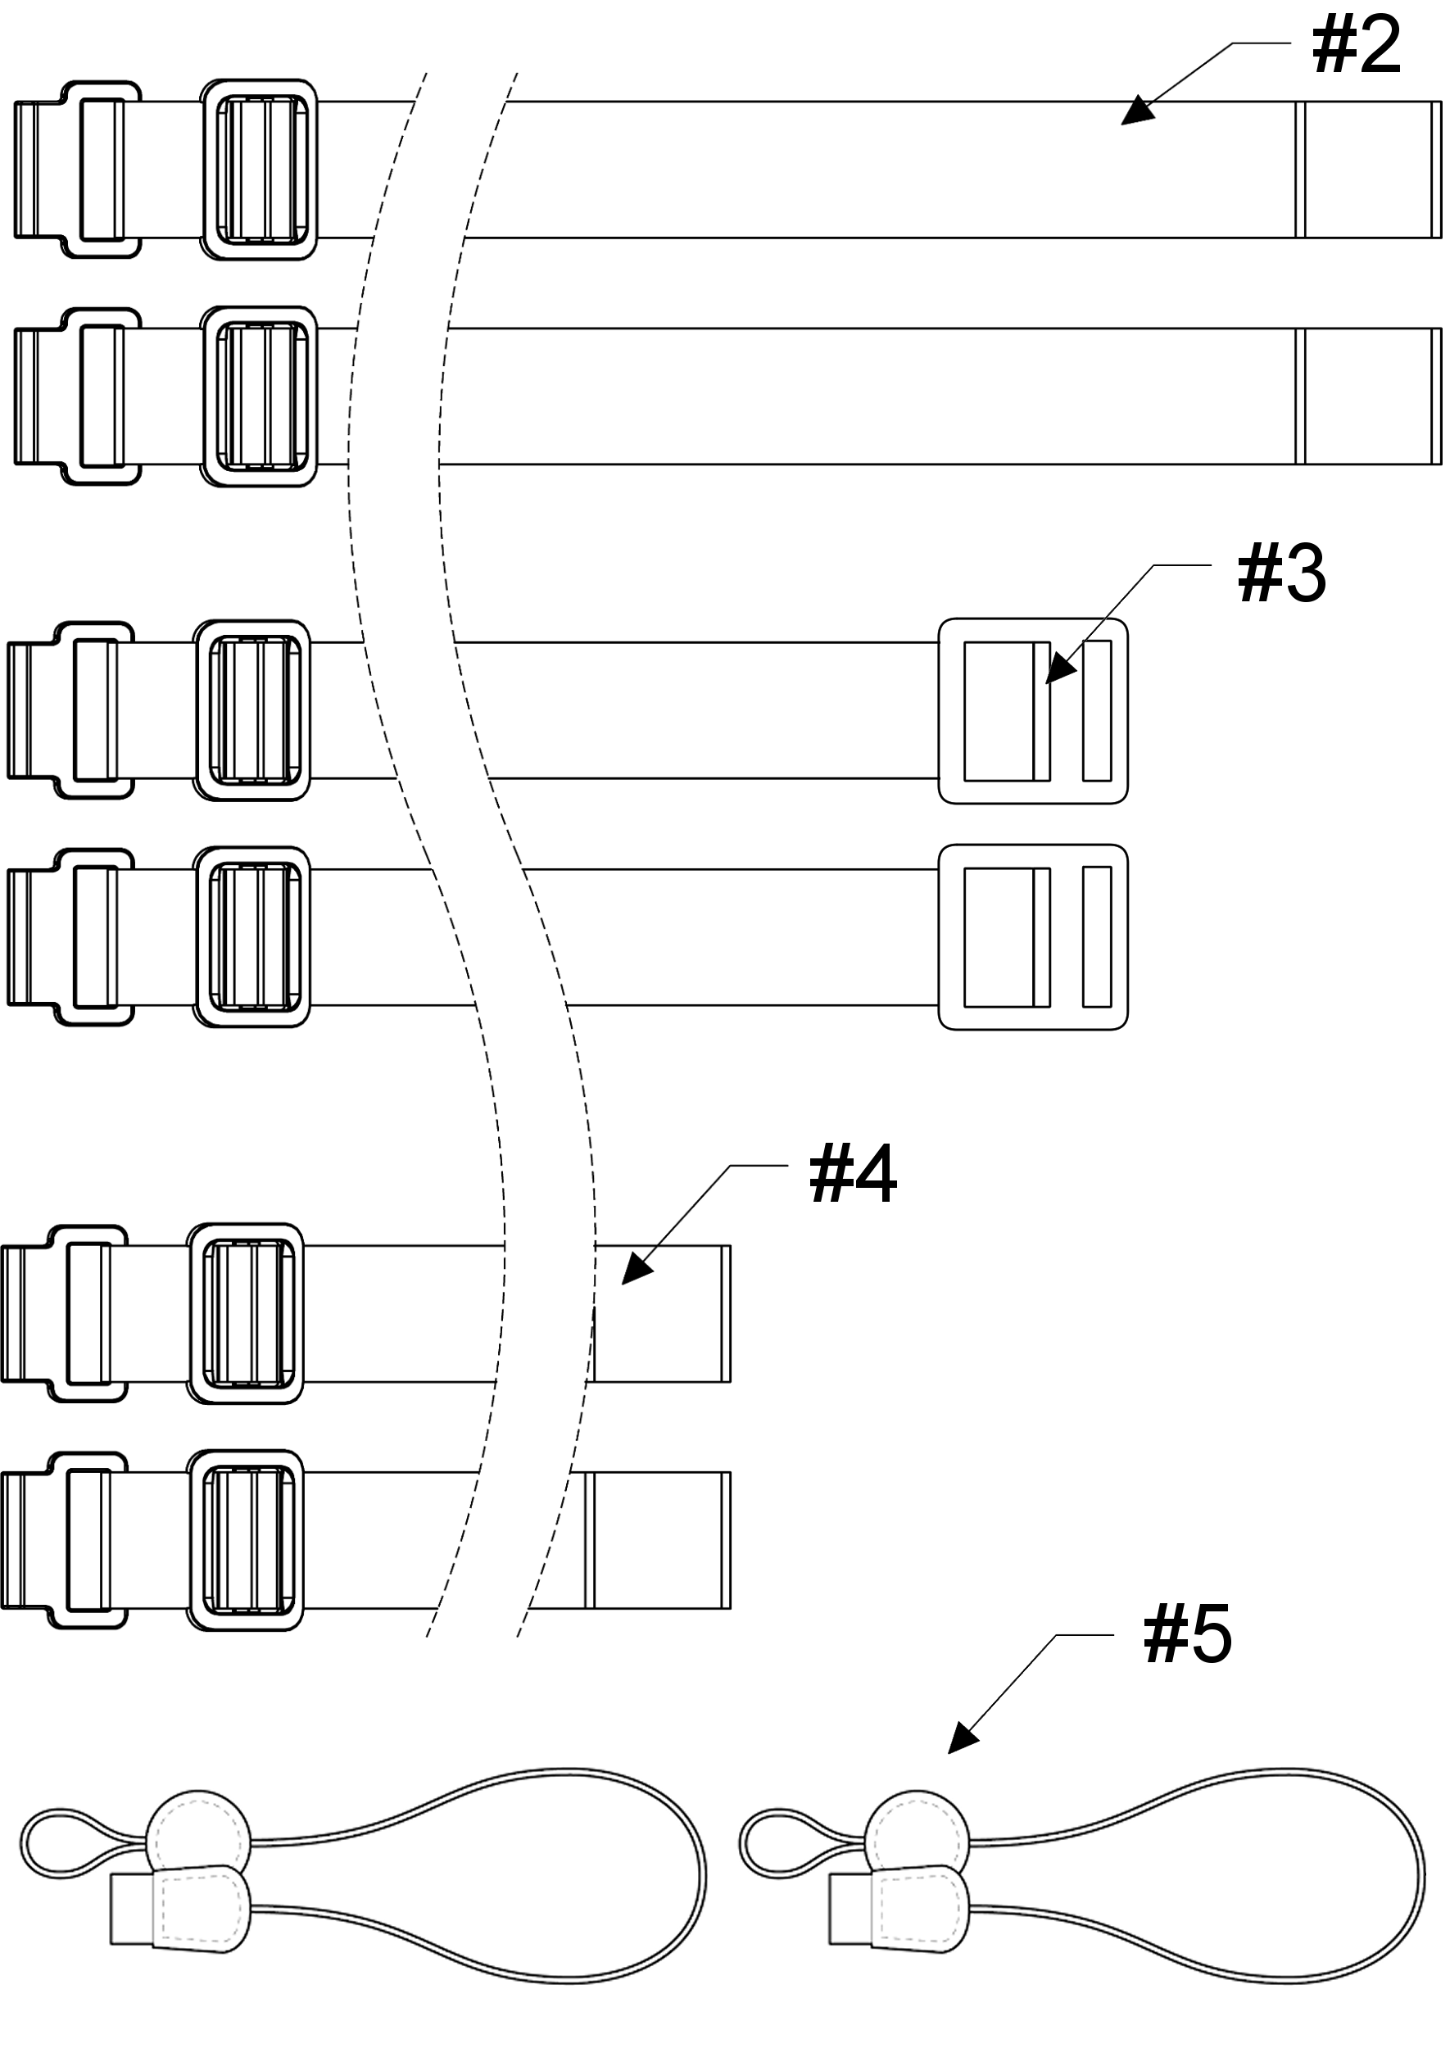
・Standard Strap Set
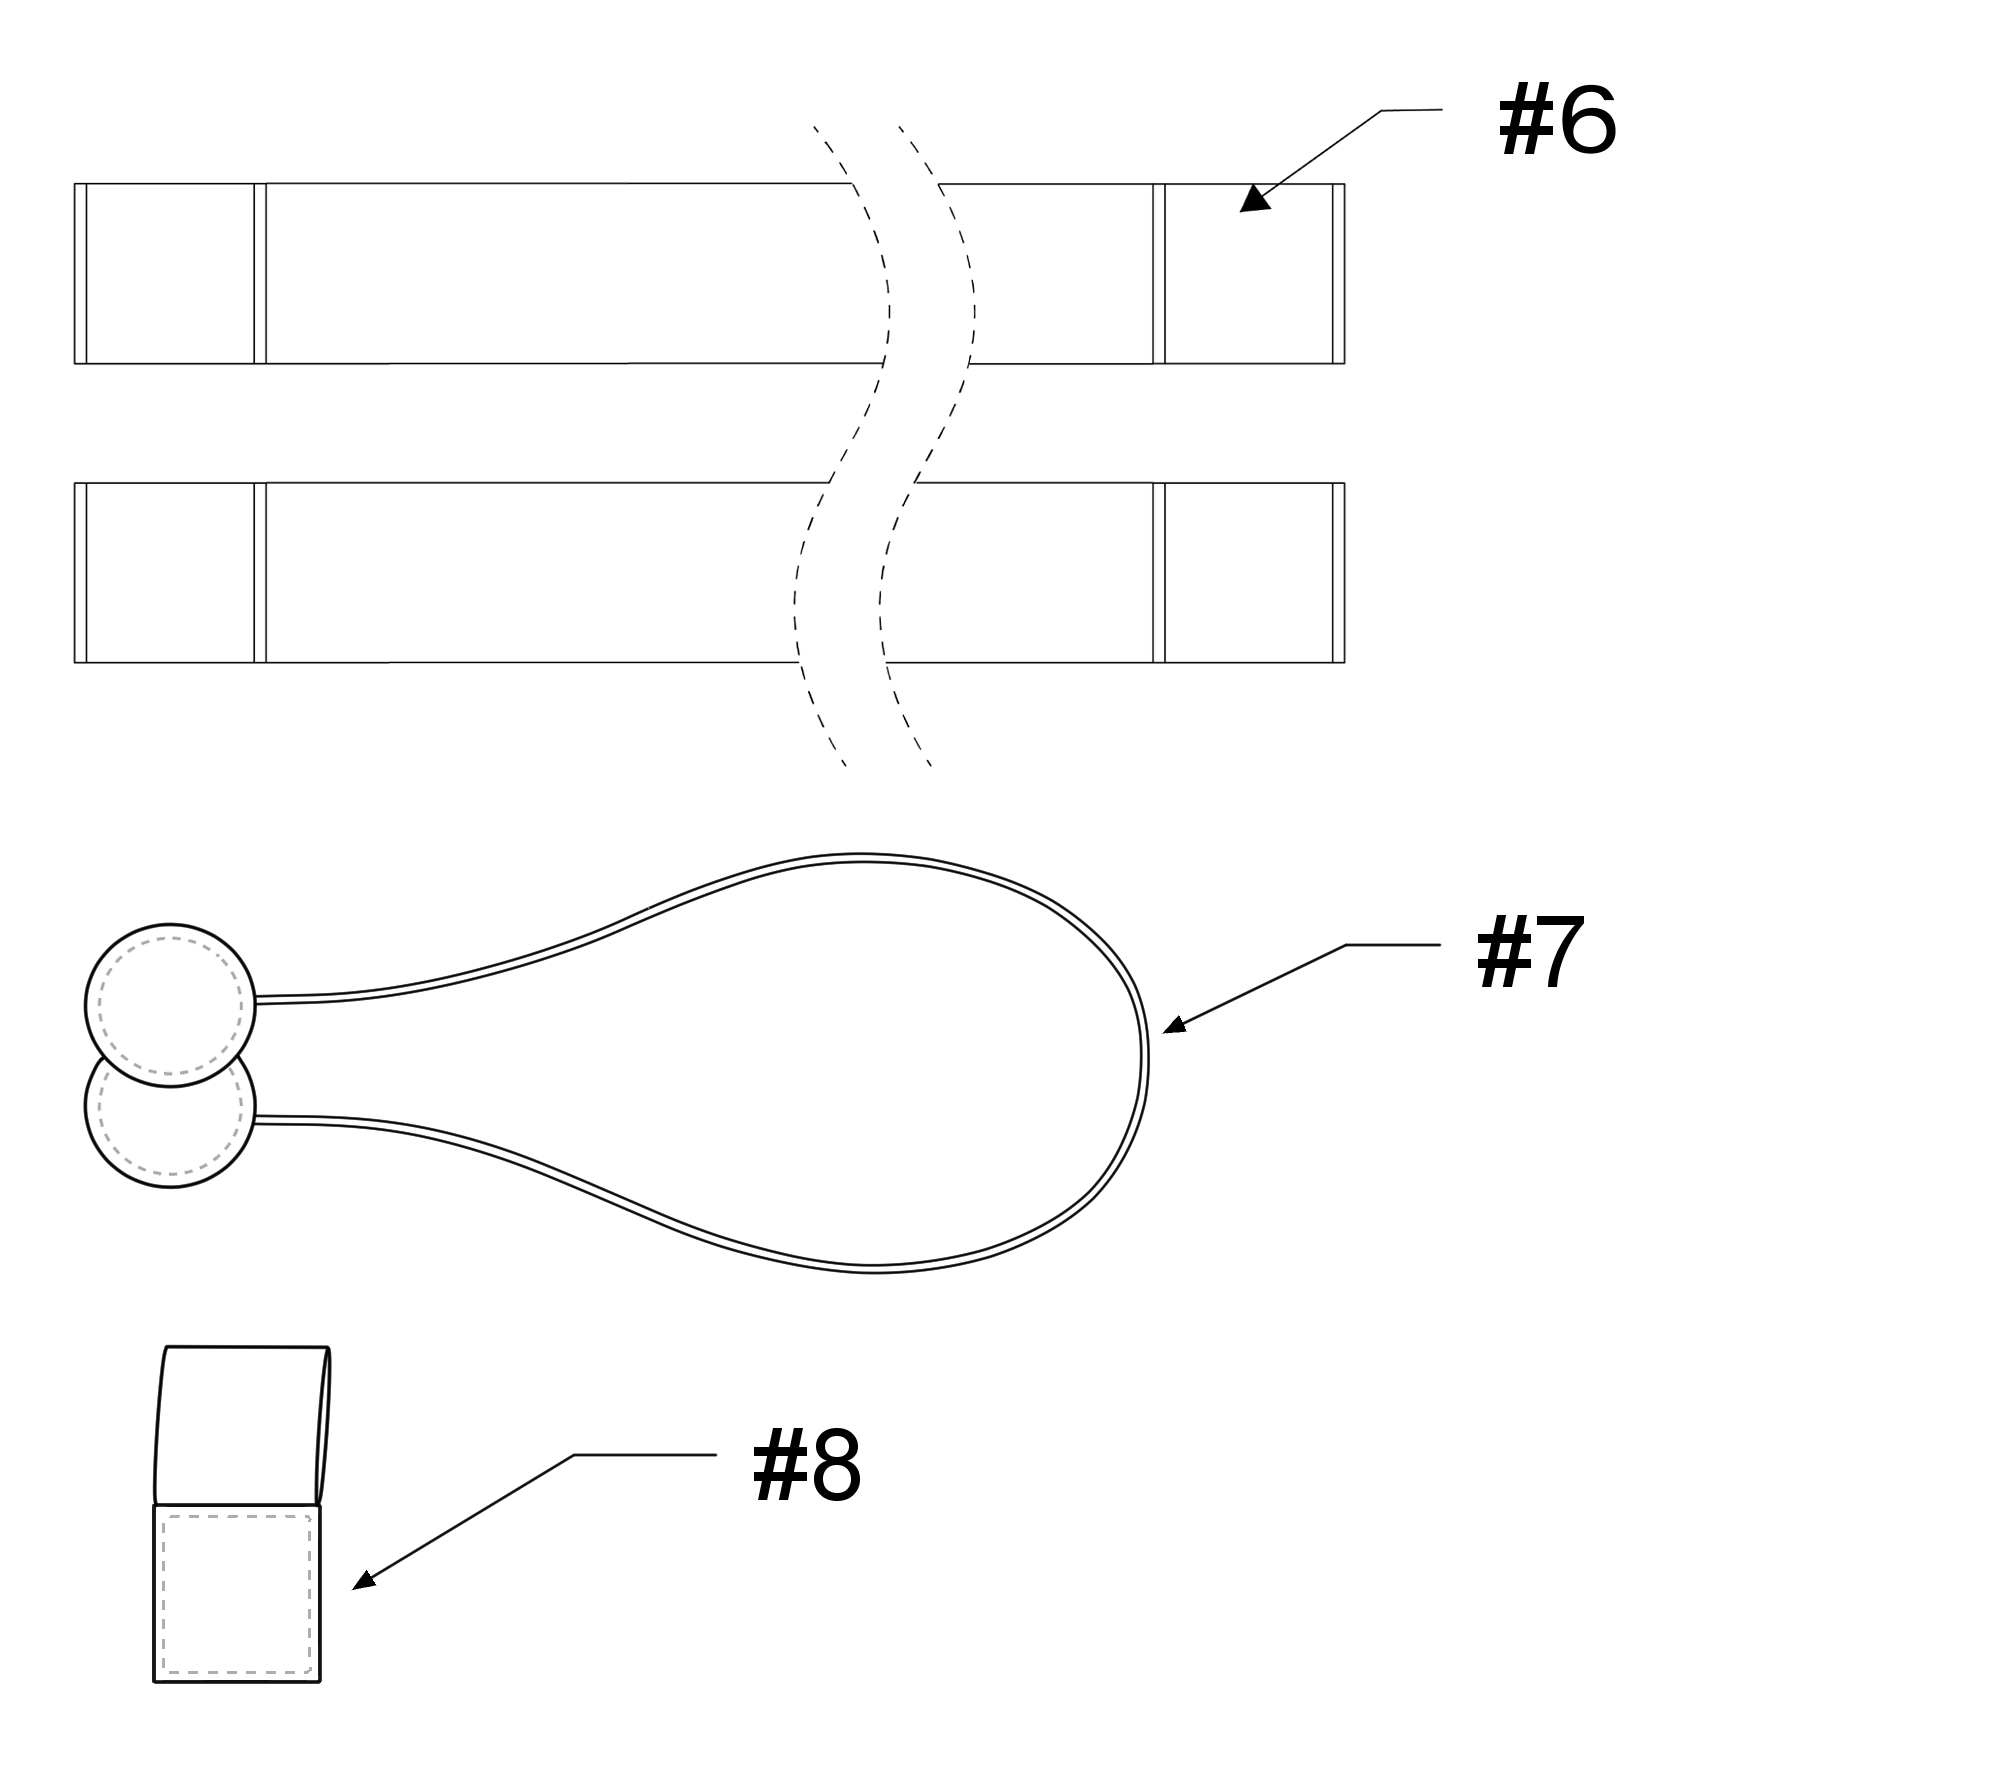
・Foot Strap Set
| No. | Name | Quantity |
| #1 | Sensor Unit | 8 |
| #2 | Chest strap/Hip strap (Common) | 2 |
| #3 | Knee Strap | 2 |
| #4 | Leg(Ankle) strap | 2 |
| #5 | Cable Fixing Strap (For HaritoraX 2) | 2 |
| #6 | Foot strap | 2 |
| #7 | Cable Fixing Strap (for Foot) | 2 |
| #8 | Hook-and-Loop Fastener (Double-sided Hook Fastener) | 4 |
5.2 Threading the Belts through the Chest and Hip Sensors
Section titled “5.2 Threading the Belts through the Chest and Hip Sensors”Pass the longest straps (Chest strap/Hip strap) through the chest and hip sensors. Pass the strap through the belt loop on the right side of the sensor (the side opposite to the one with the charging terminal). Pass the strap from the back of the sensor with the hook-and-loop fastener side facing outward.
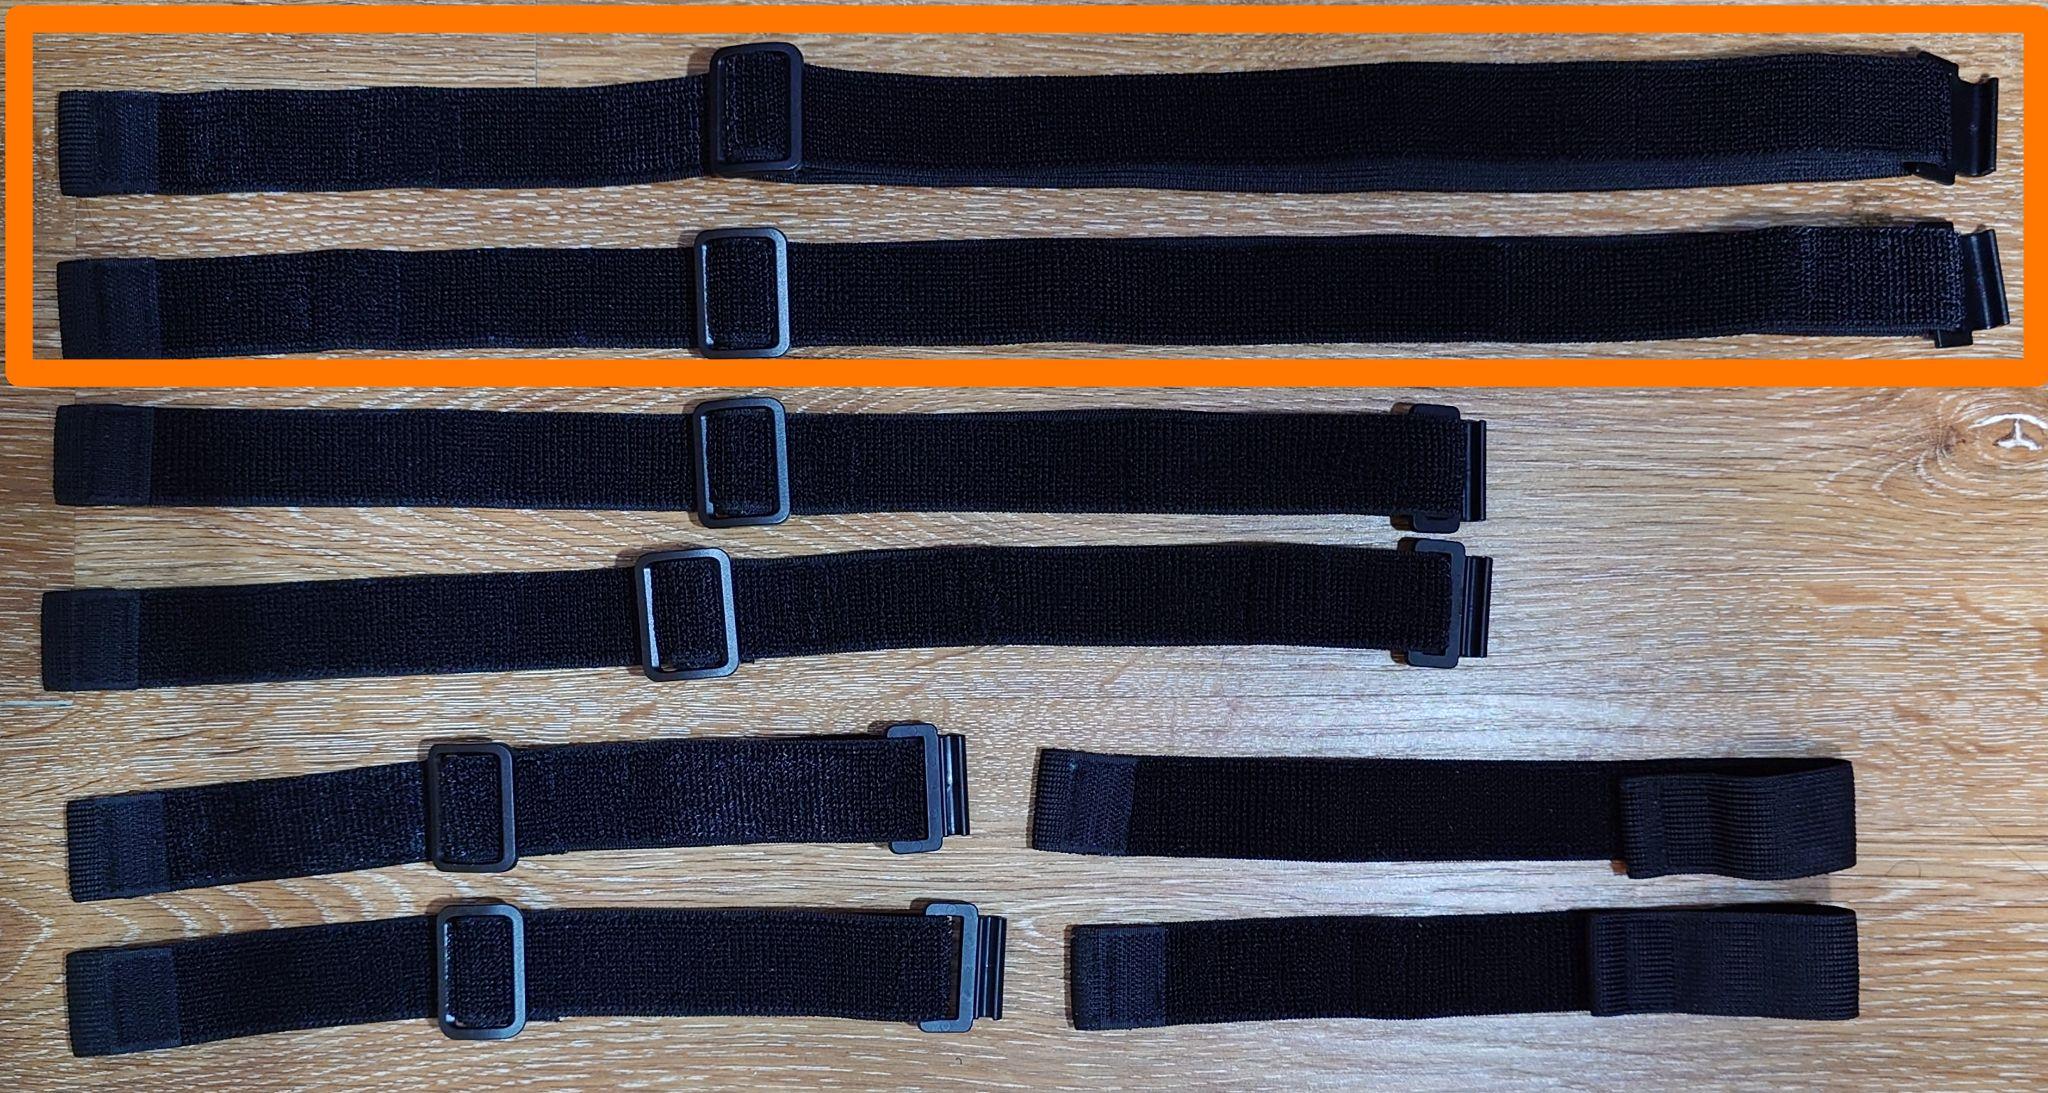
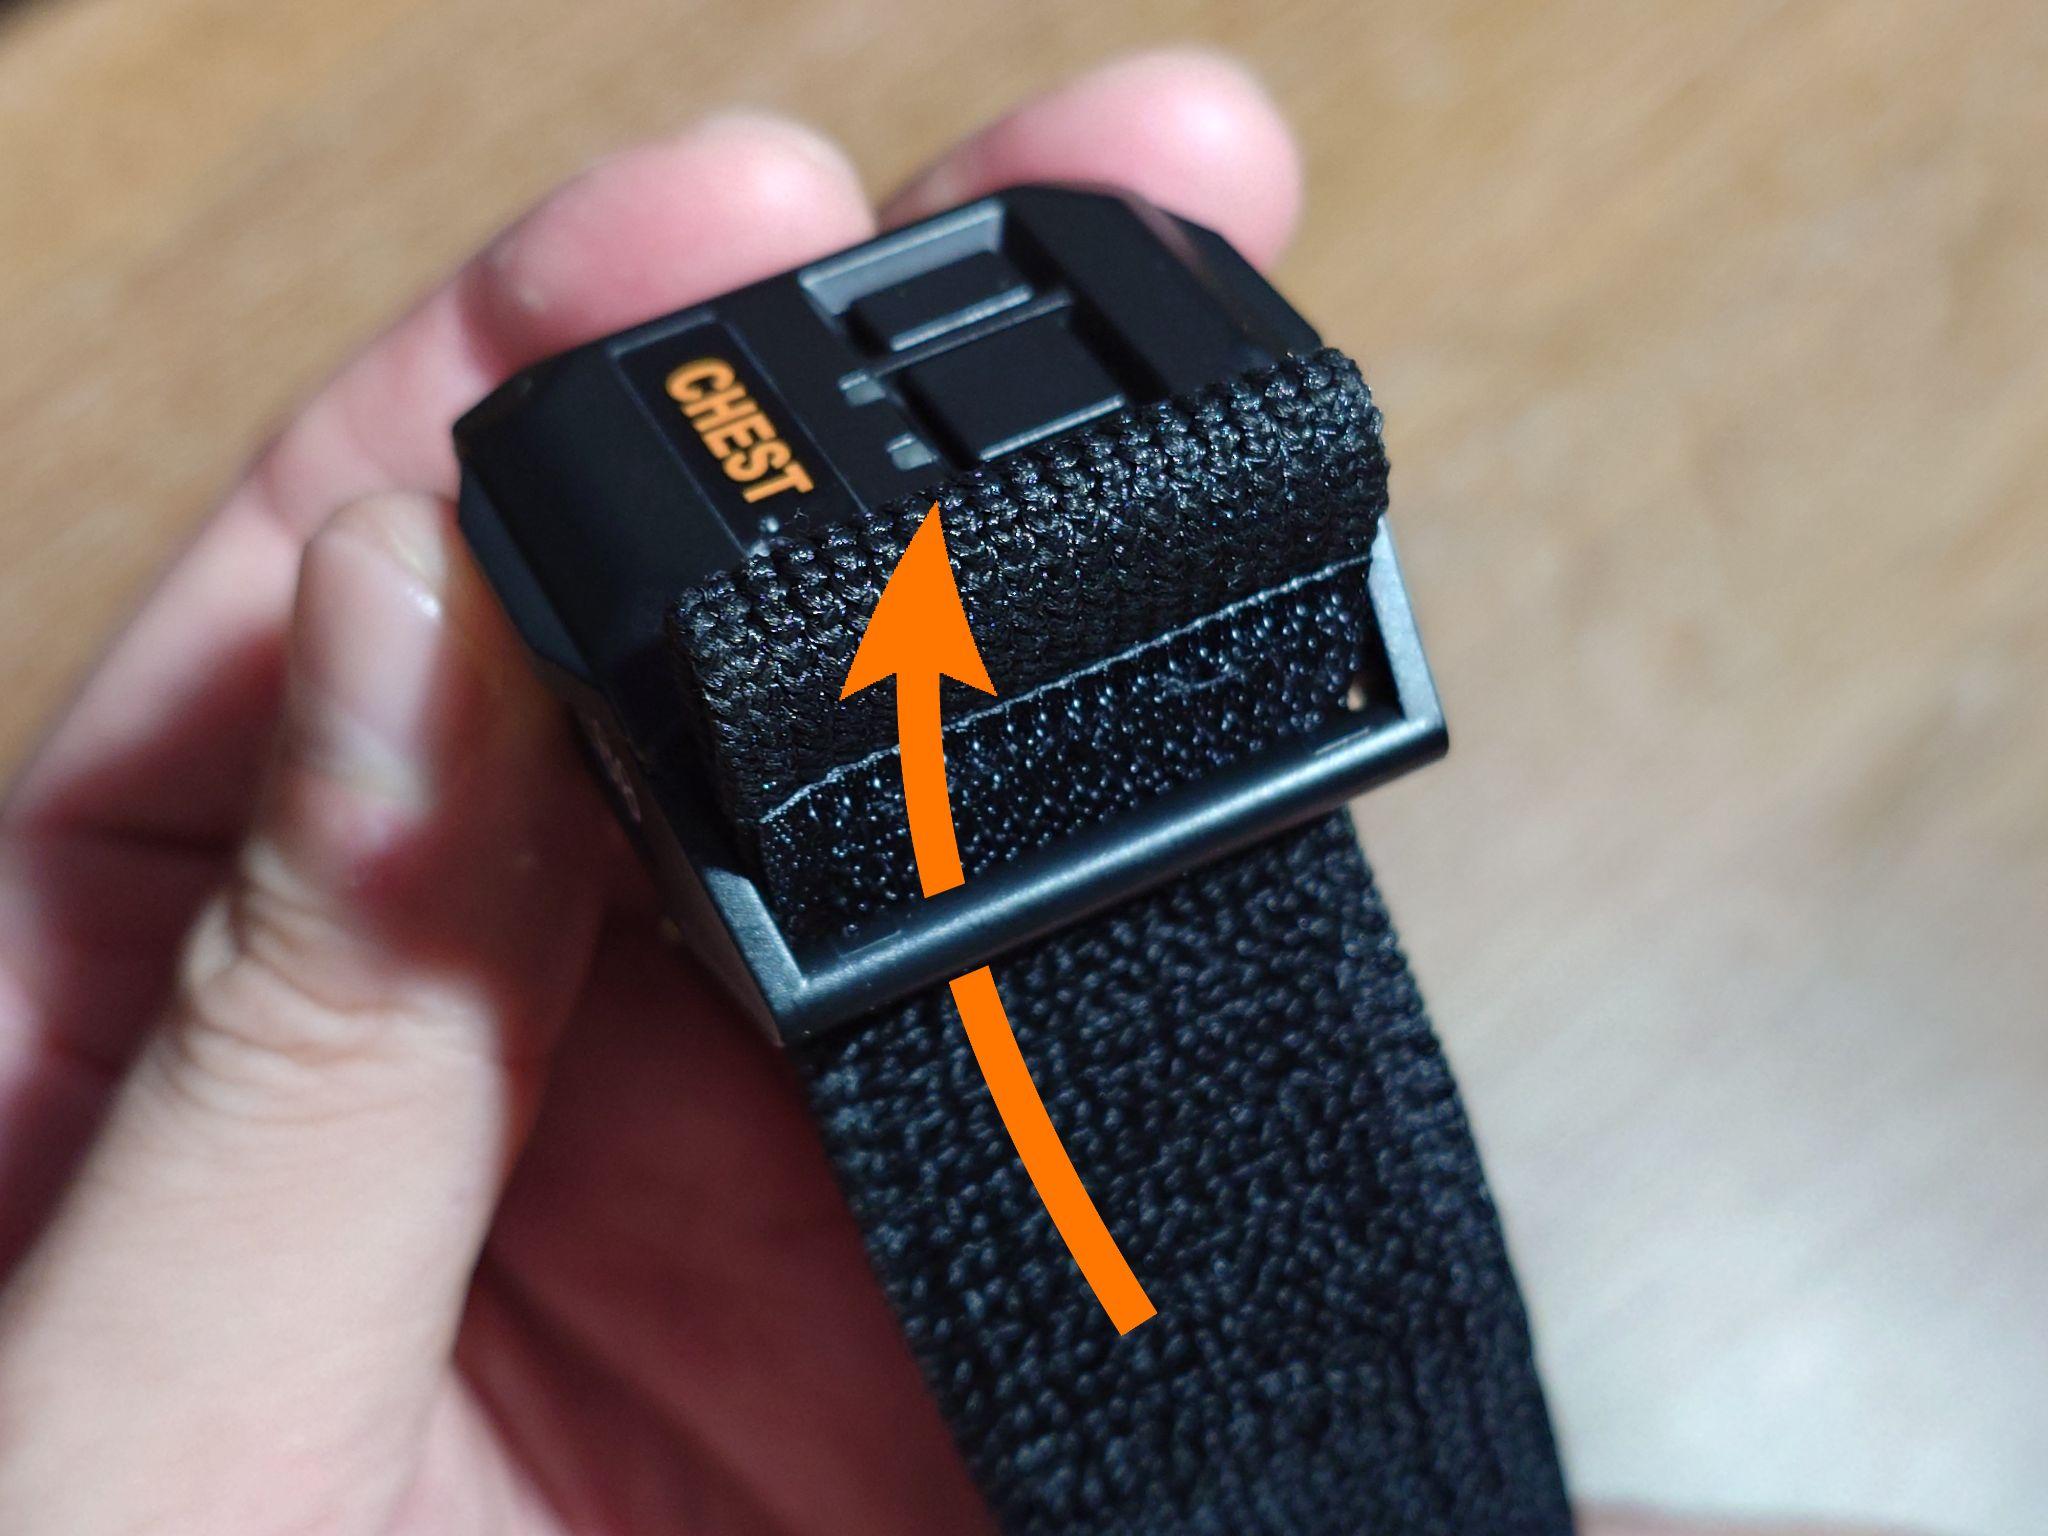
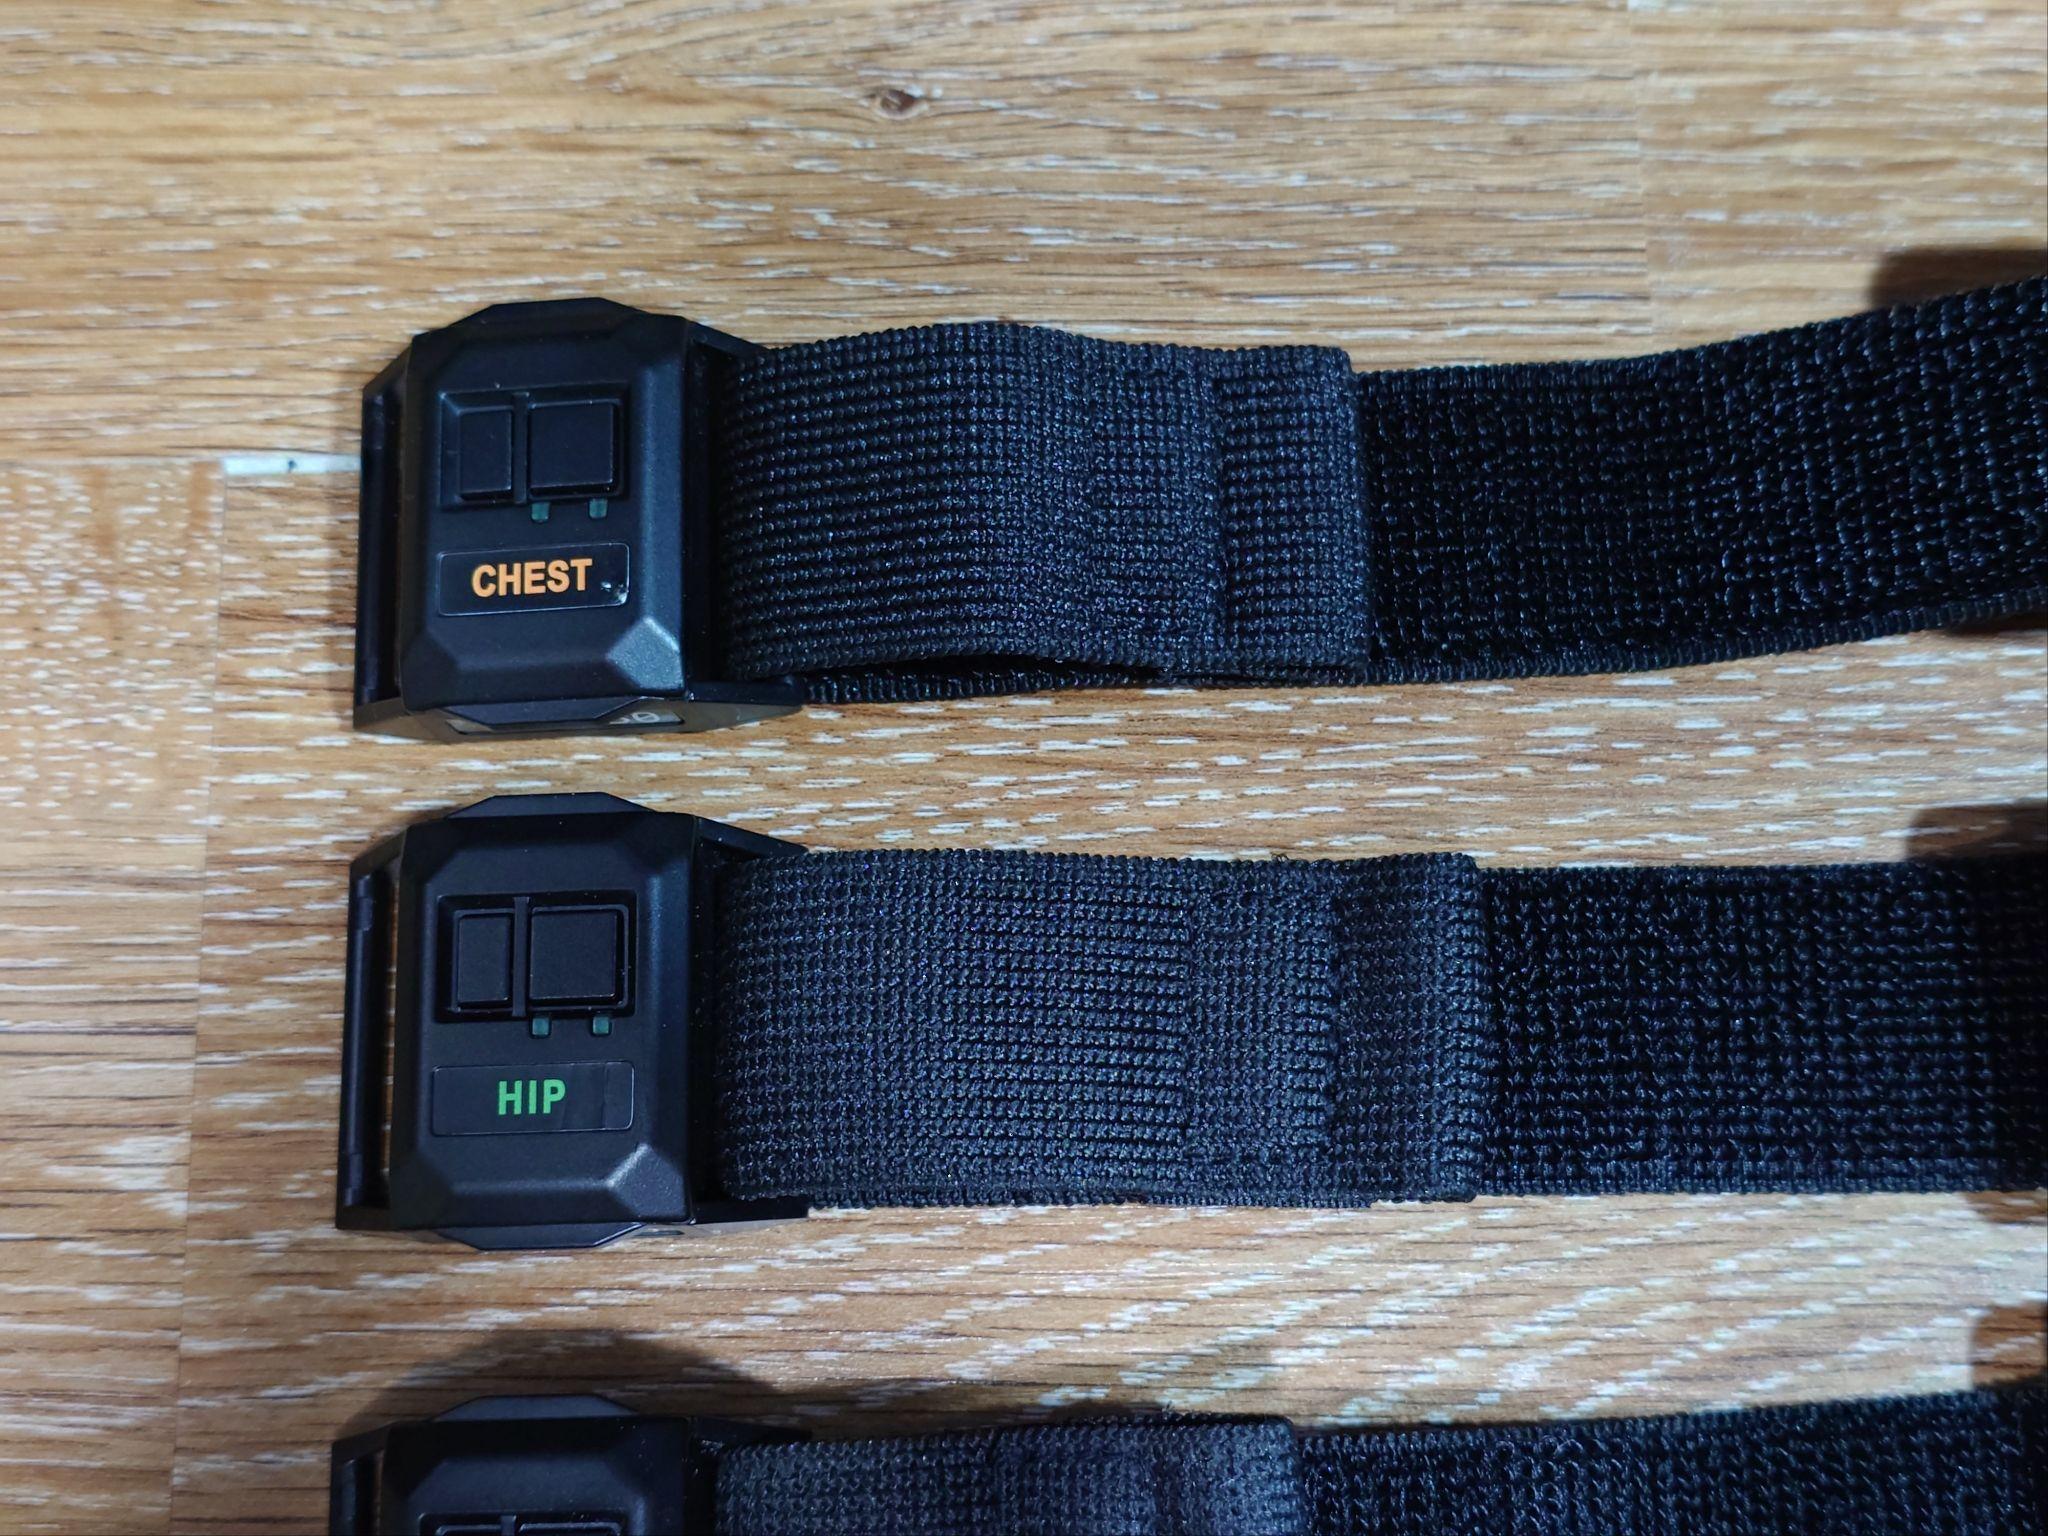
5.3 Threading the Belts through the Right and Left Knee Sensors
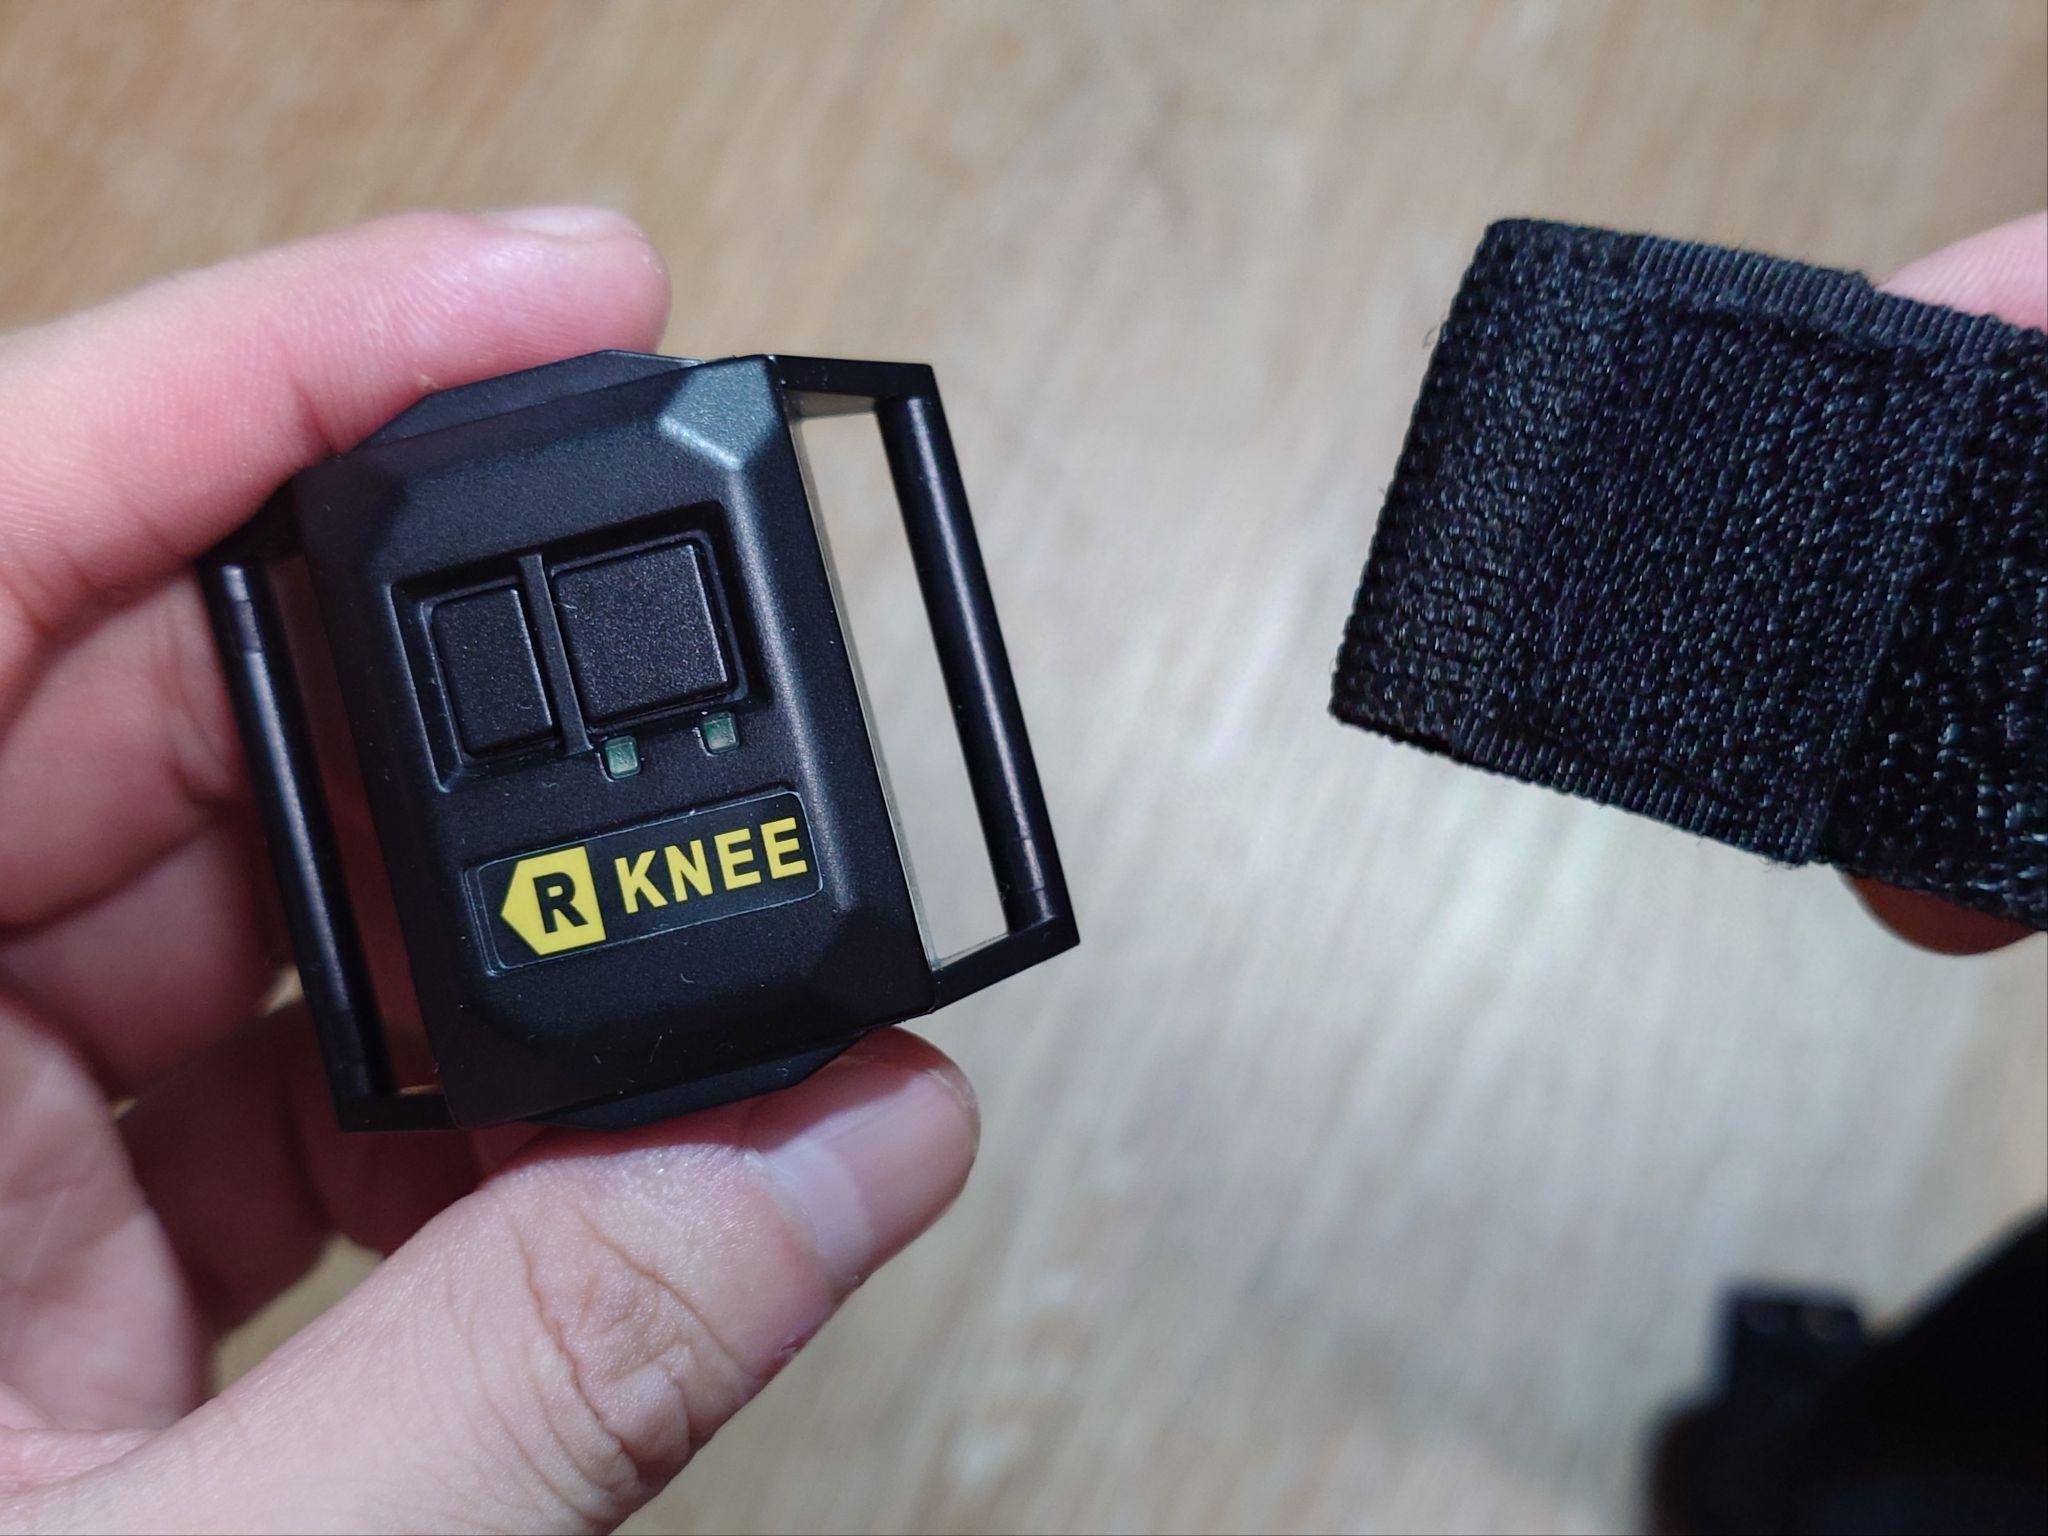
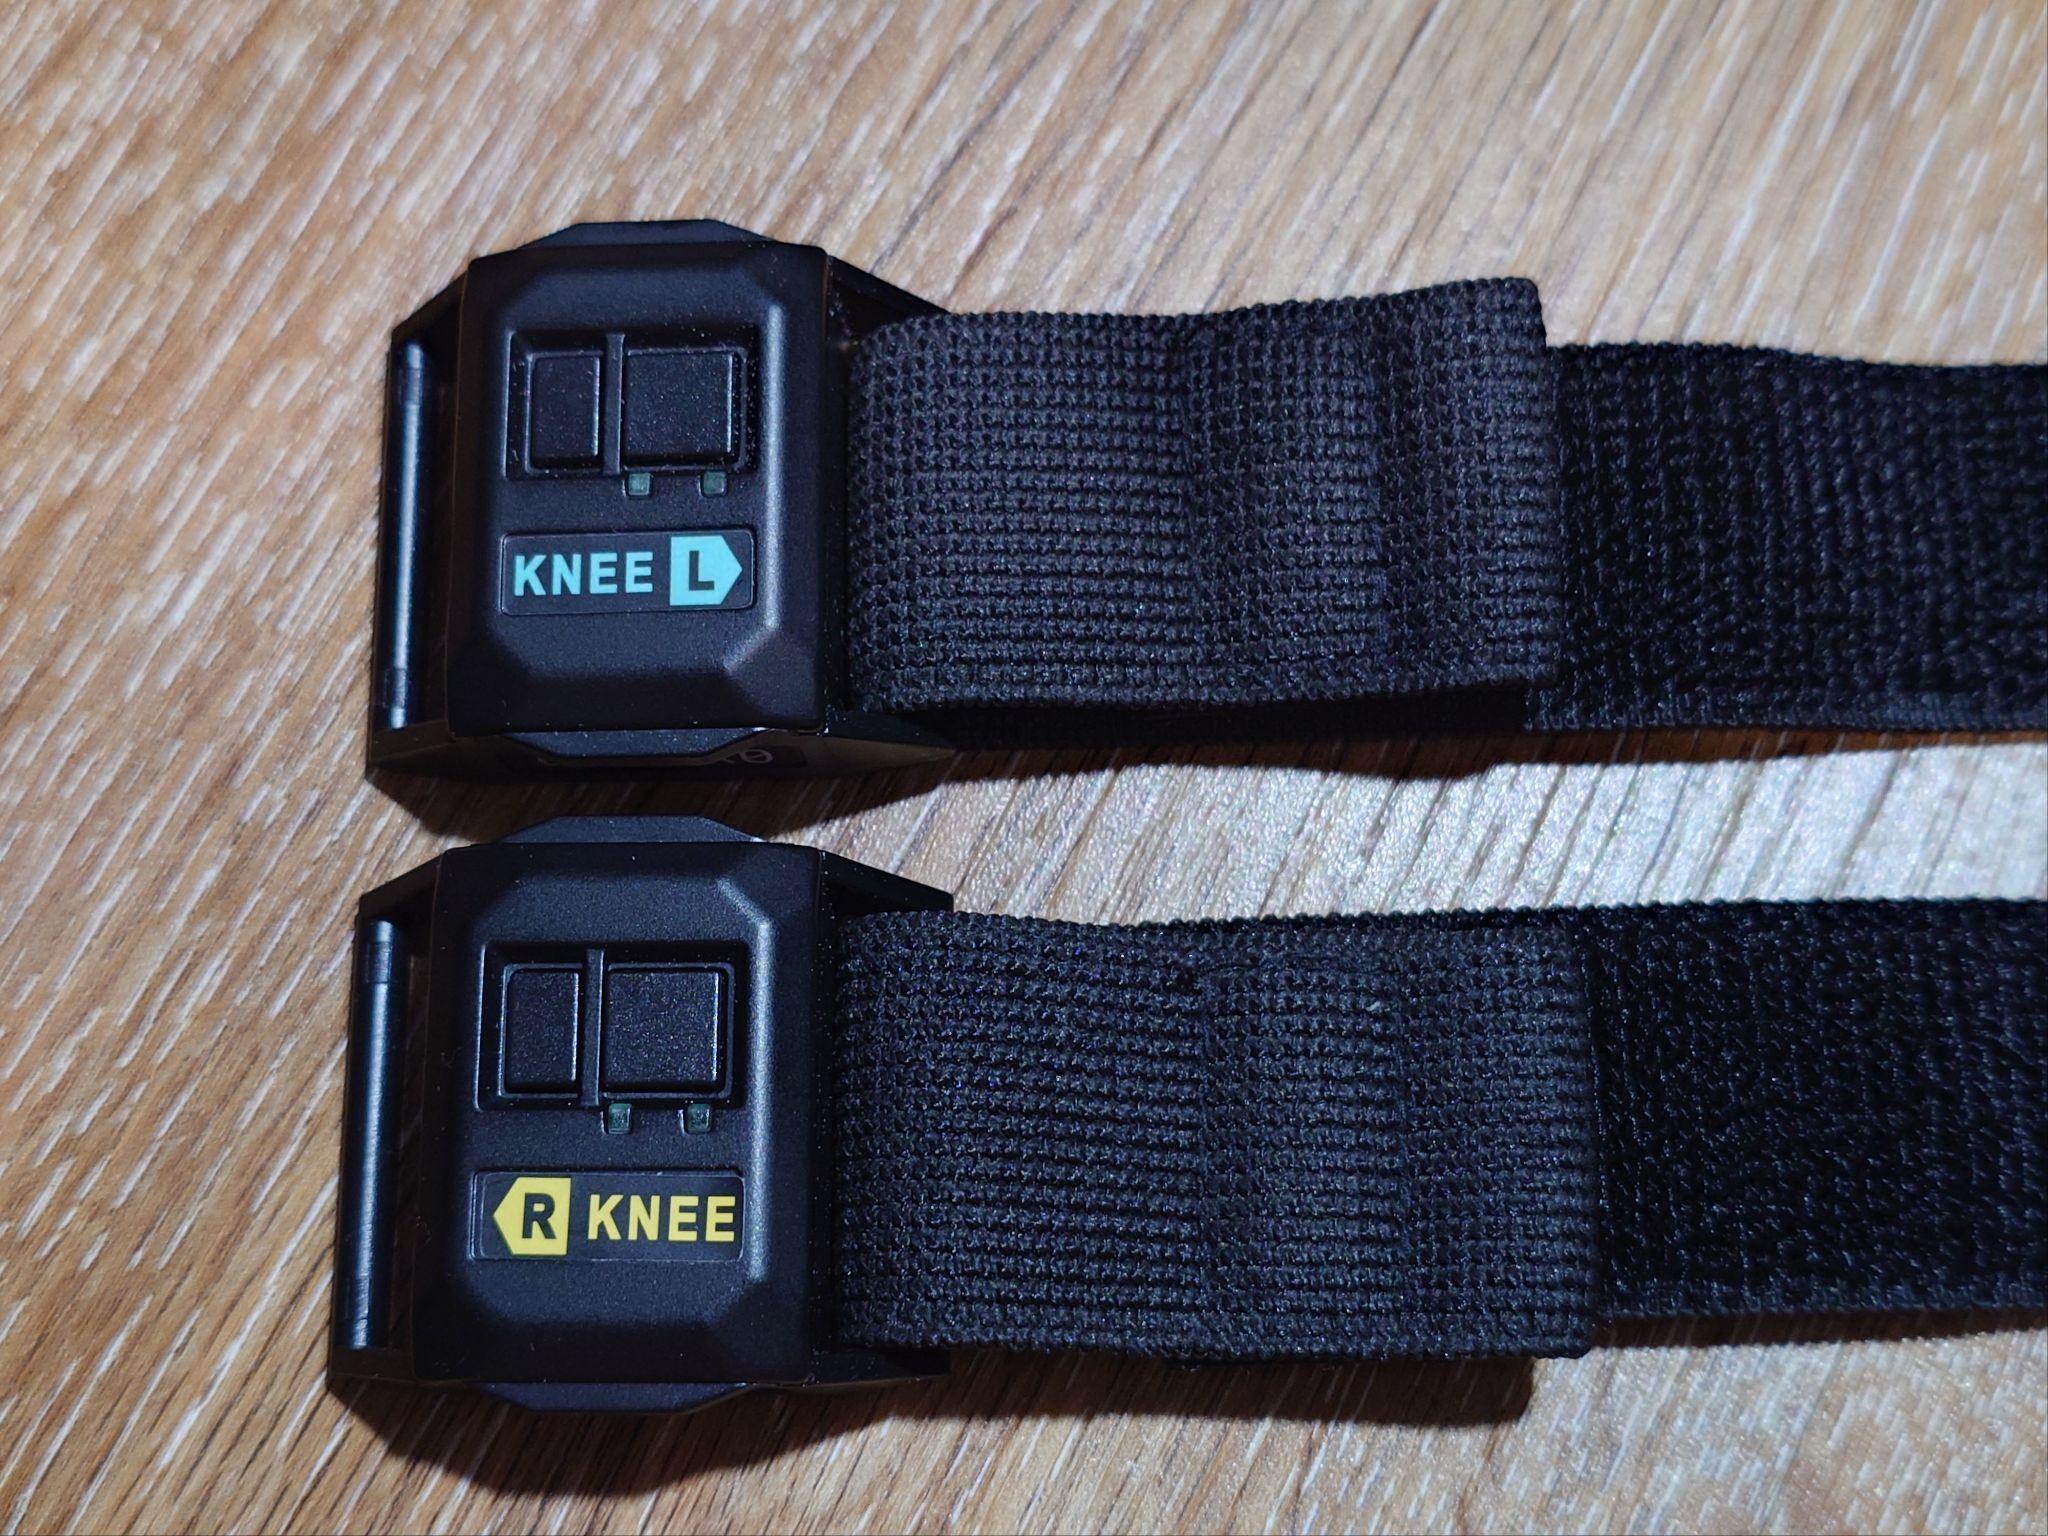
Section titled “5.3 Threading the Belts through the Right and Left Knee Sensors”Pass the middle length straps (Knee straps) through the knee sensors. The position and direction of passing the strap are the same as above.*The knee belts include plastic parts as shown in the image below, but these are not required.
Please remove them before use.
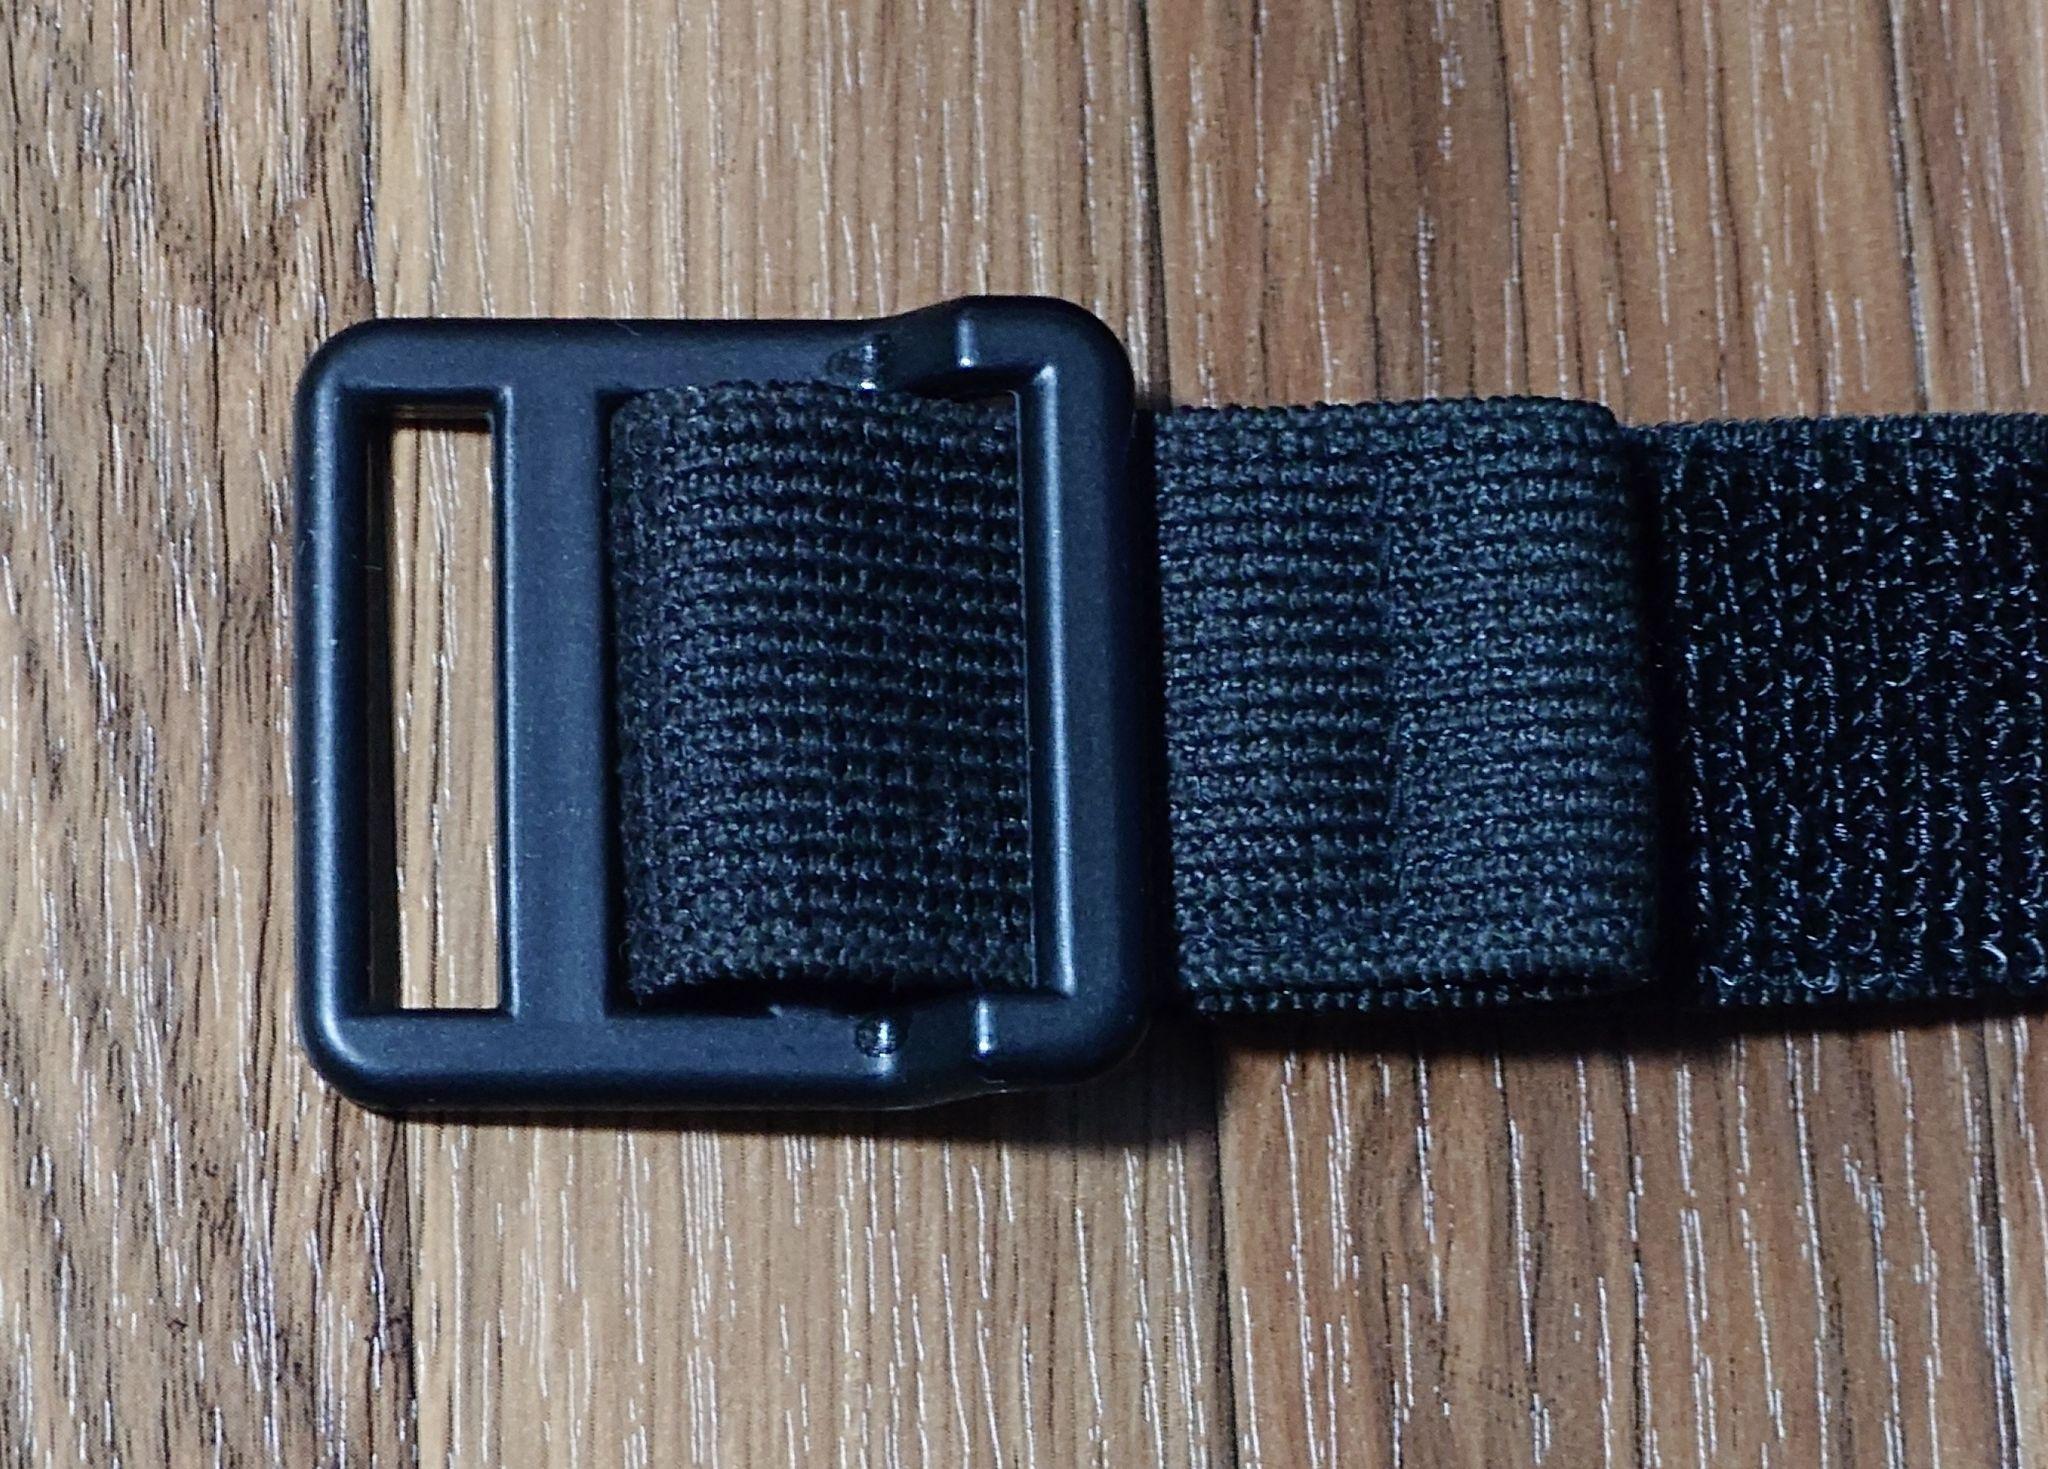
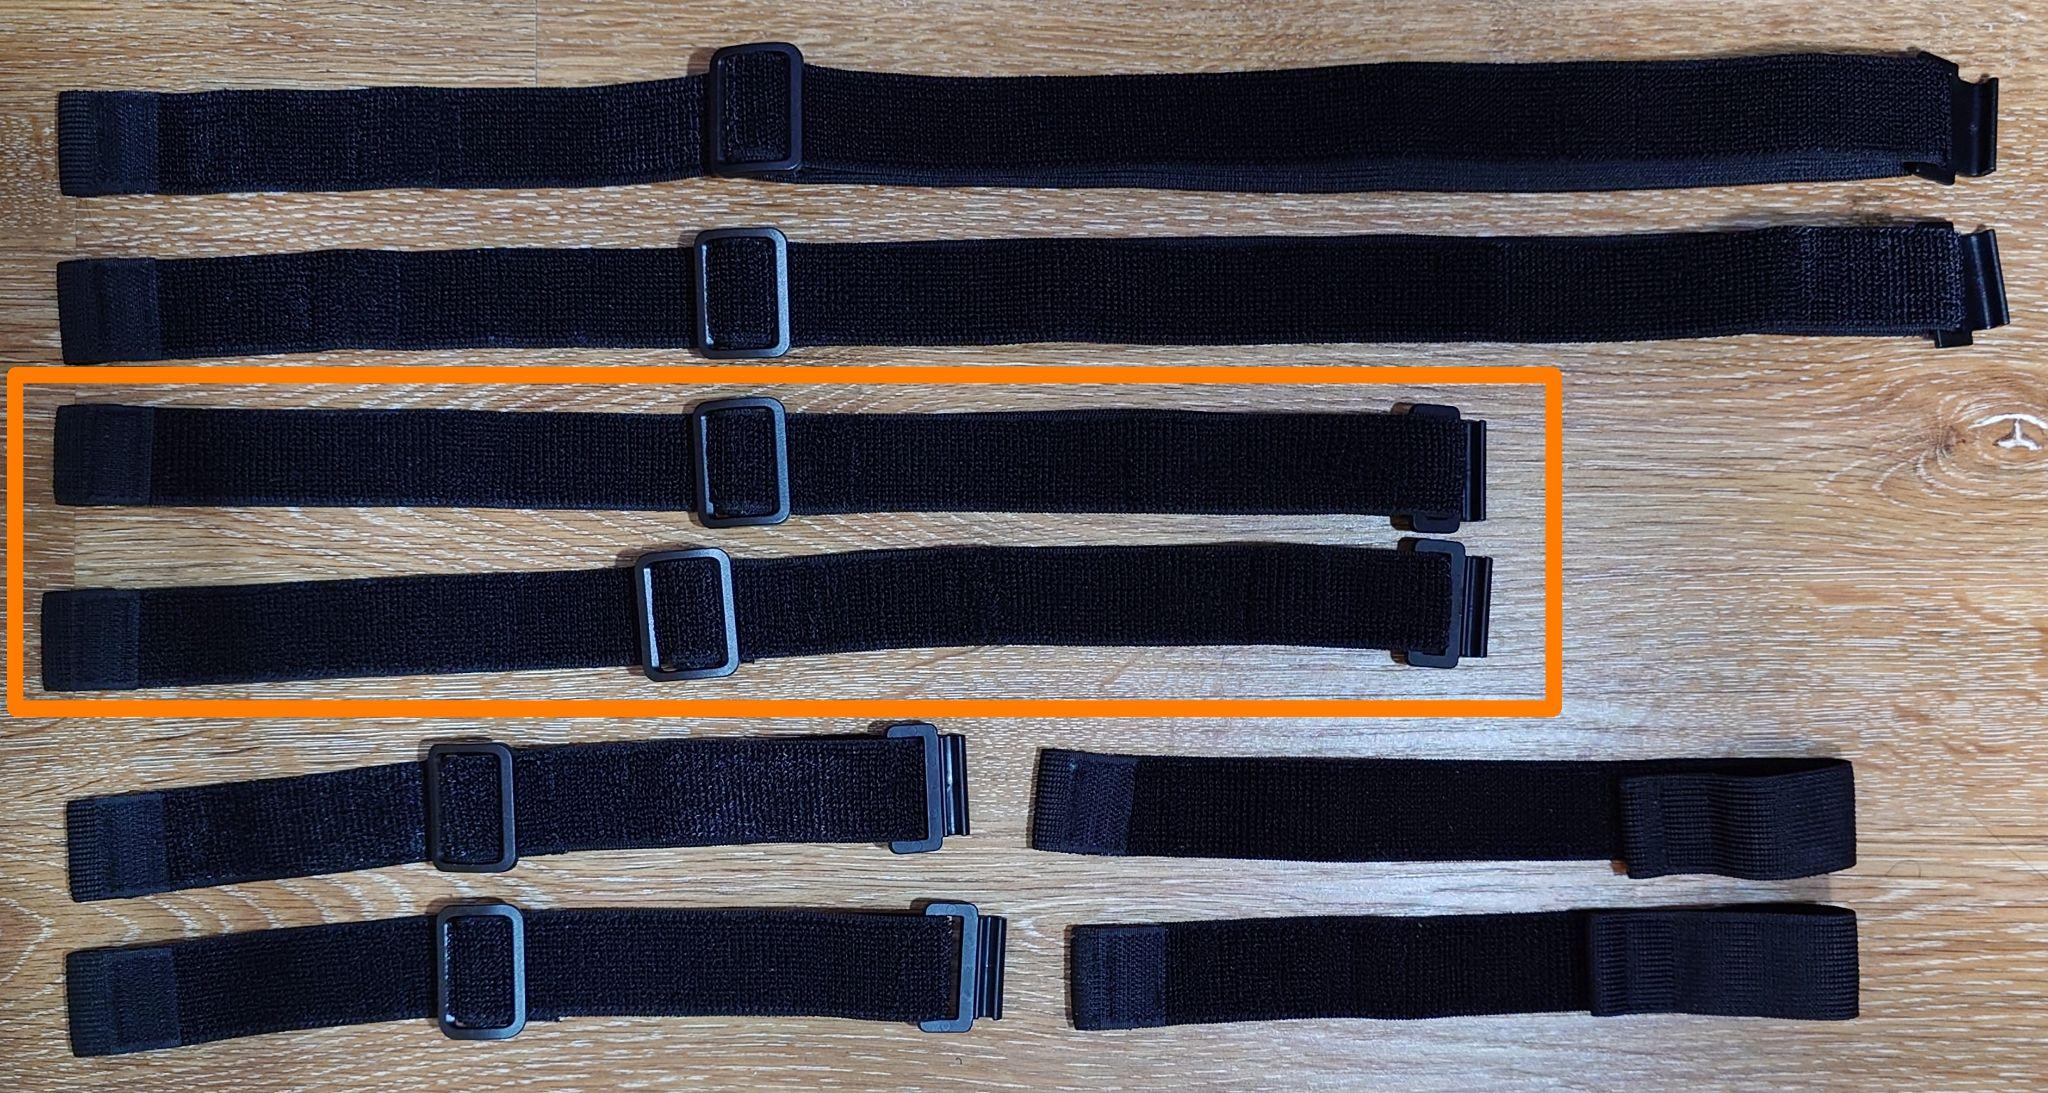
5.4 Threading the Belts through the Right and Left Ankle Sensors
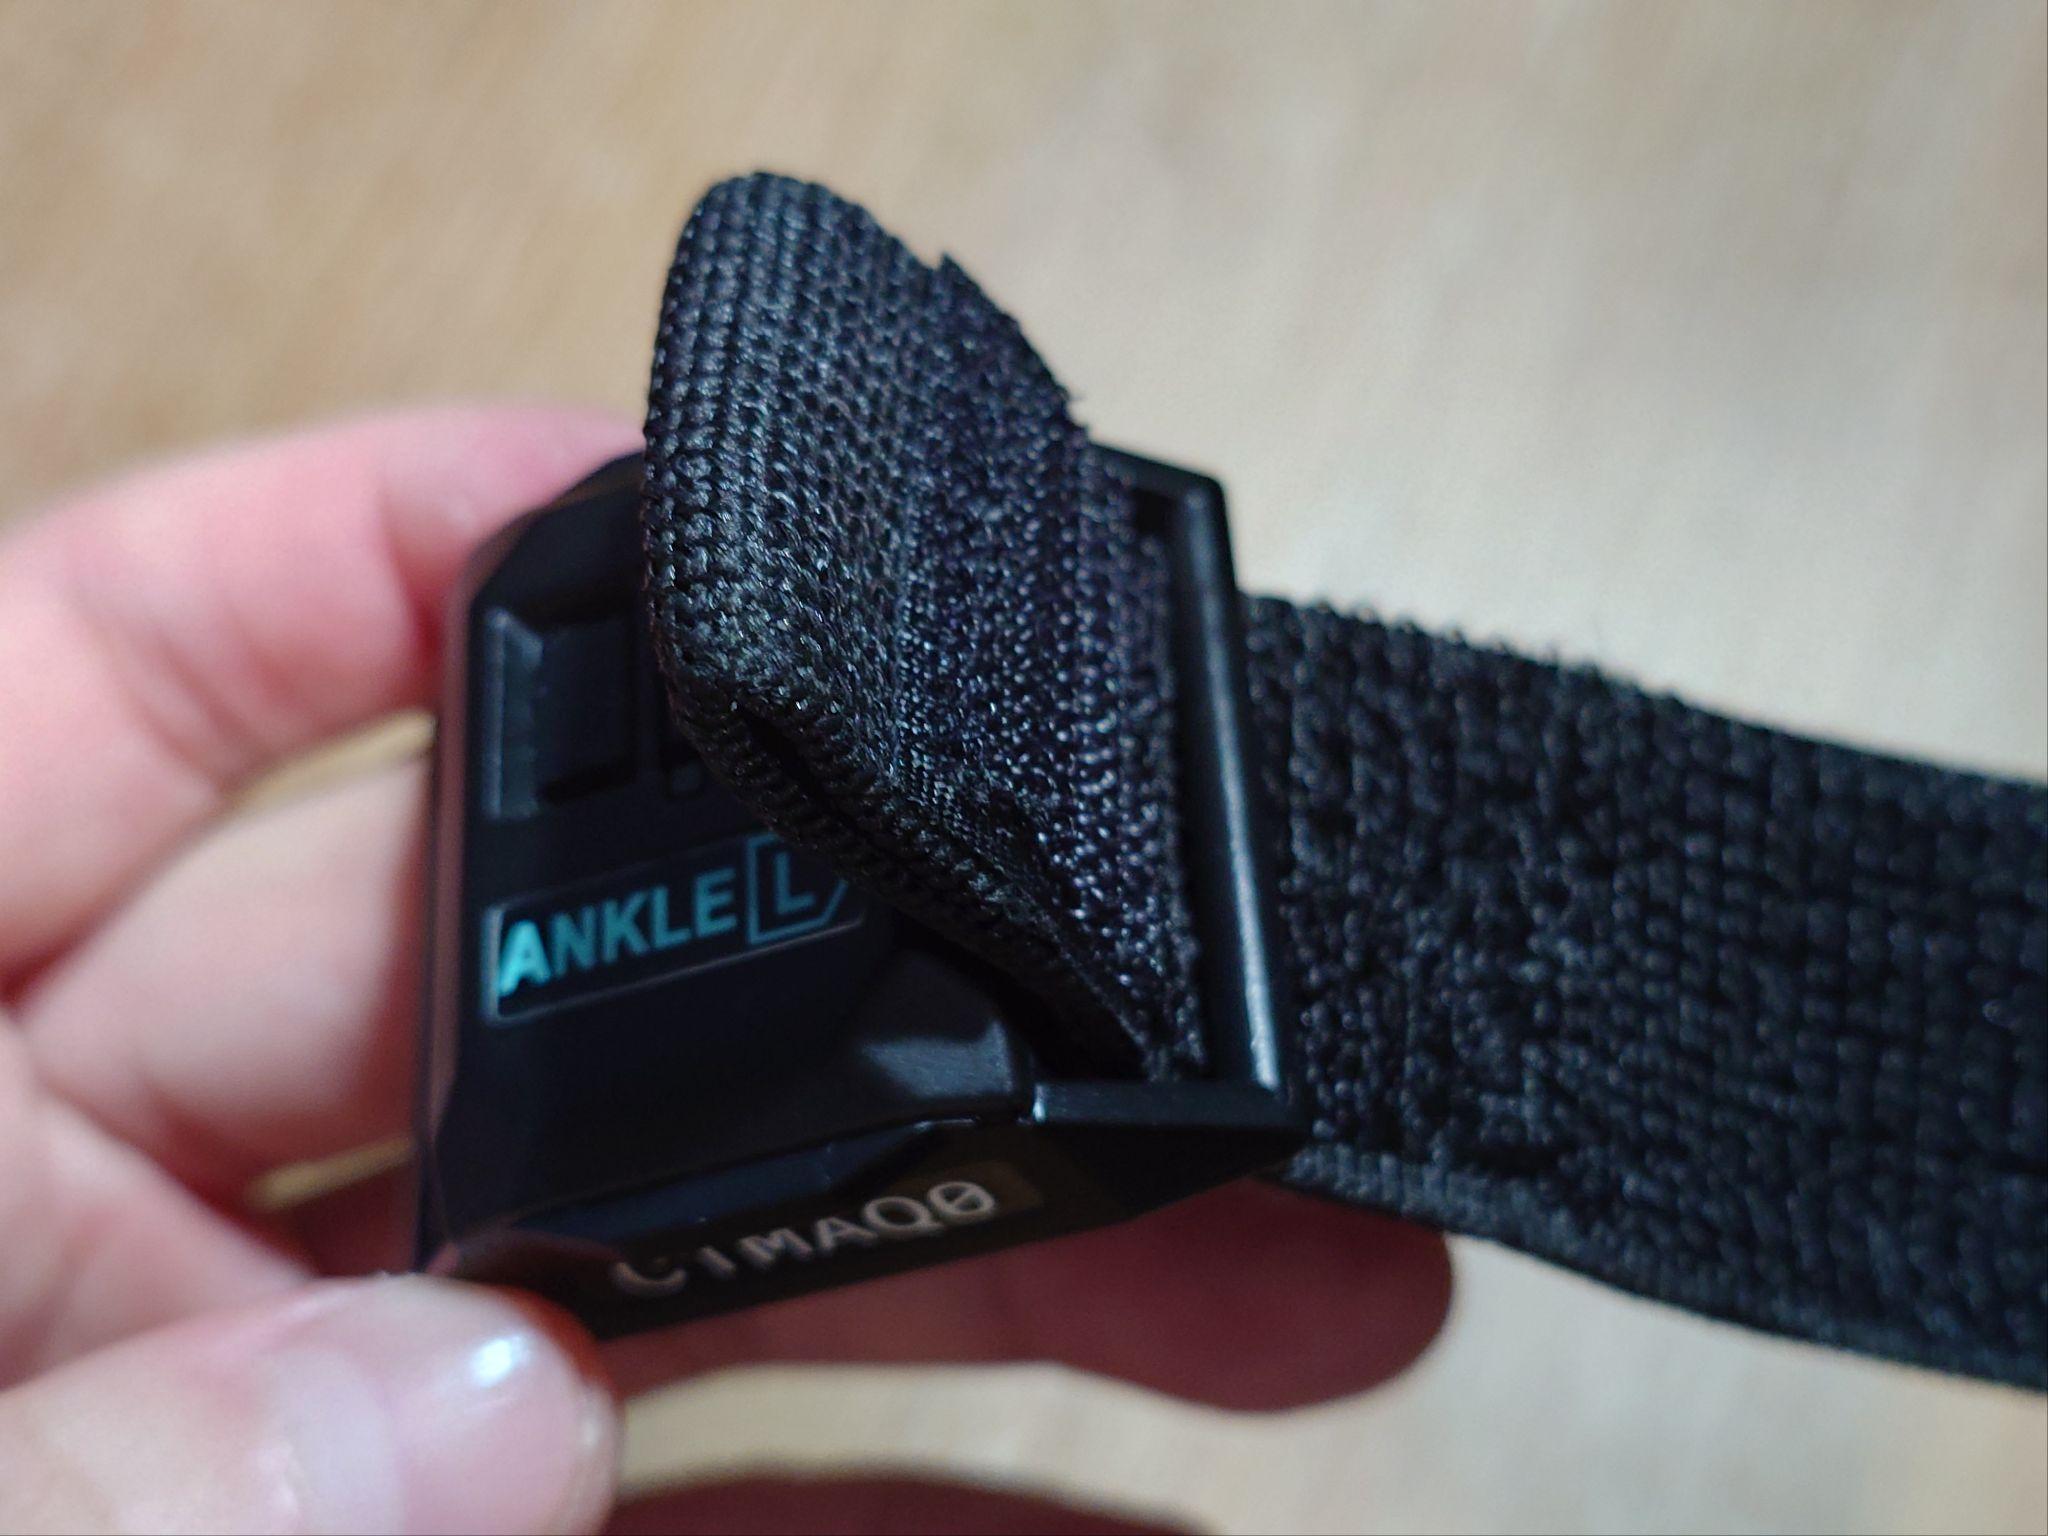
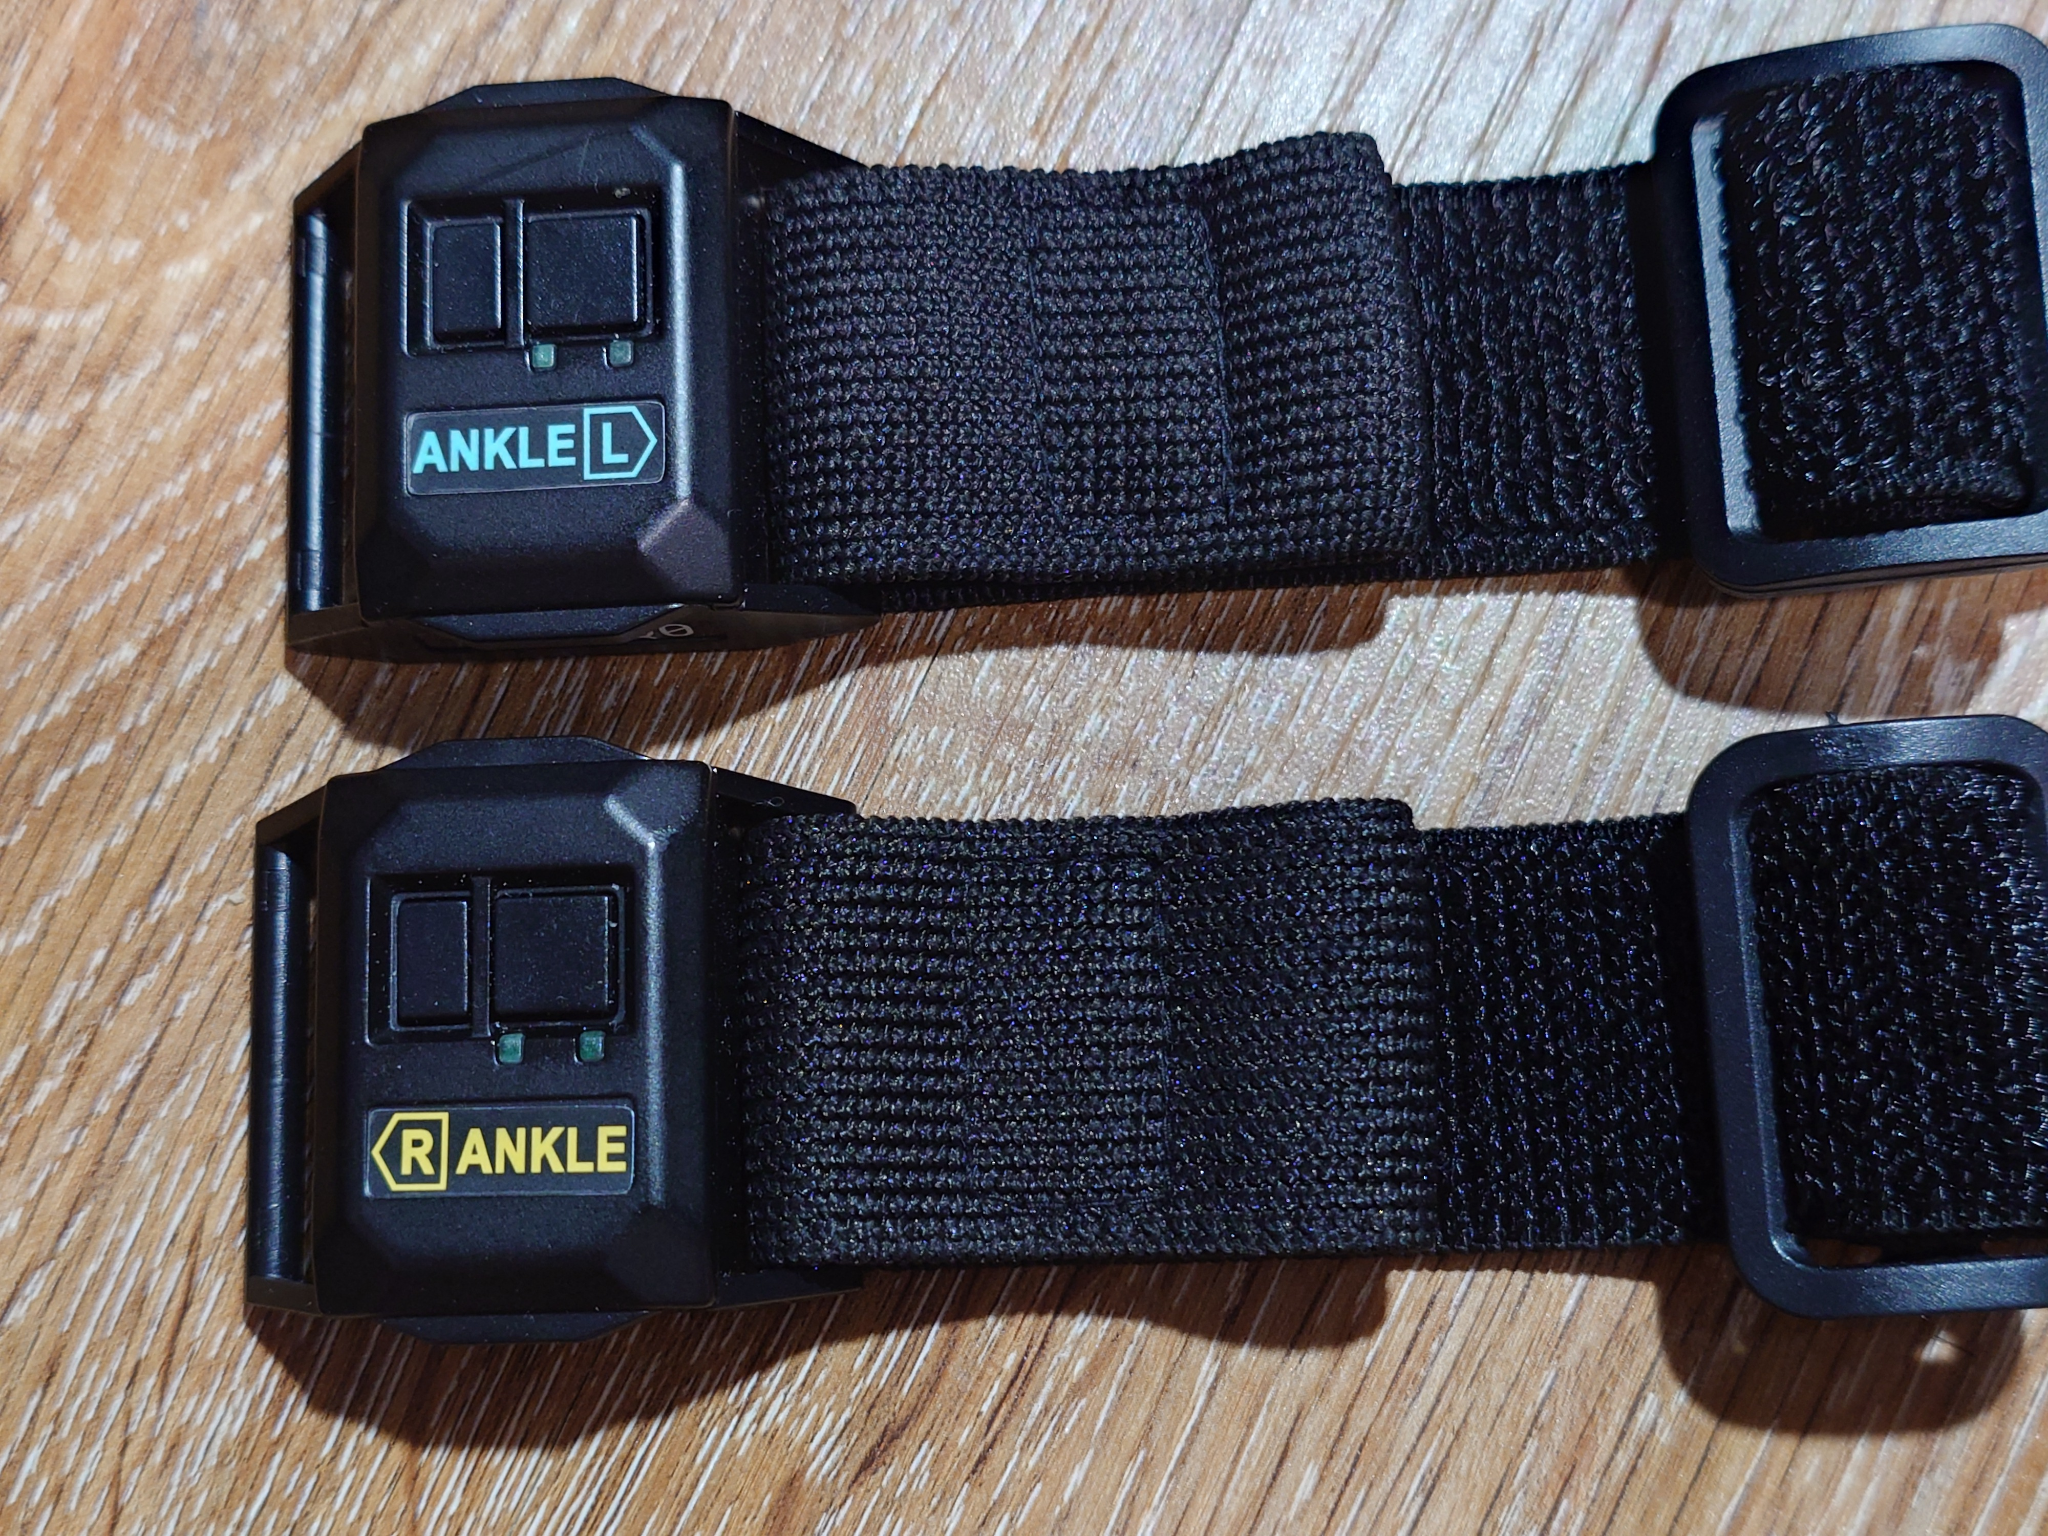
Section titled “5.4 Threading the Belts through the Right and Left Ankle Sensors”Pass the short straps with hook parts (ankle straps) through the ankle sensors. The position and direction of passing the strap are the same as above.
* The straps without hook parts are for the feet.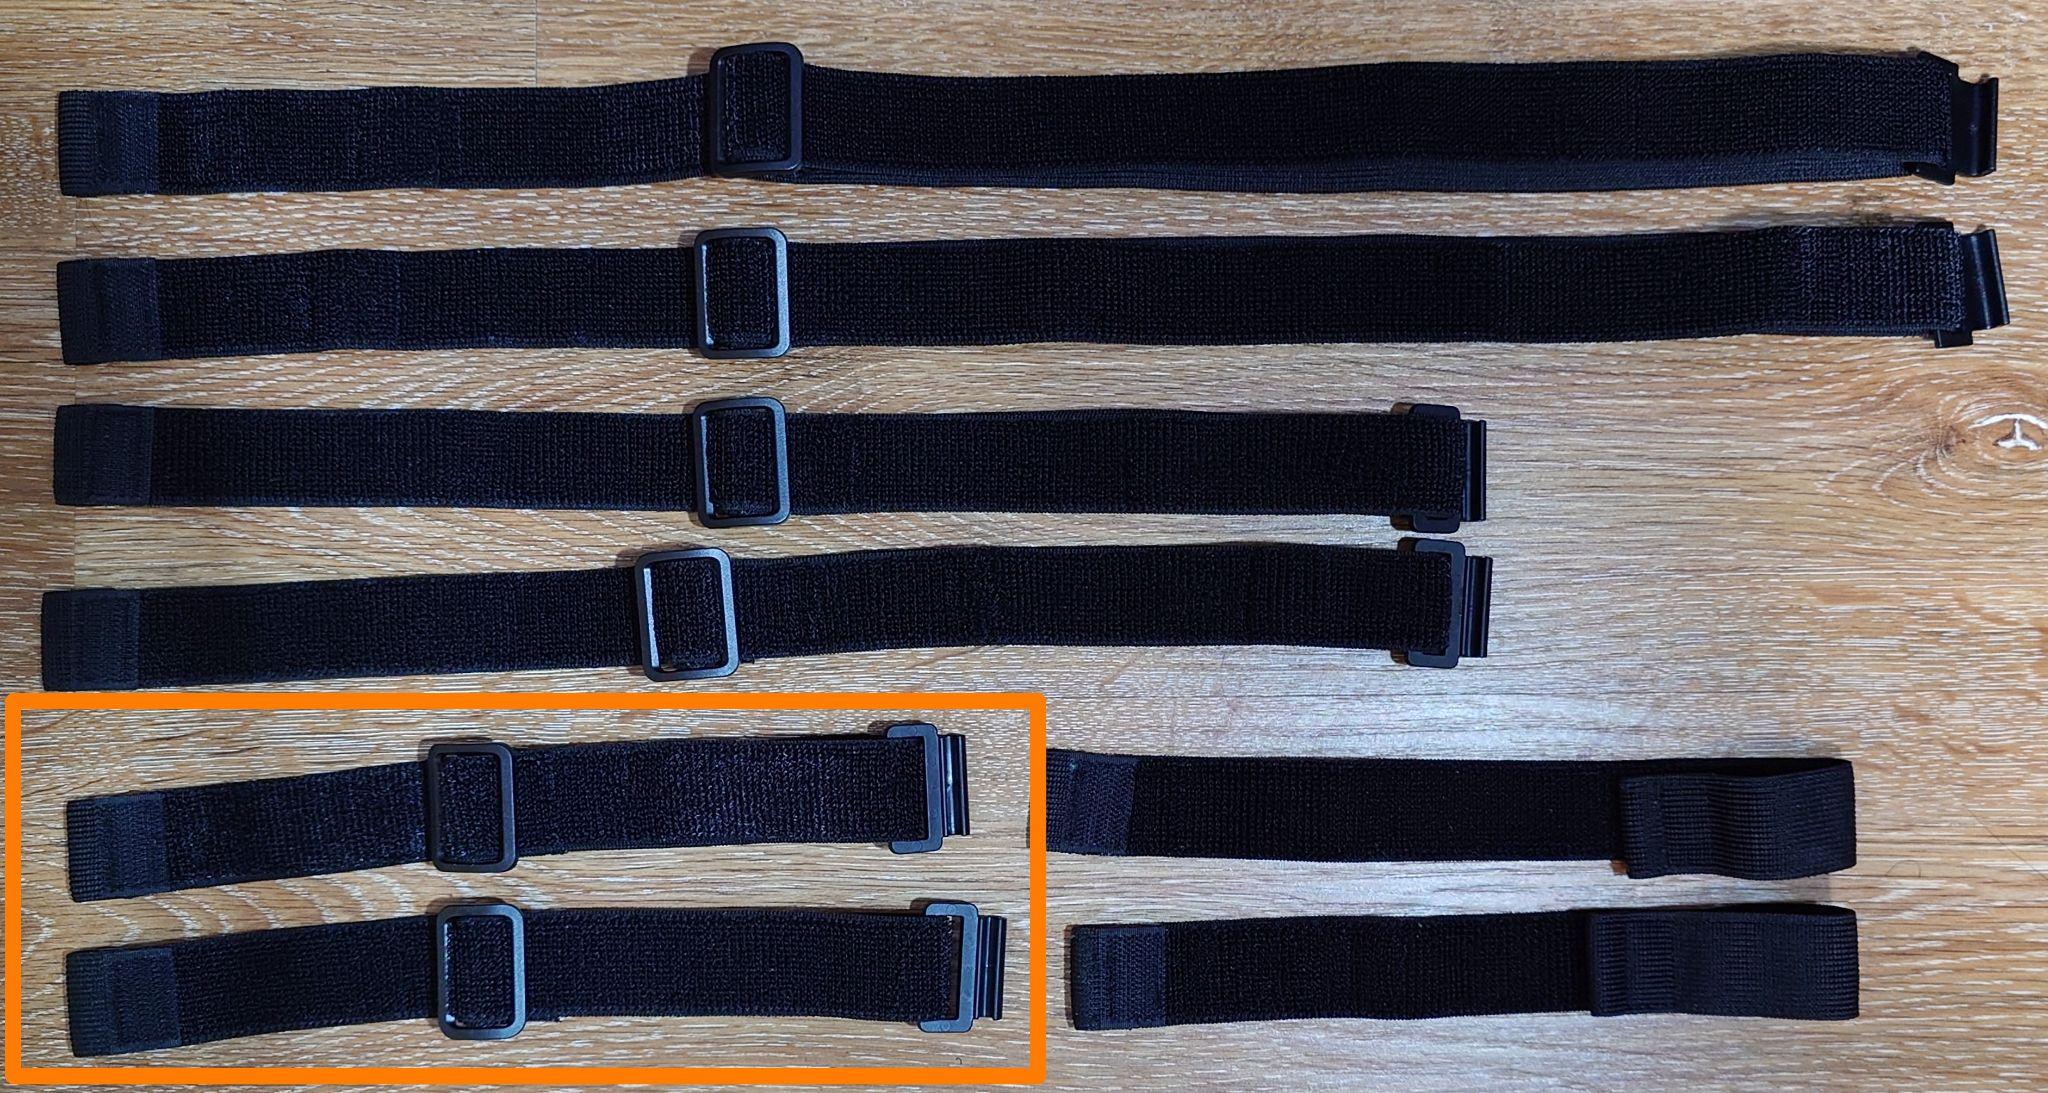
5.5 Threading the Belts through the Right and Left Foot Sensors
Section titled “5.5 Threading the Belts through the Right and Left Foot Sensors”Pass the short straps without hook parts (foot straps) through the foot sensors. Pass the straps through both belt loops from the back of the sensor so that the hook-and-loop fastener faces outward.
* The straps with hook parts are for the ankles.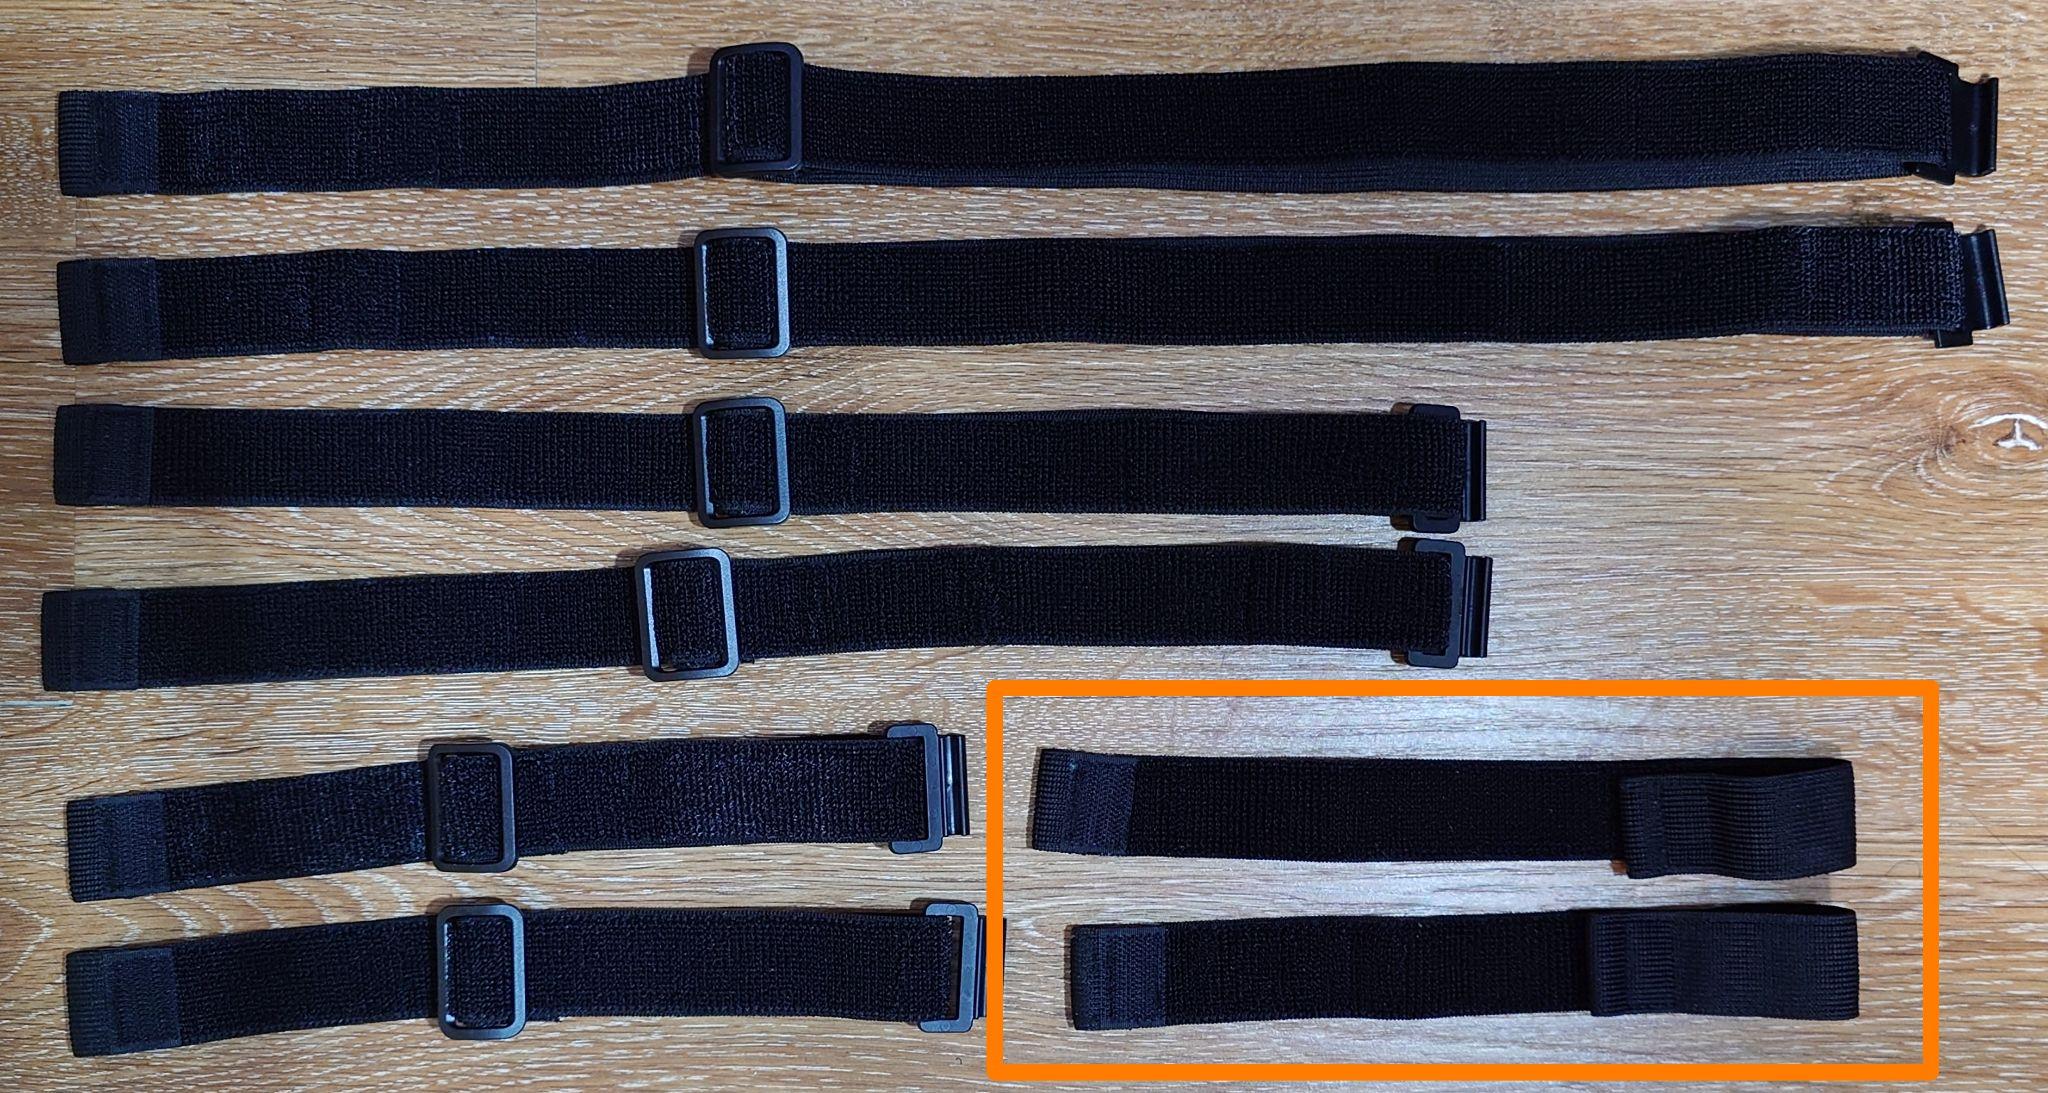
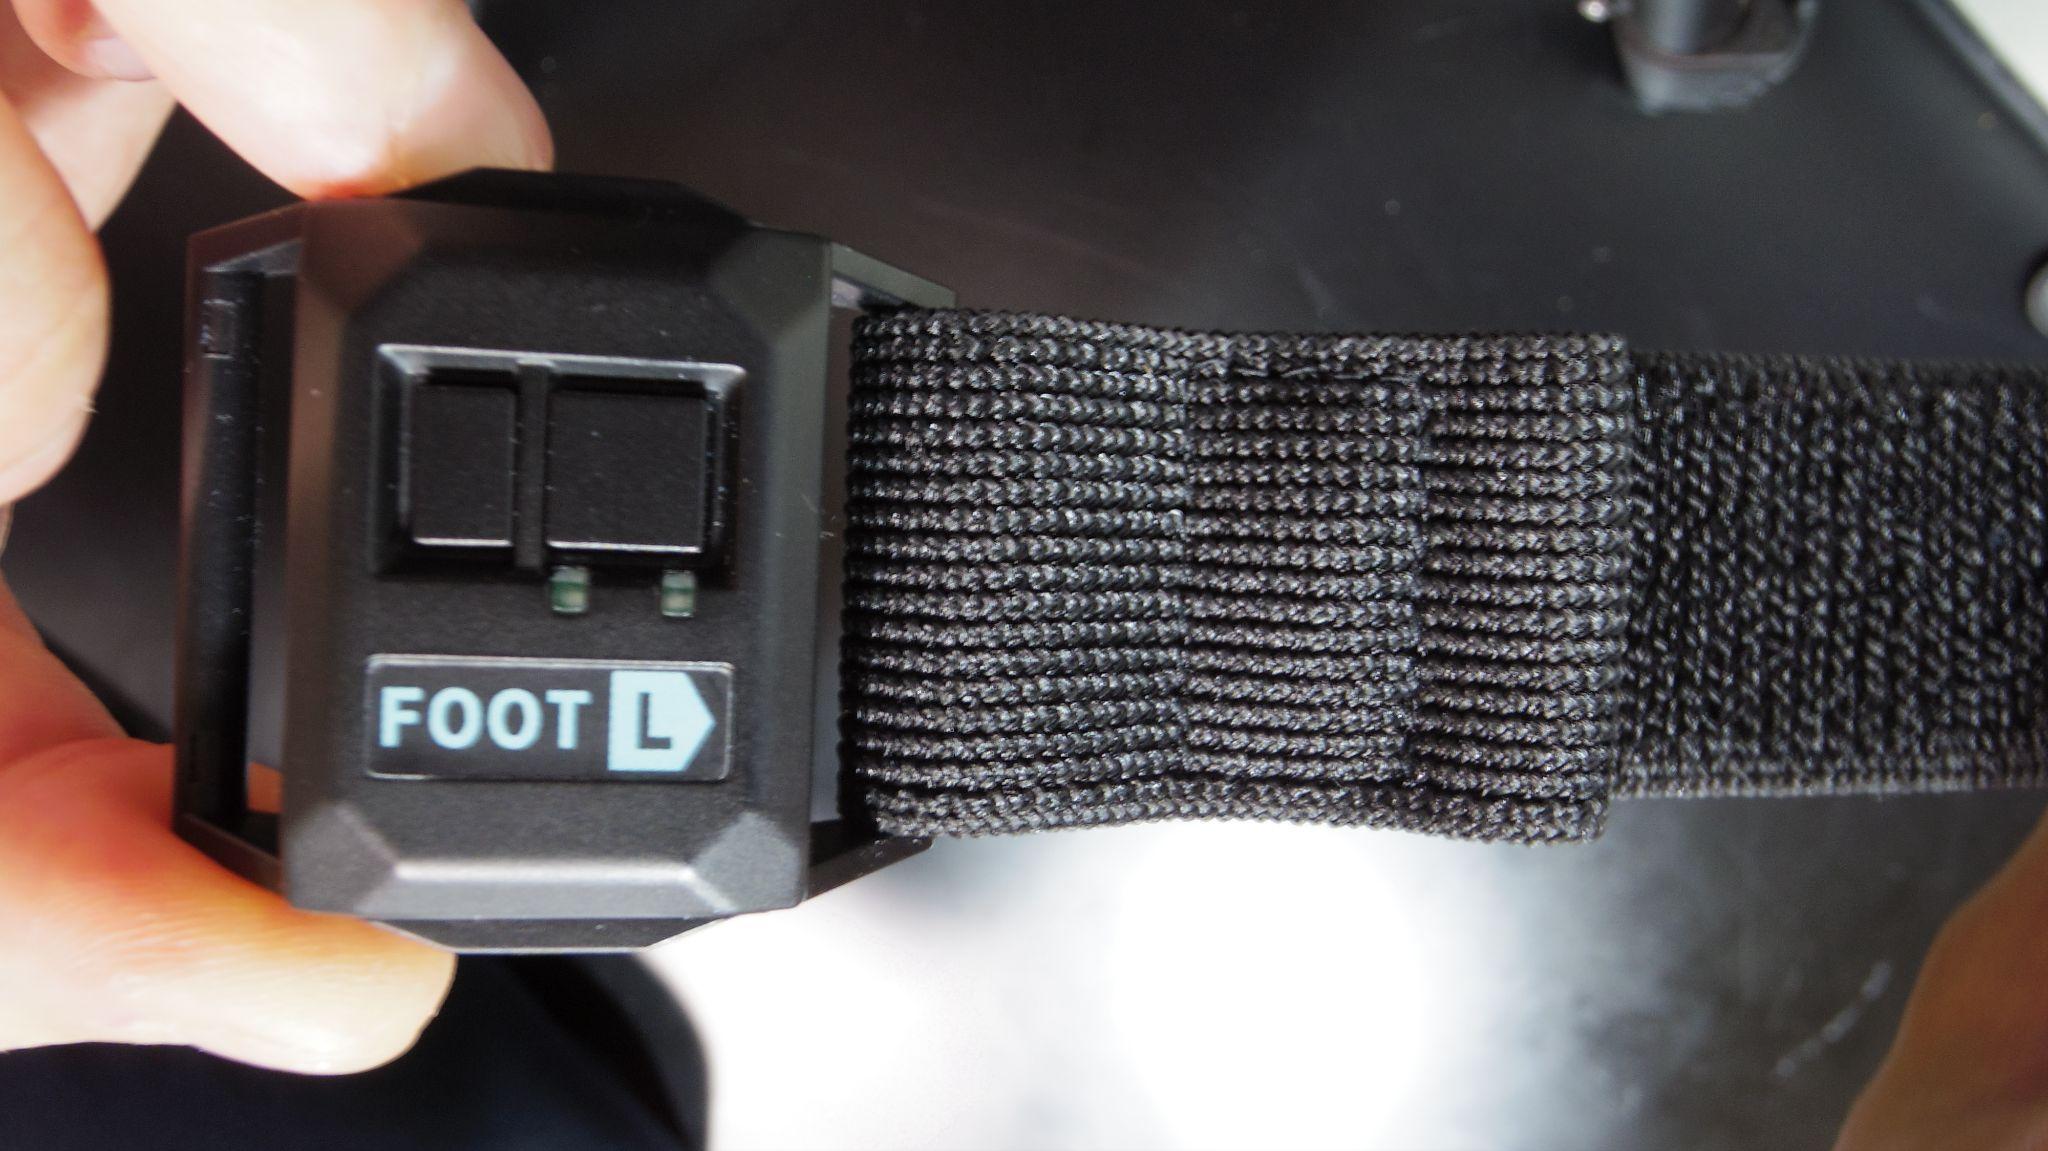
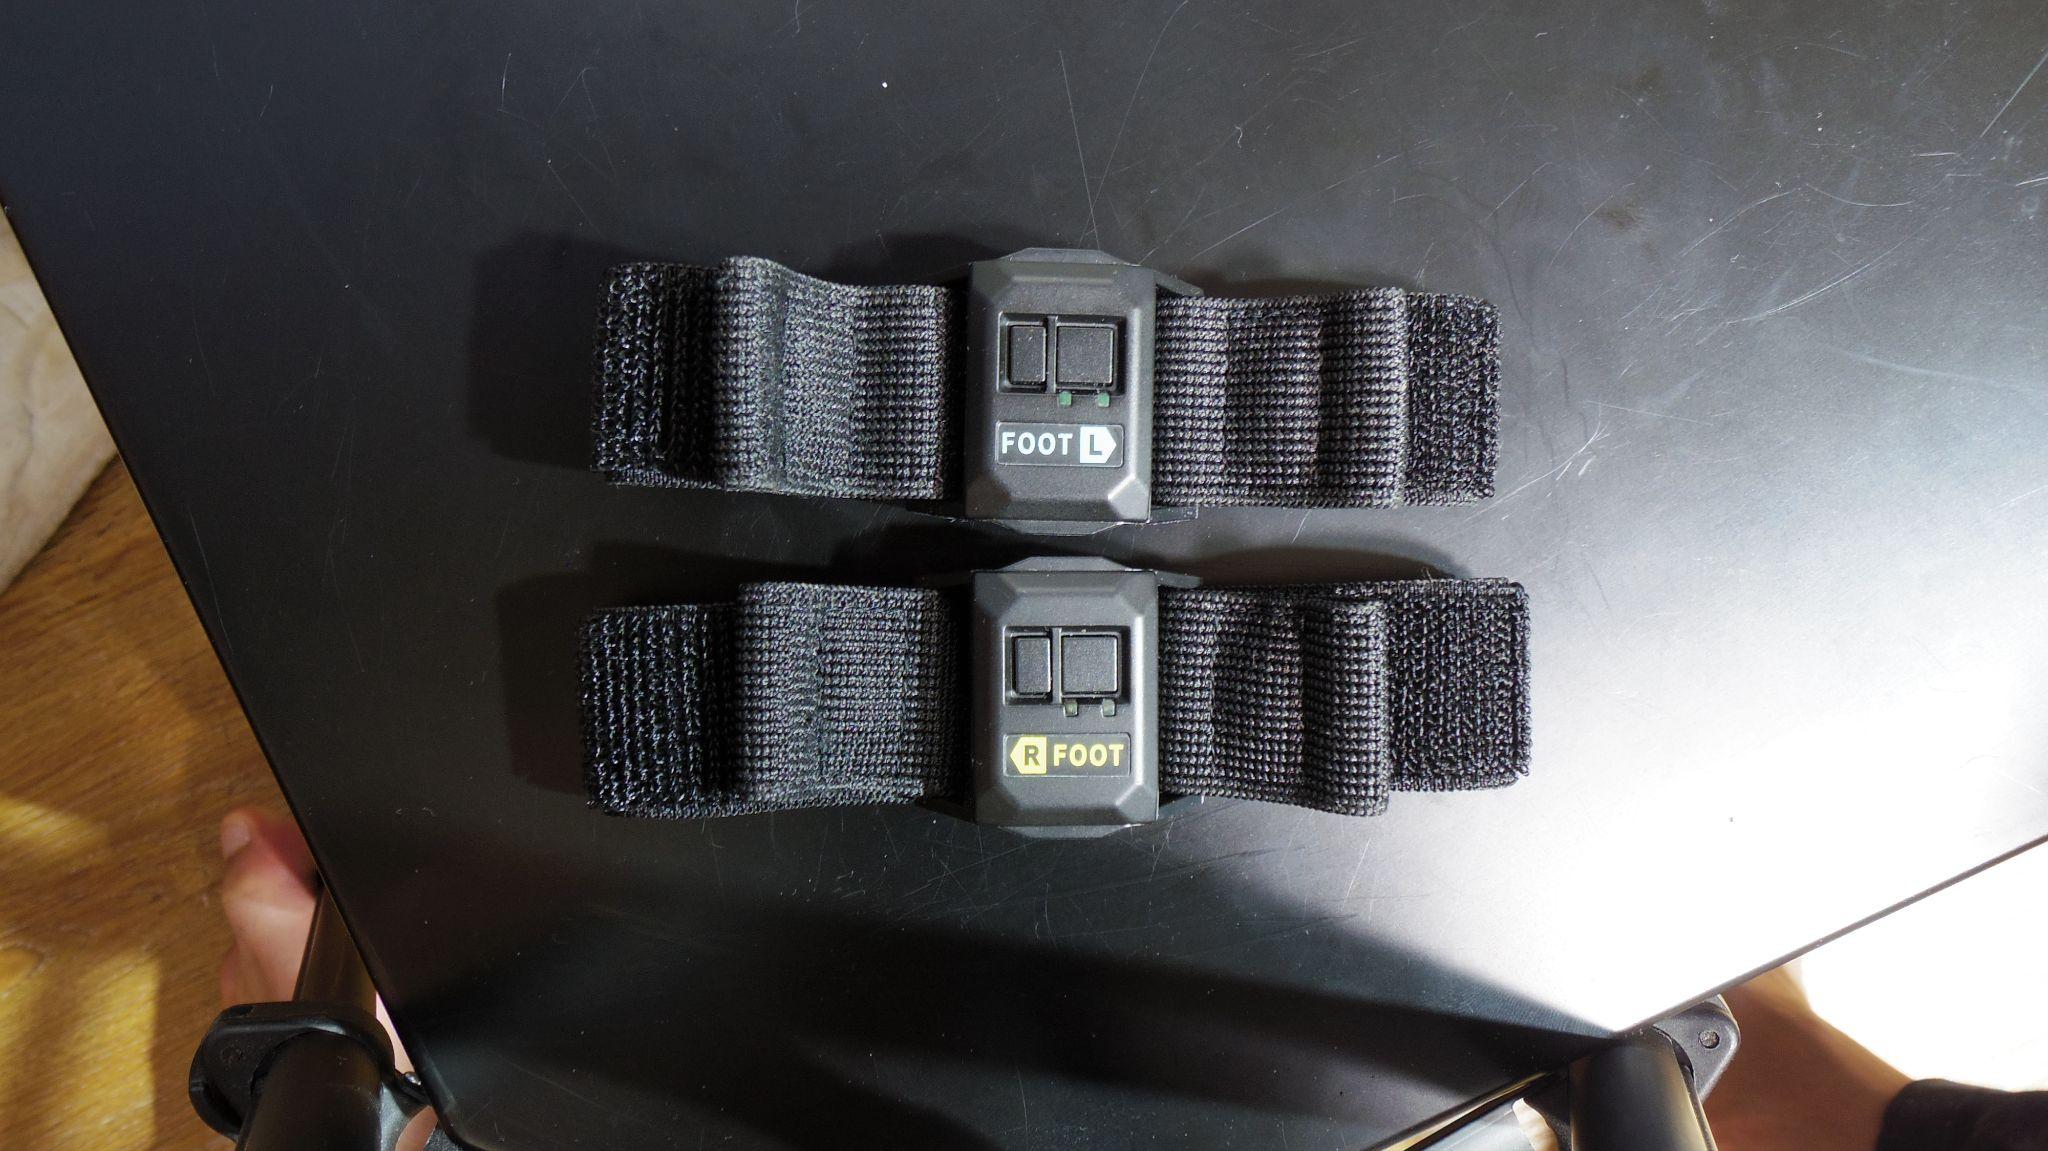
[Completed sensors & straps]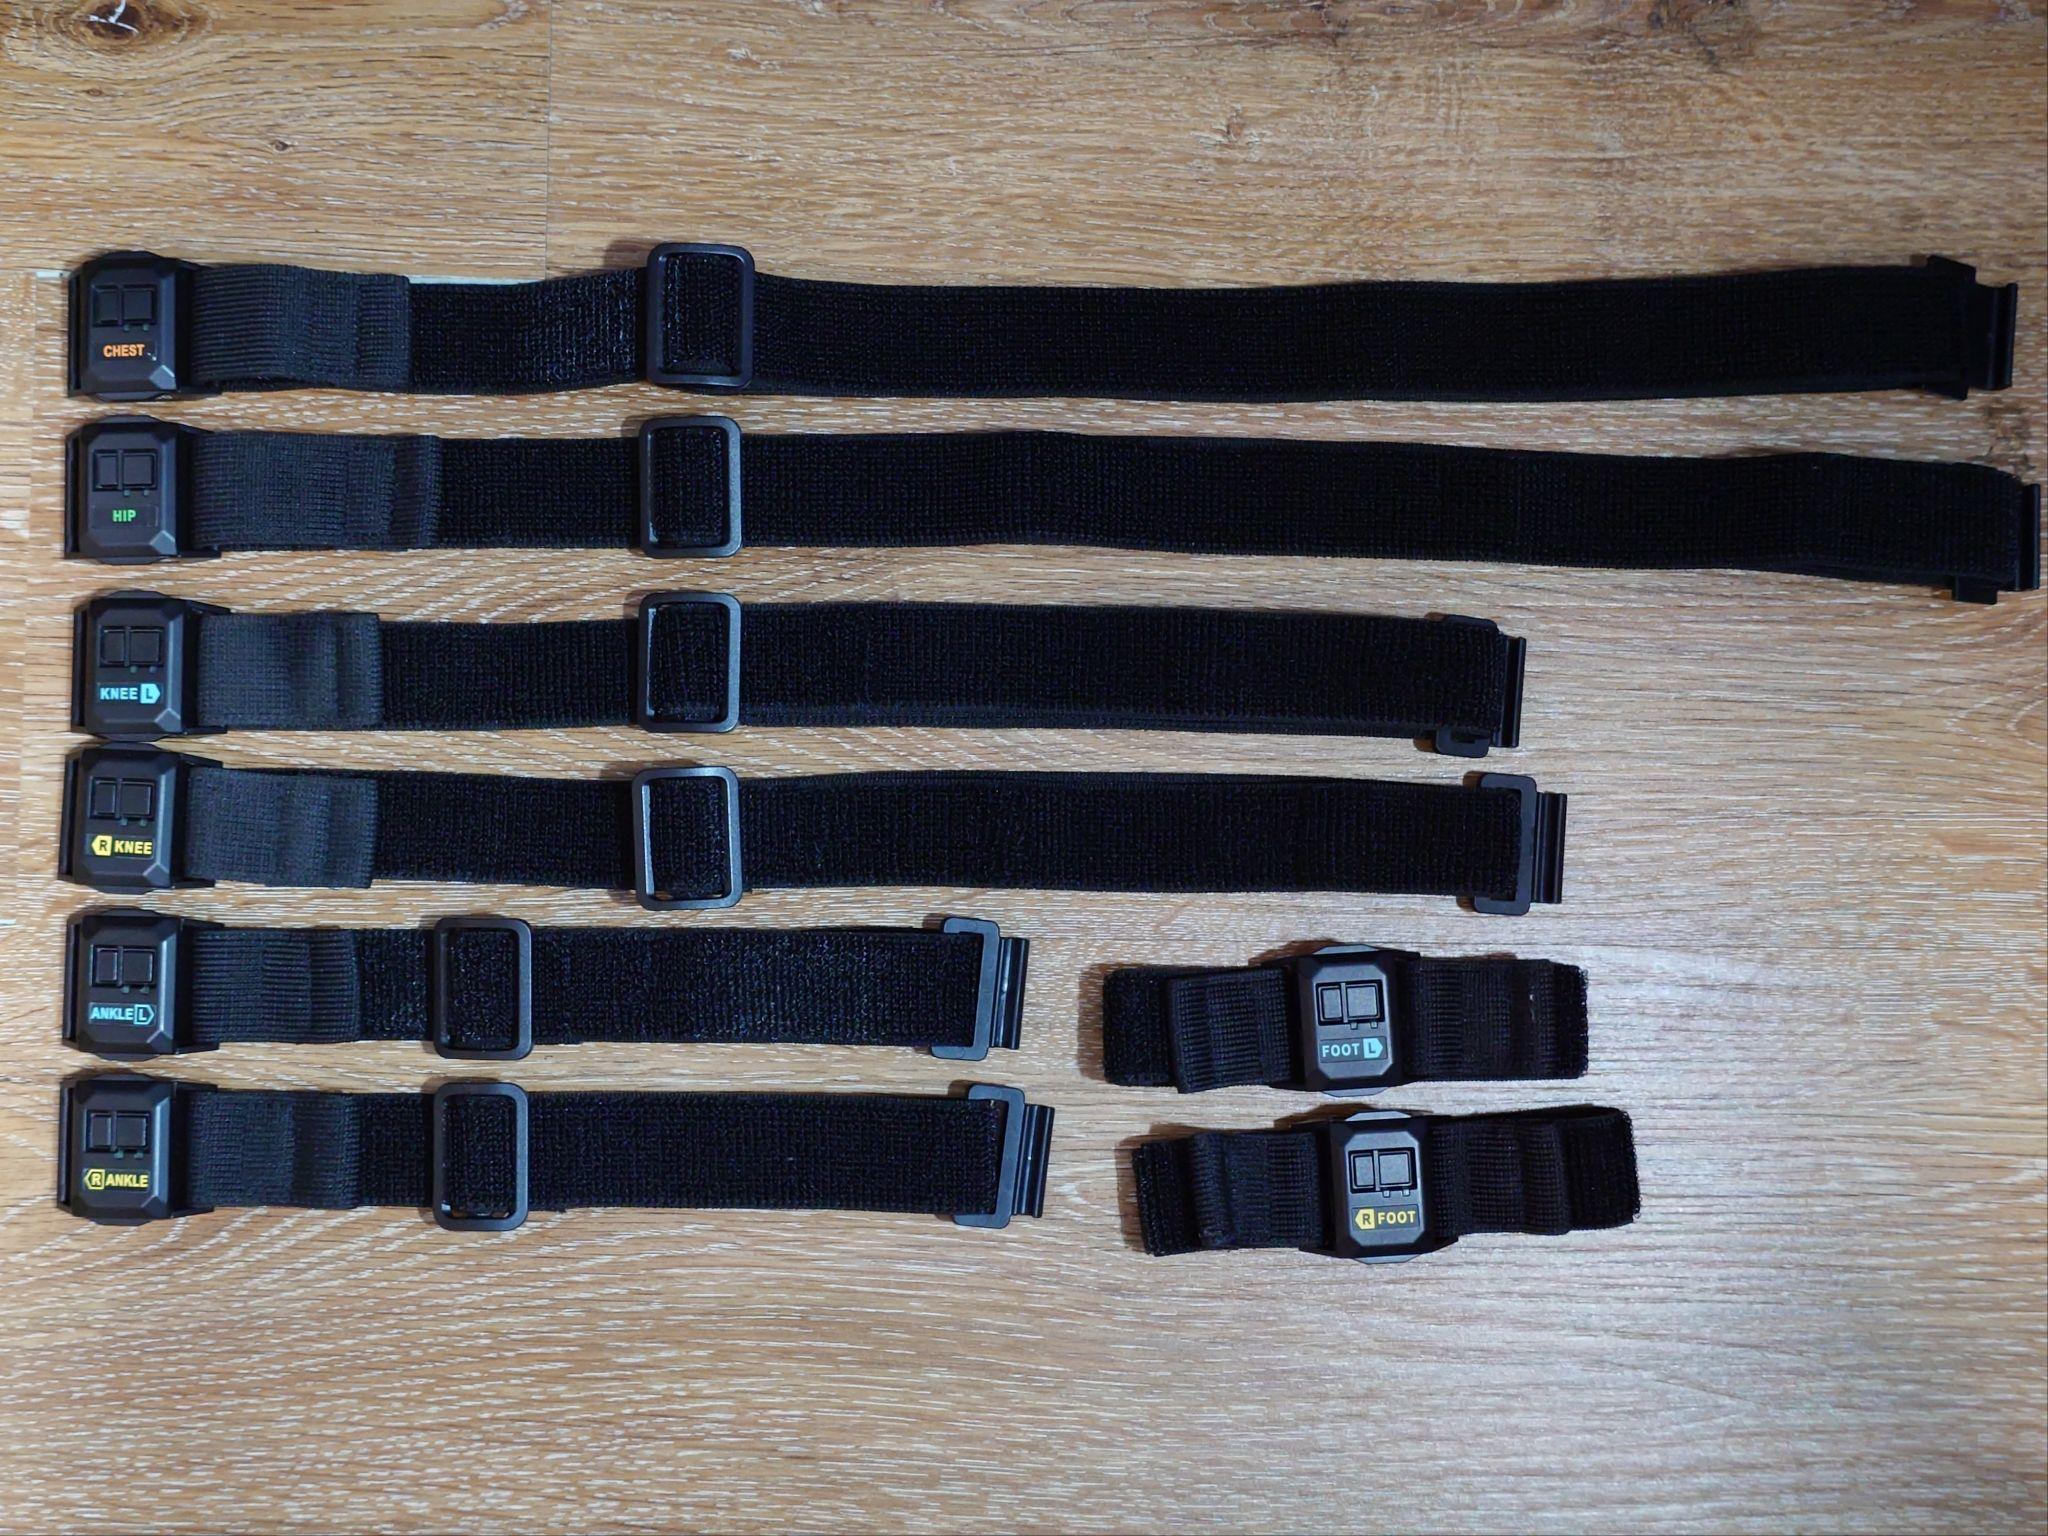
6. Put on the sensors
Section titled “6. Put on the sensors”6.1 Check the orientation and mounting position.
Section titled “6.1 Check the orientation and mounting position.”Prepare the belts assembled in Assembling the “HaritoraX 2 Pro”
Put on each sensor on your body. The sensor has an installation position and a vertical direction. Please note that it will not work properly if you put it on by wrong direction or position.
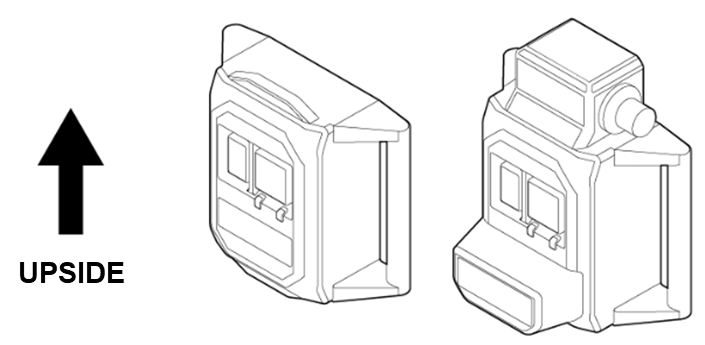
Attach the eight sensors as shown in the figure below.
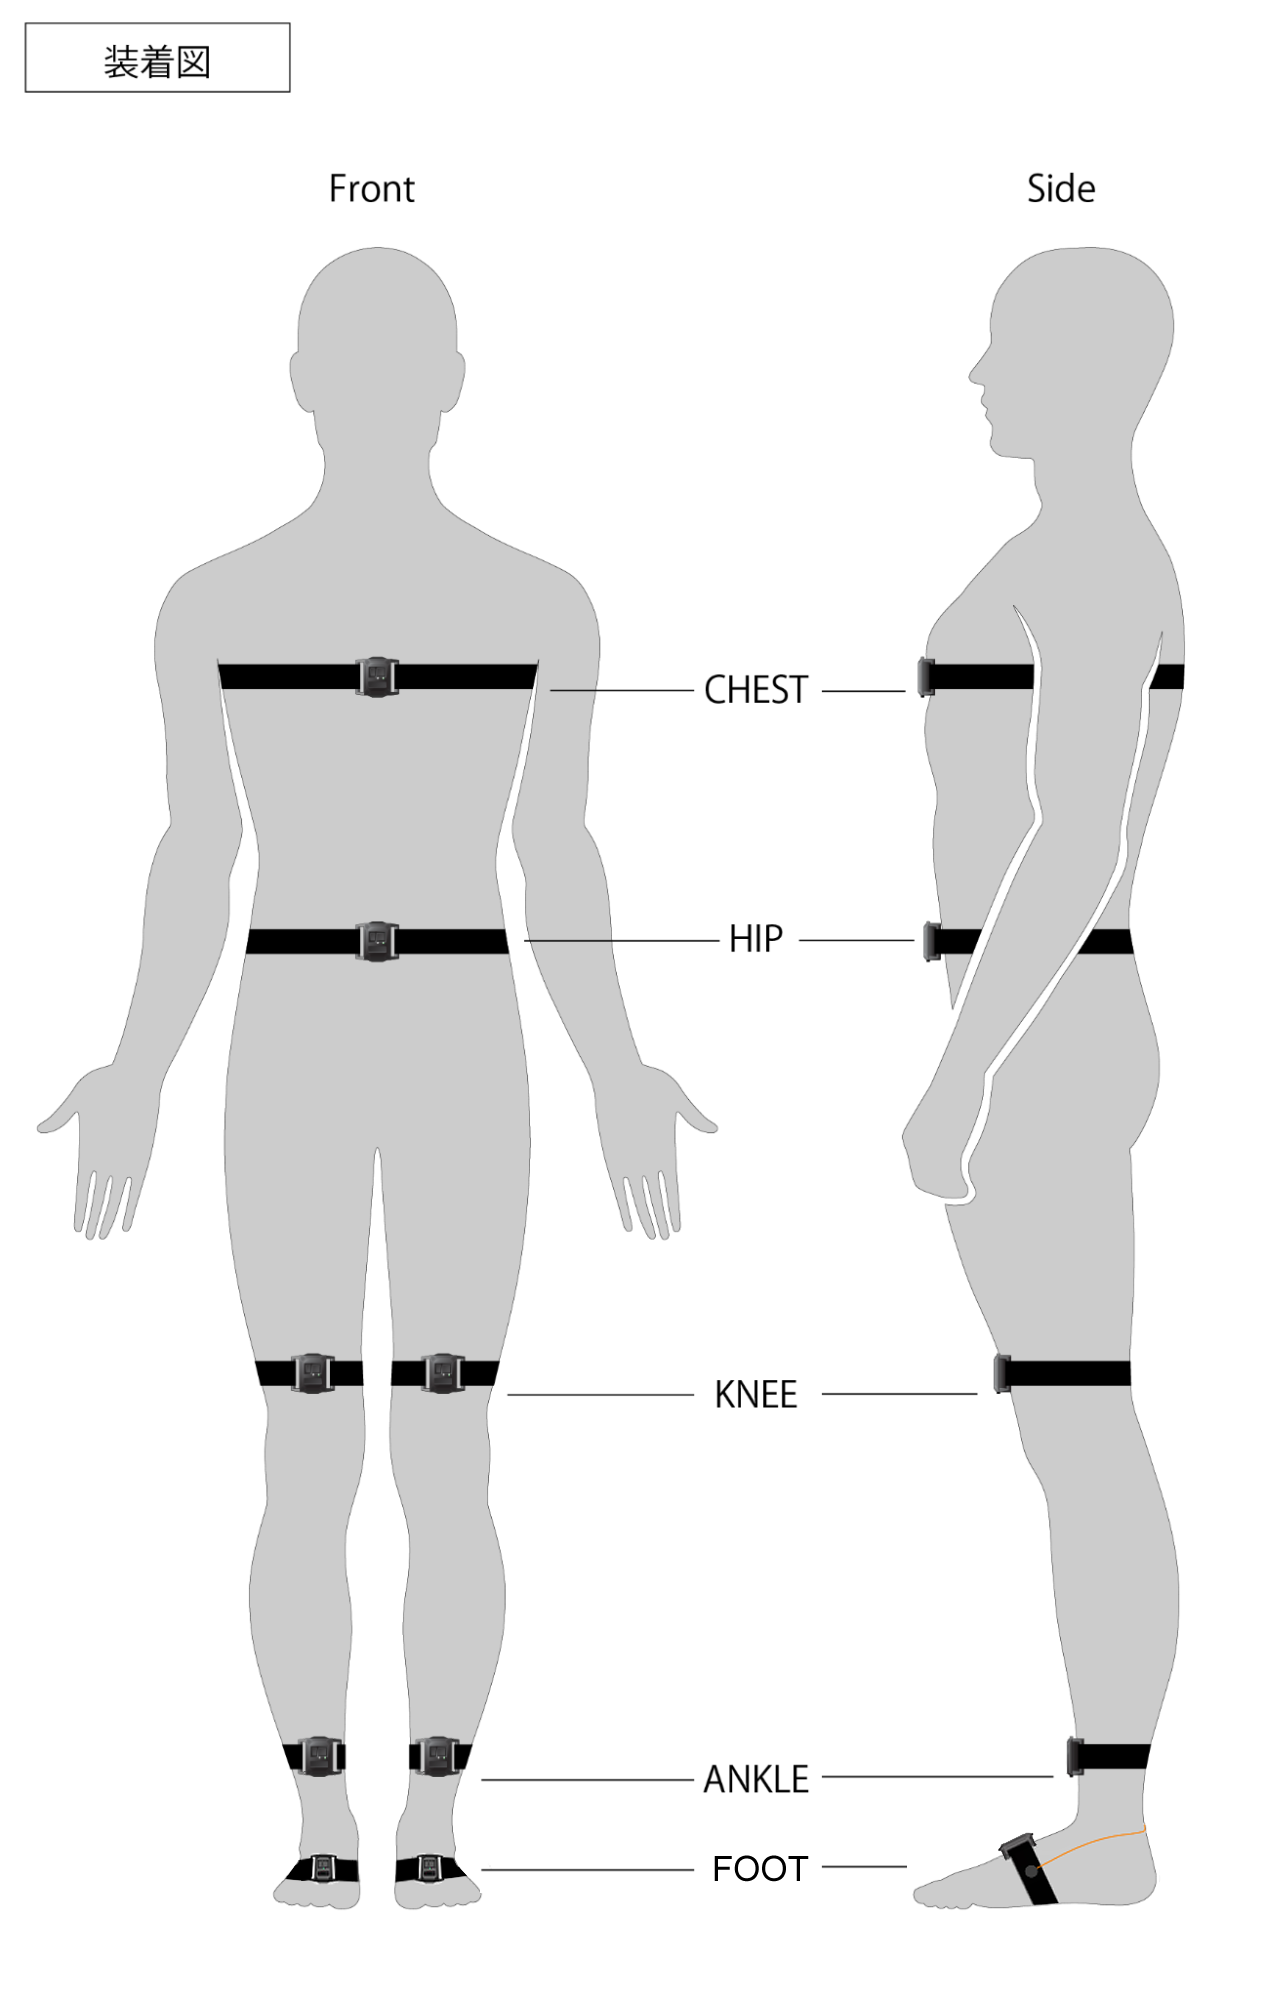
6.2 Attaching the Sensors from Chest to Ankles
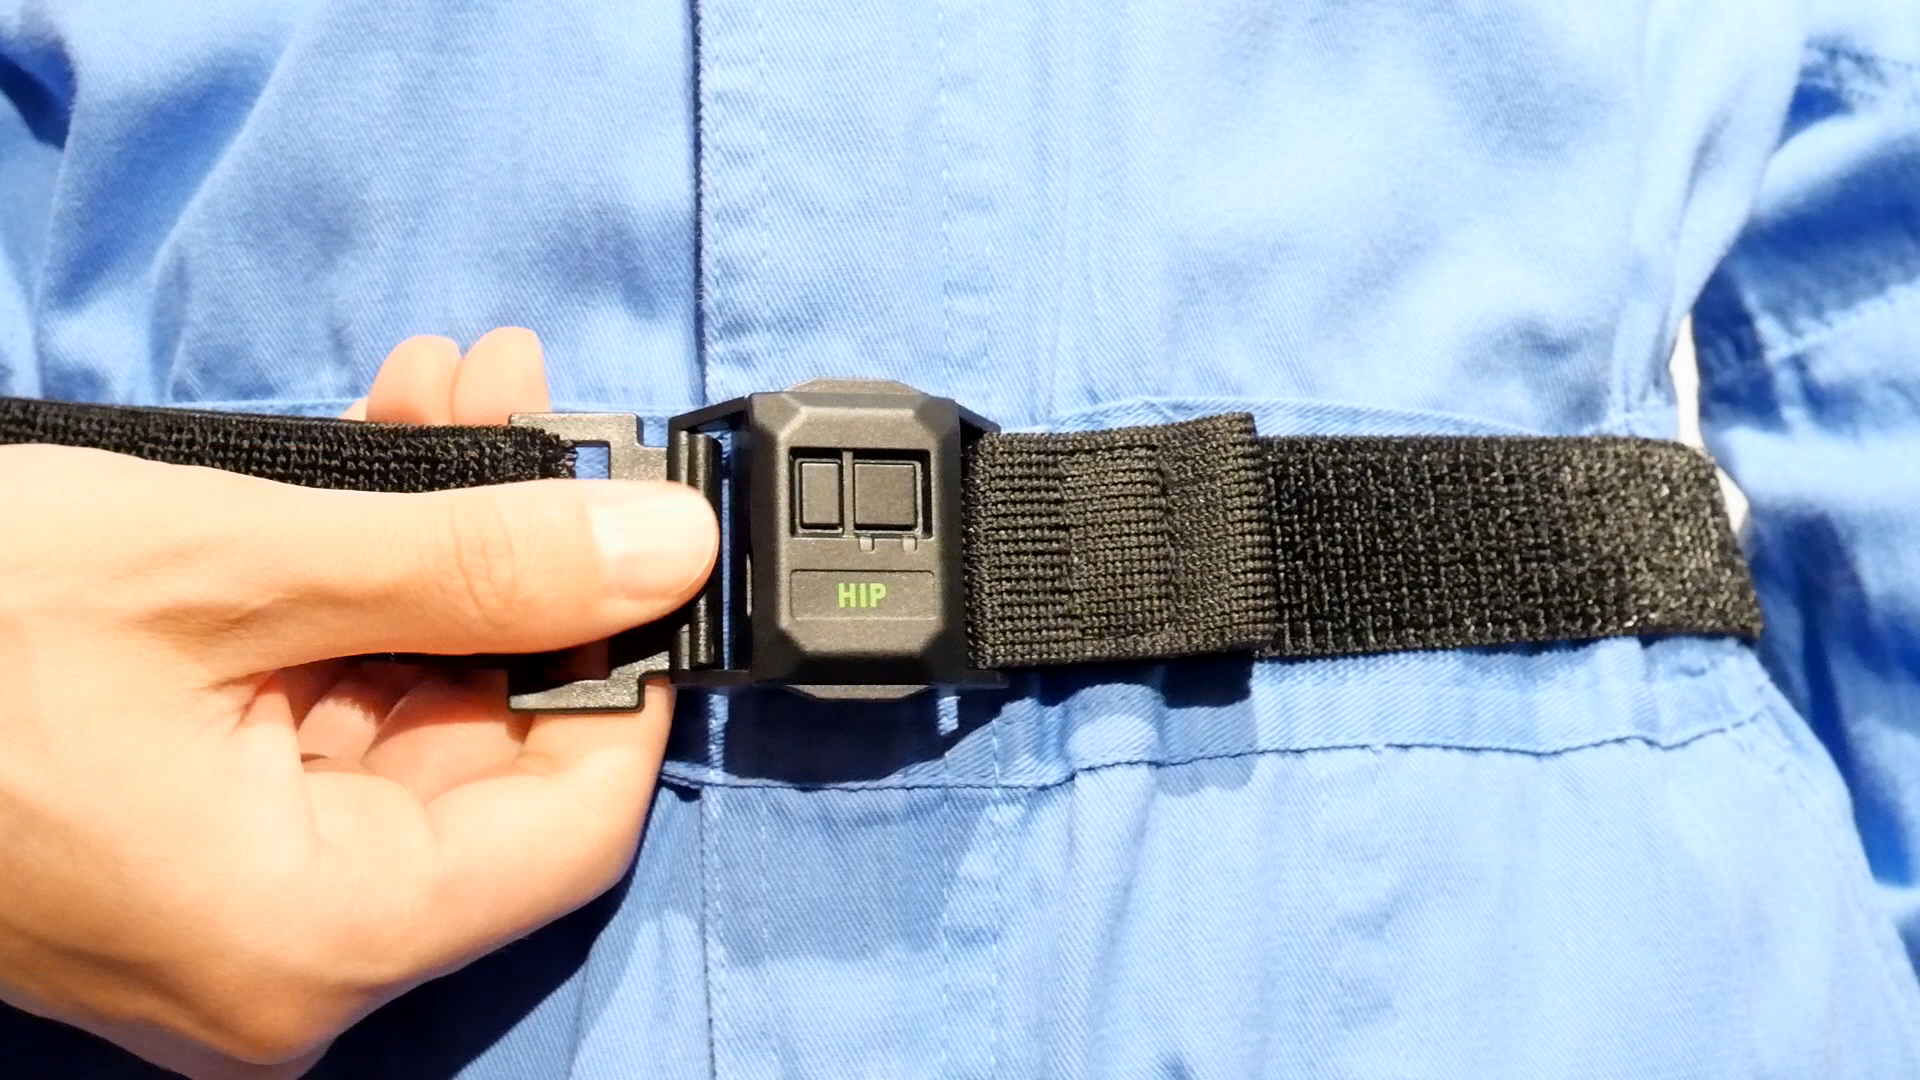
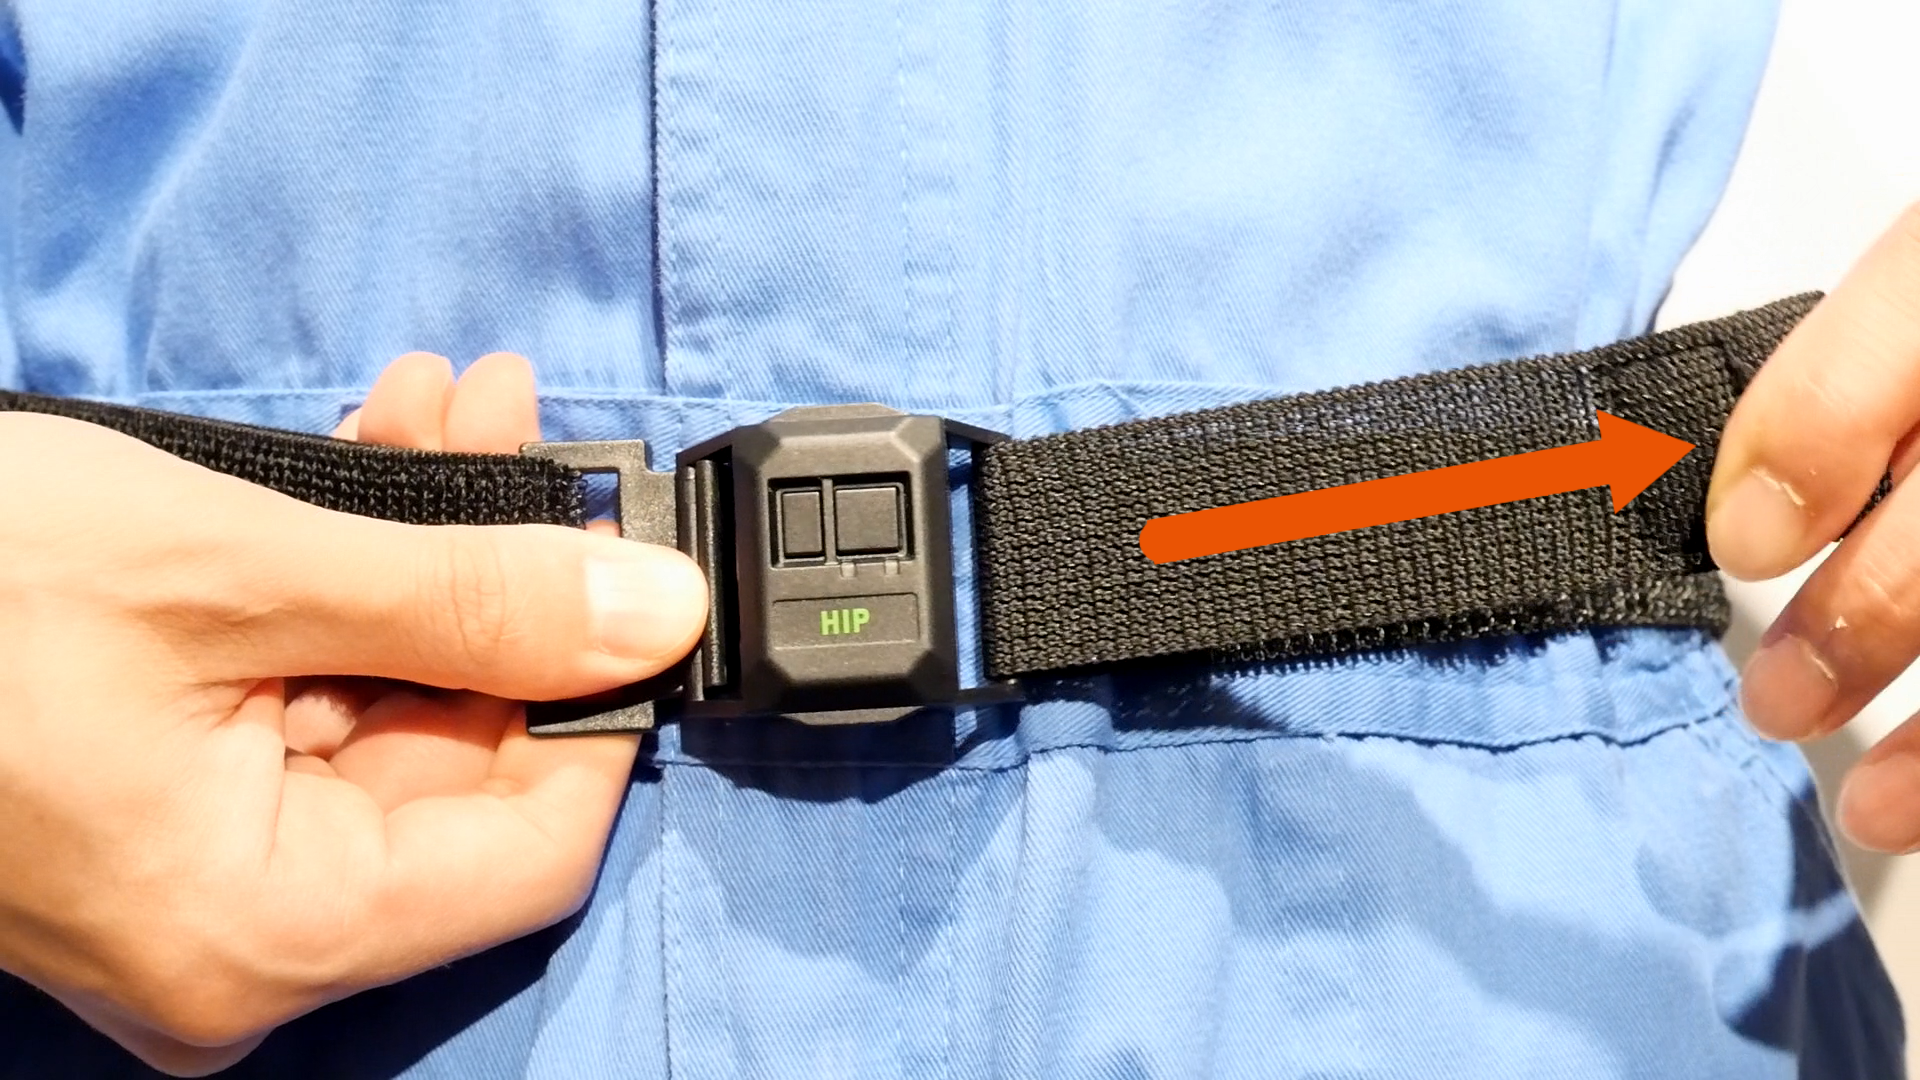
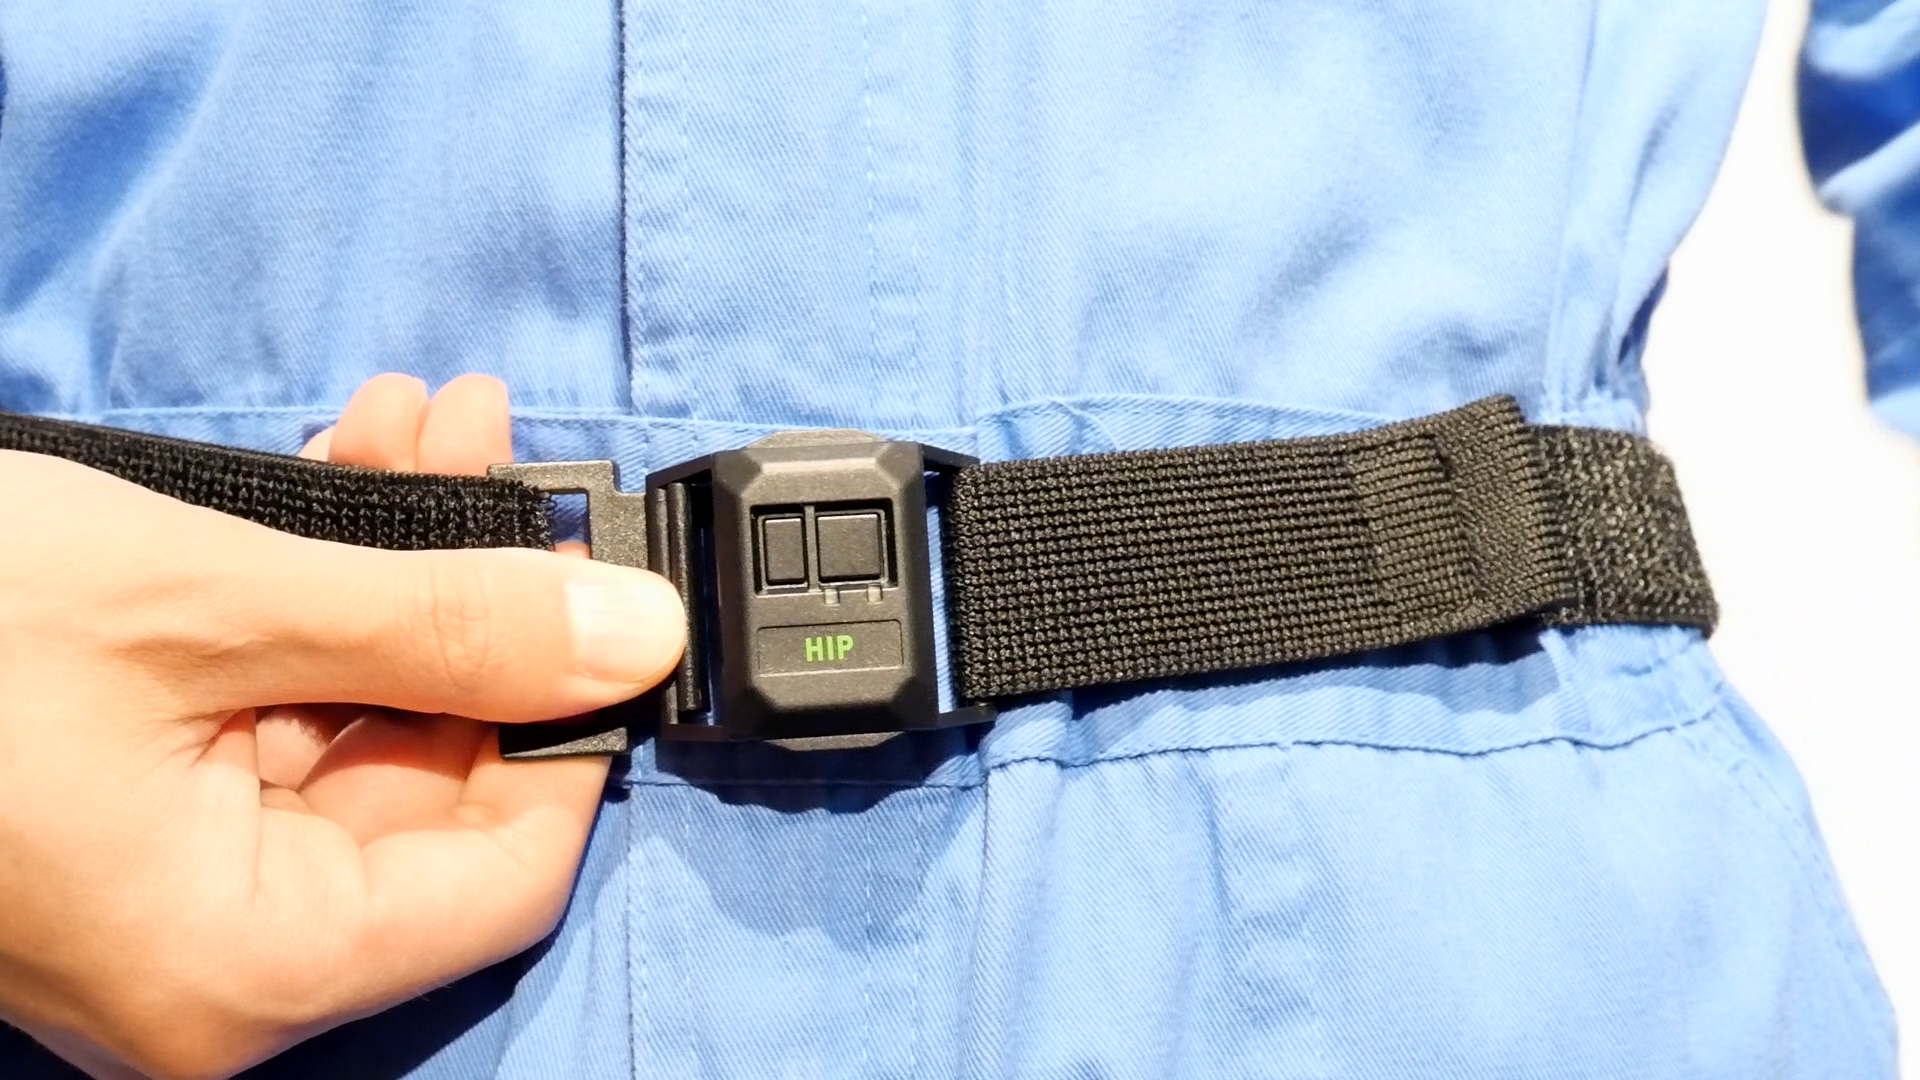
Section titled “6.2 Attaching the Sensors from Chest to Ankles”Attach the chest, hip, knee, and ankle sensors.
Make sure to attach the hook parts securely to the main sensor units.
If the belt feels loose, hold down the sensor and the hook part, then peel off the hook-and-loop fastener on the opposite side once. Pull the belt to adjust the tightness and fasten it again.
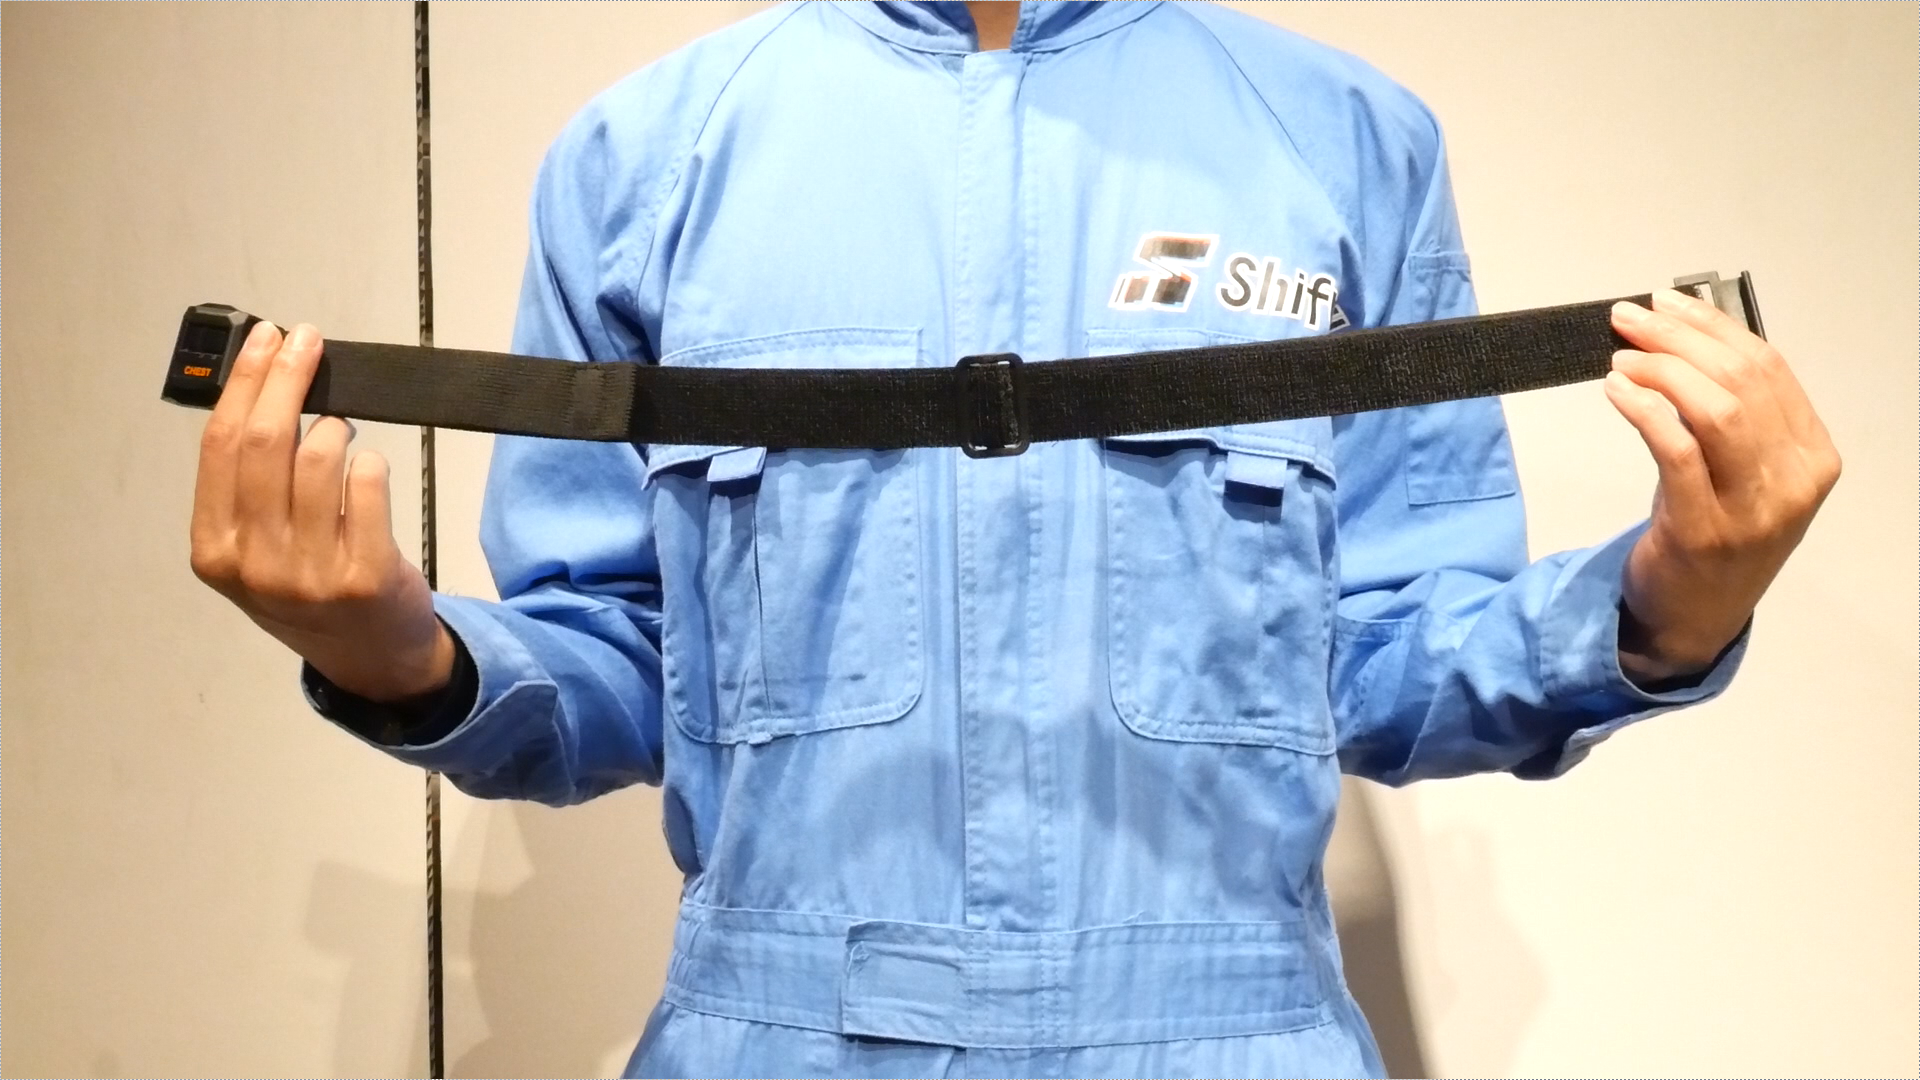
6.3 Attaching the Foot Sensors
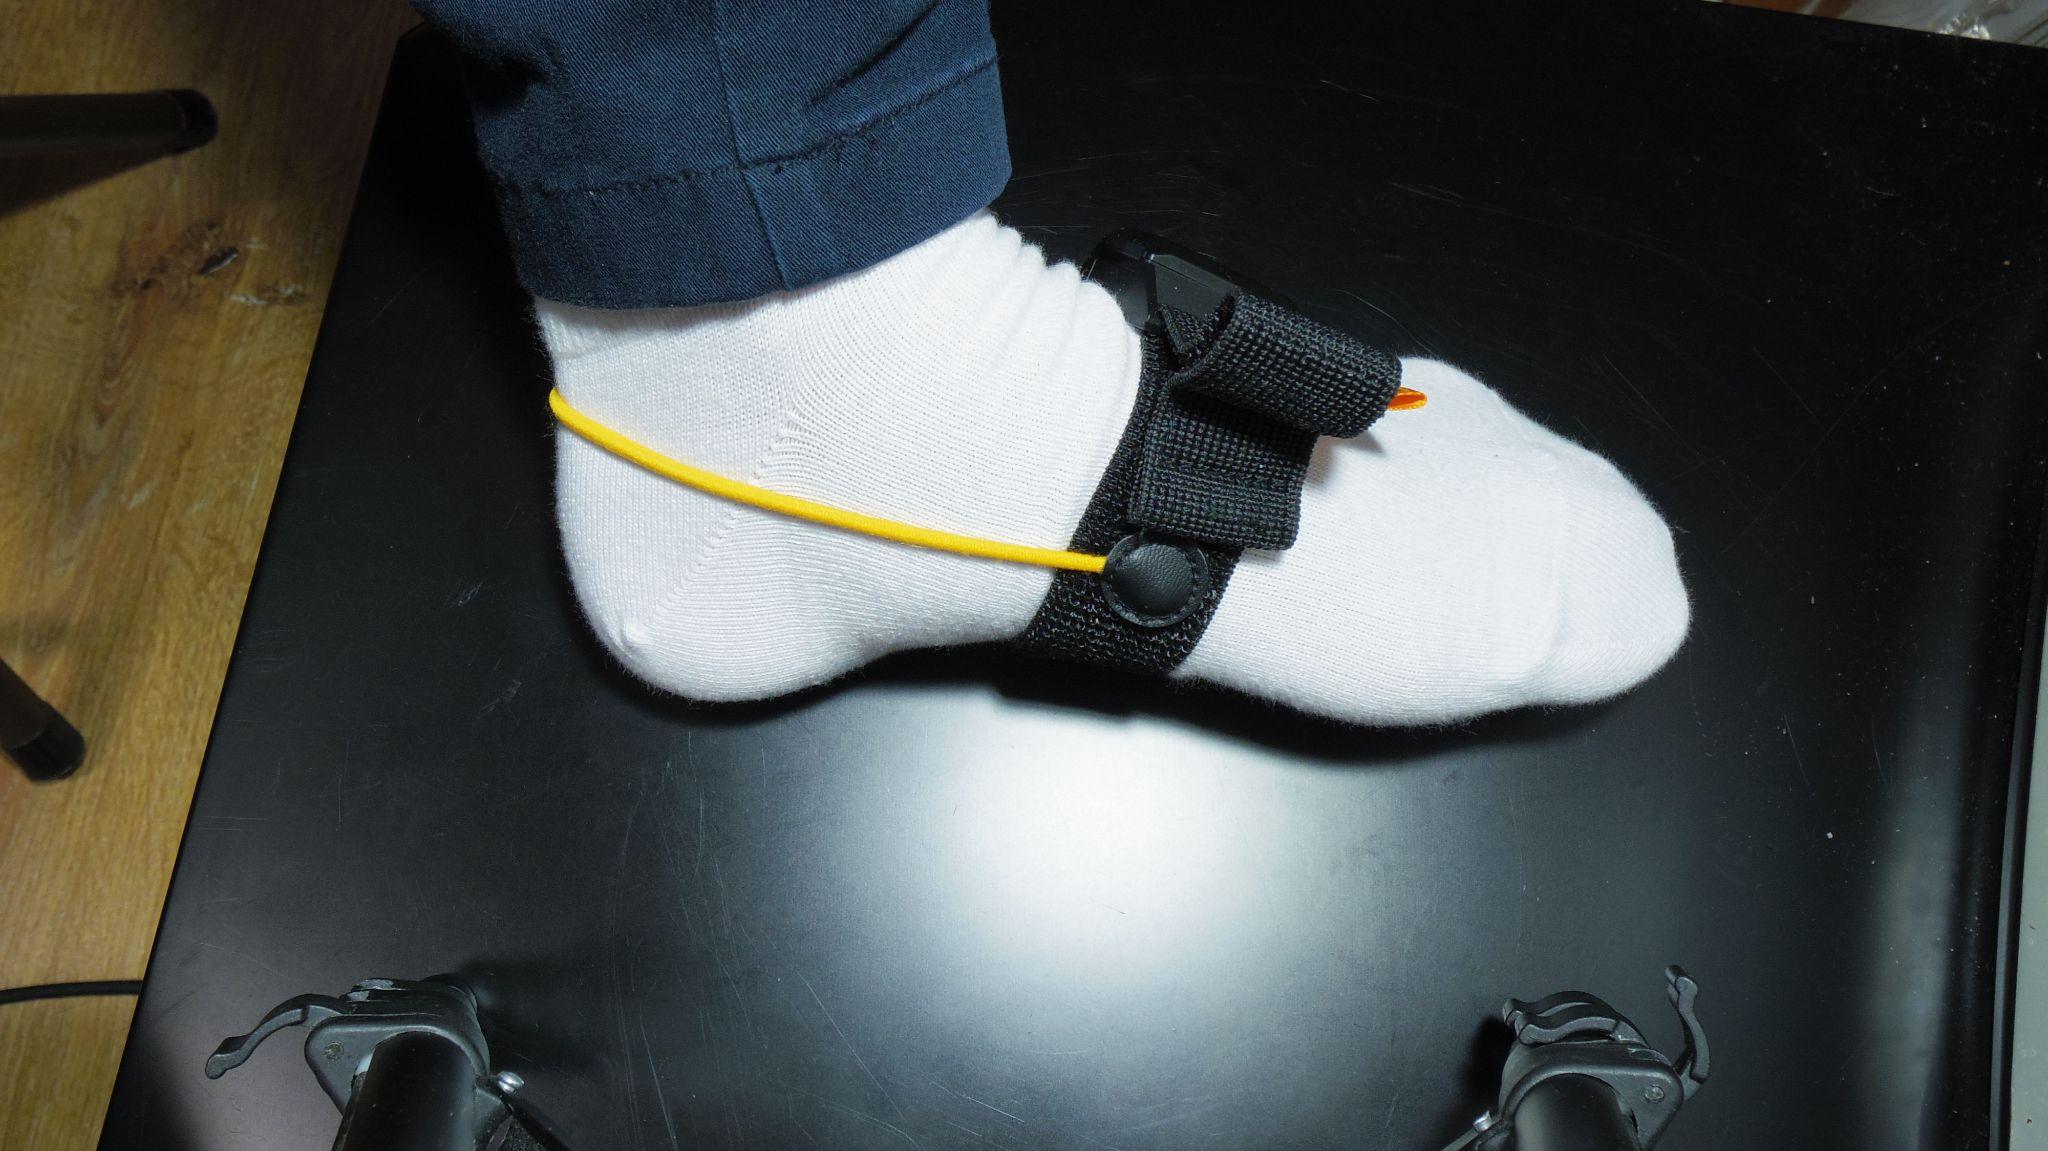
Section titled “6.3 Attaching the Foot Sensors”Attach the foot sensors to the insteps as shown in the photo.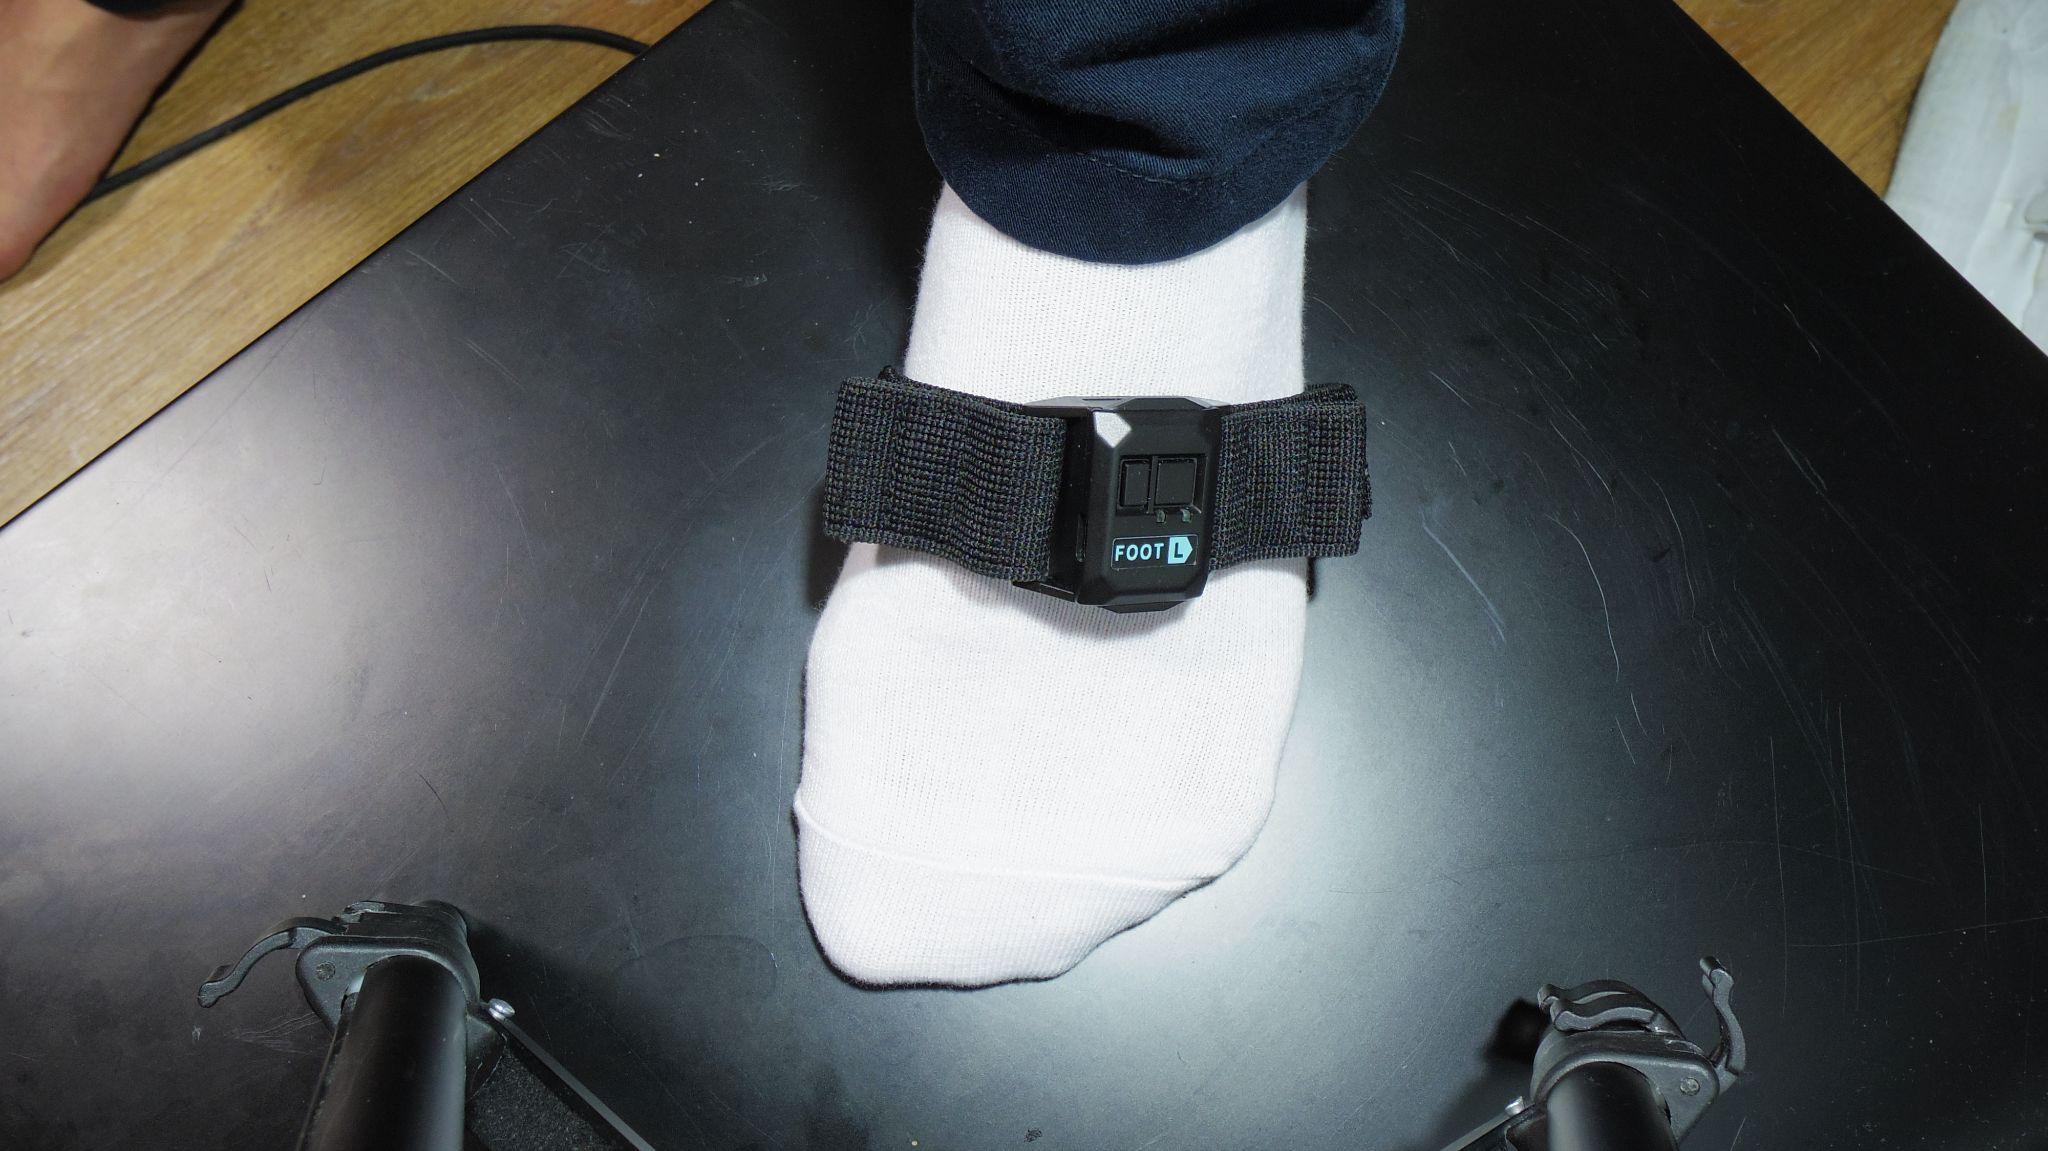
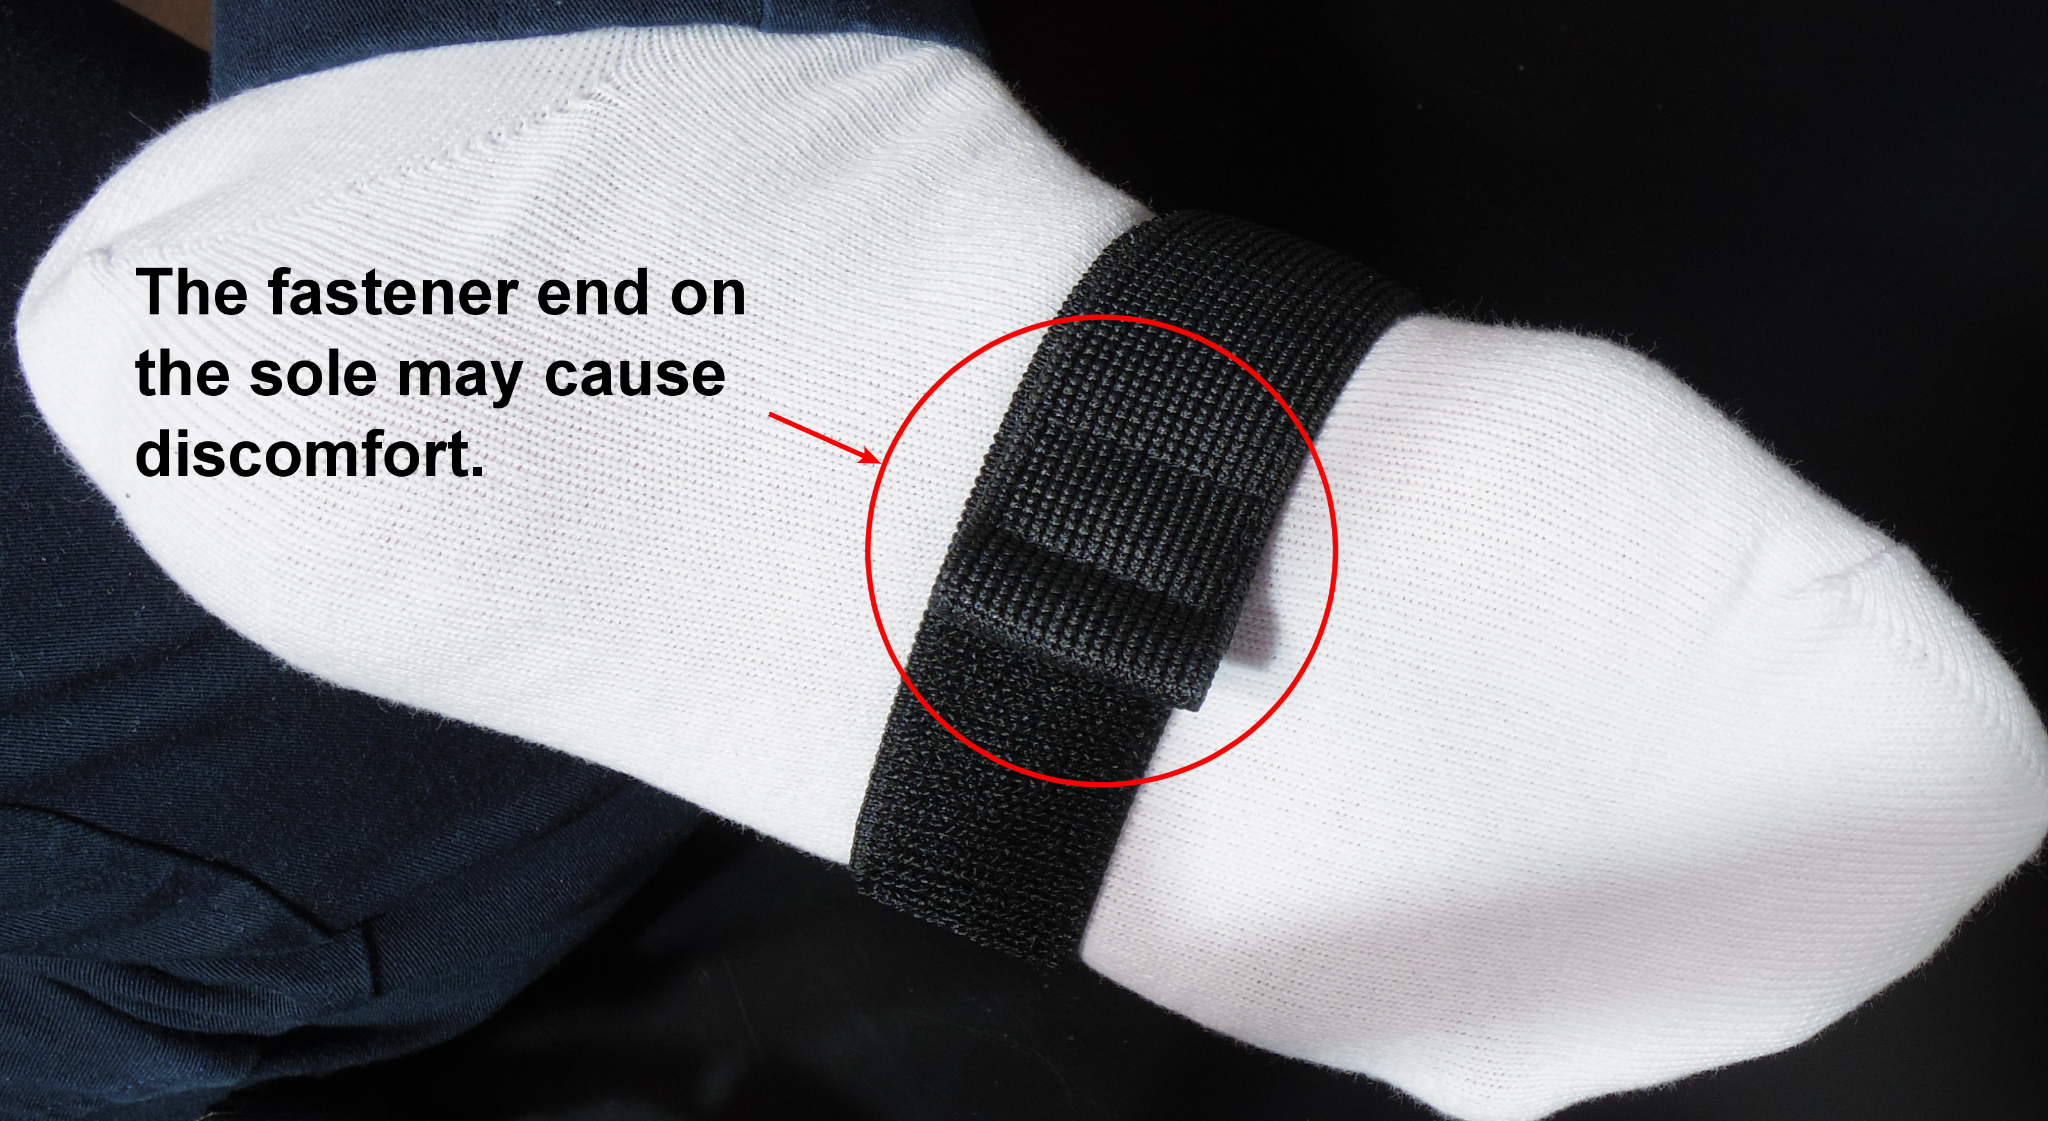
Depending on your foot size, the end of the fastener may wrap around to the sole and feel uncomfortable.
In that case, you can use the included Double-sided Hook Fastener to leave some slack in the foot strap as shown in the photo.
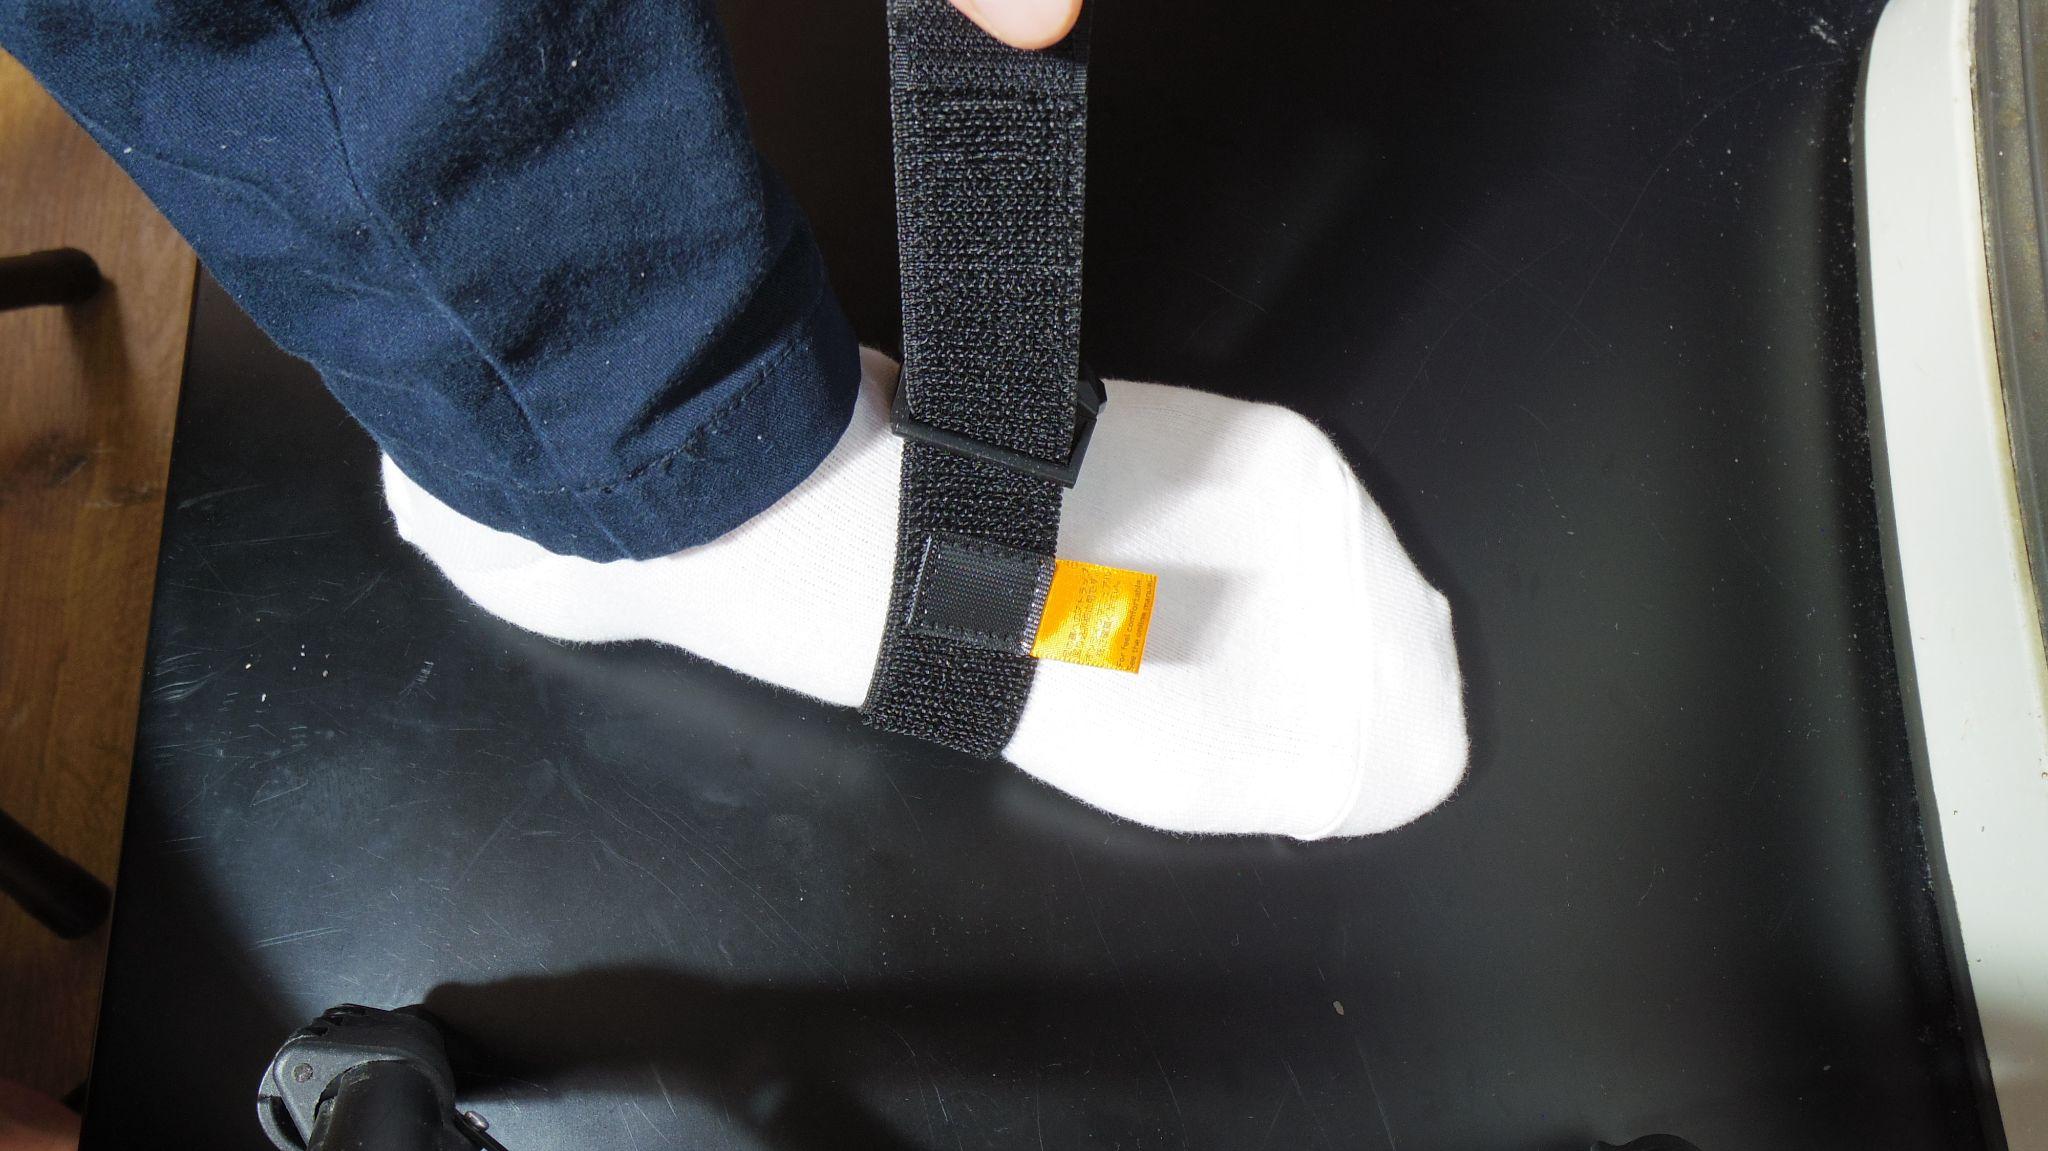
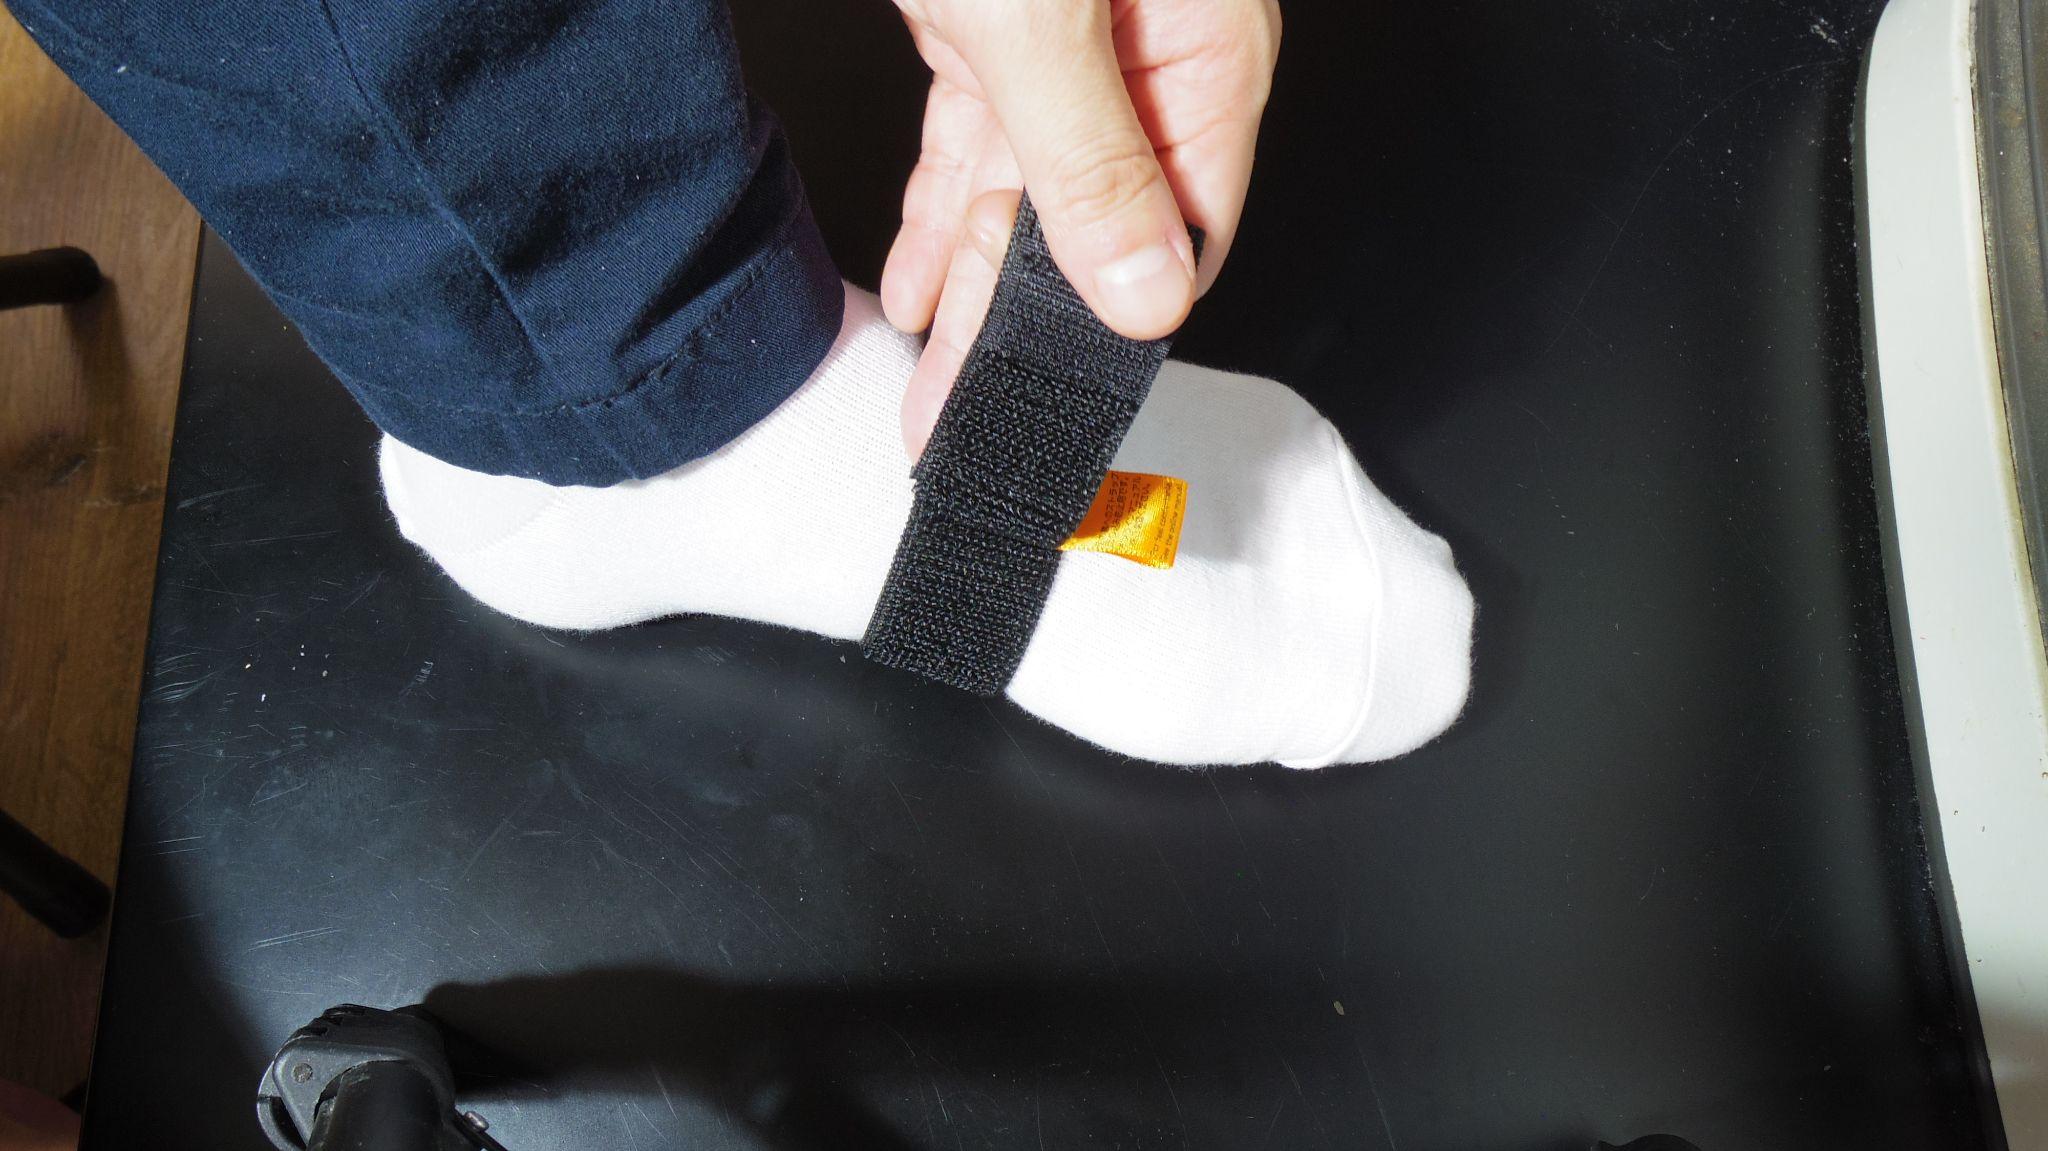
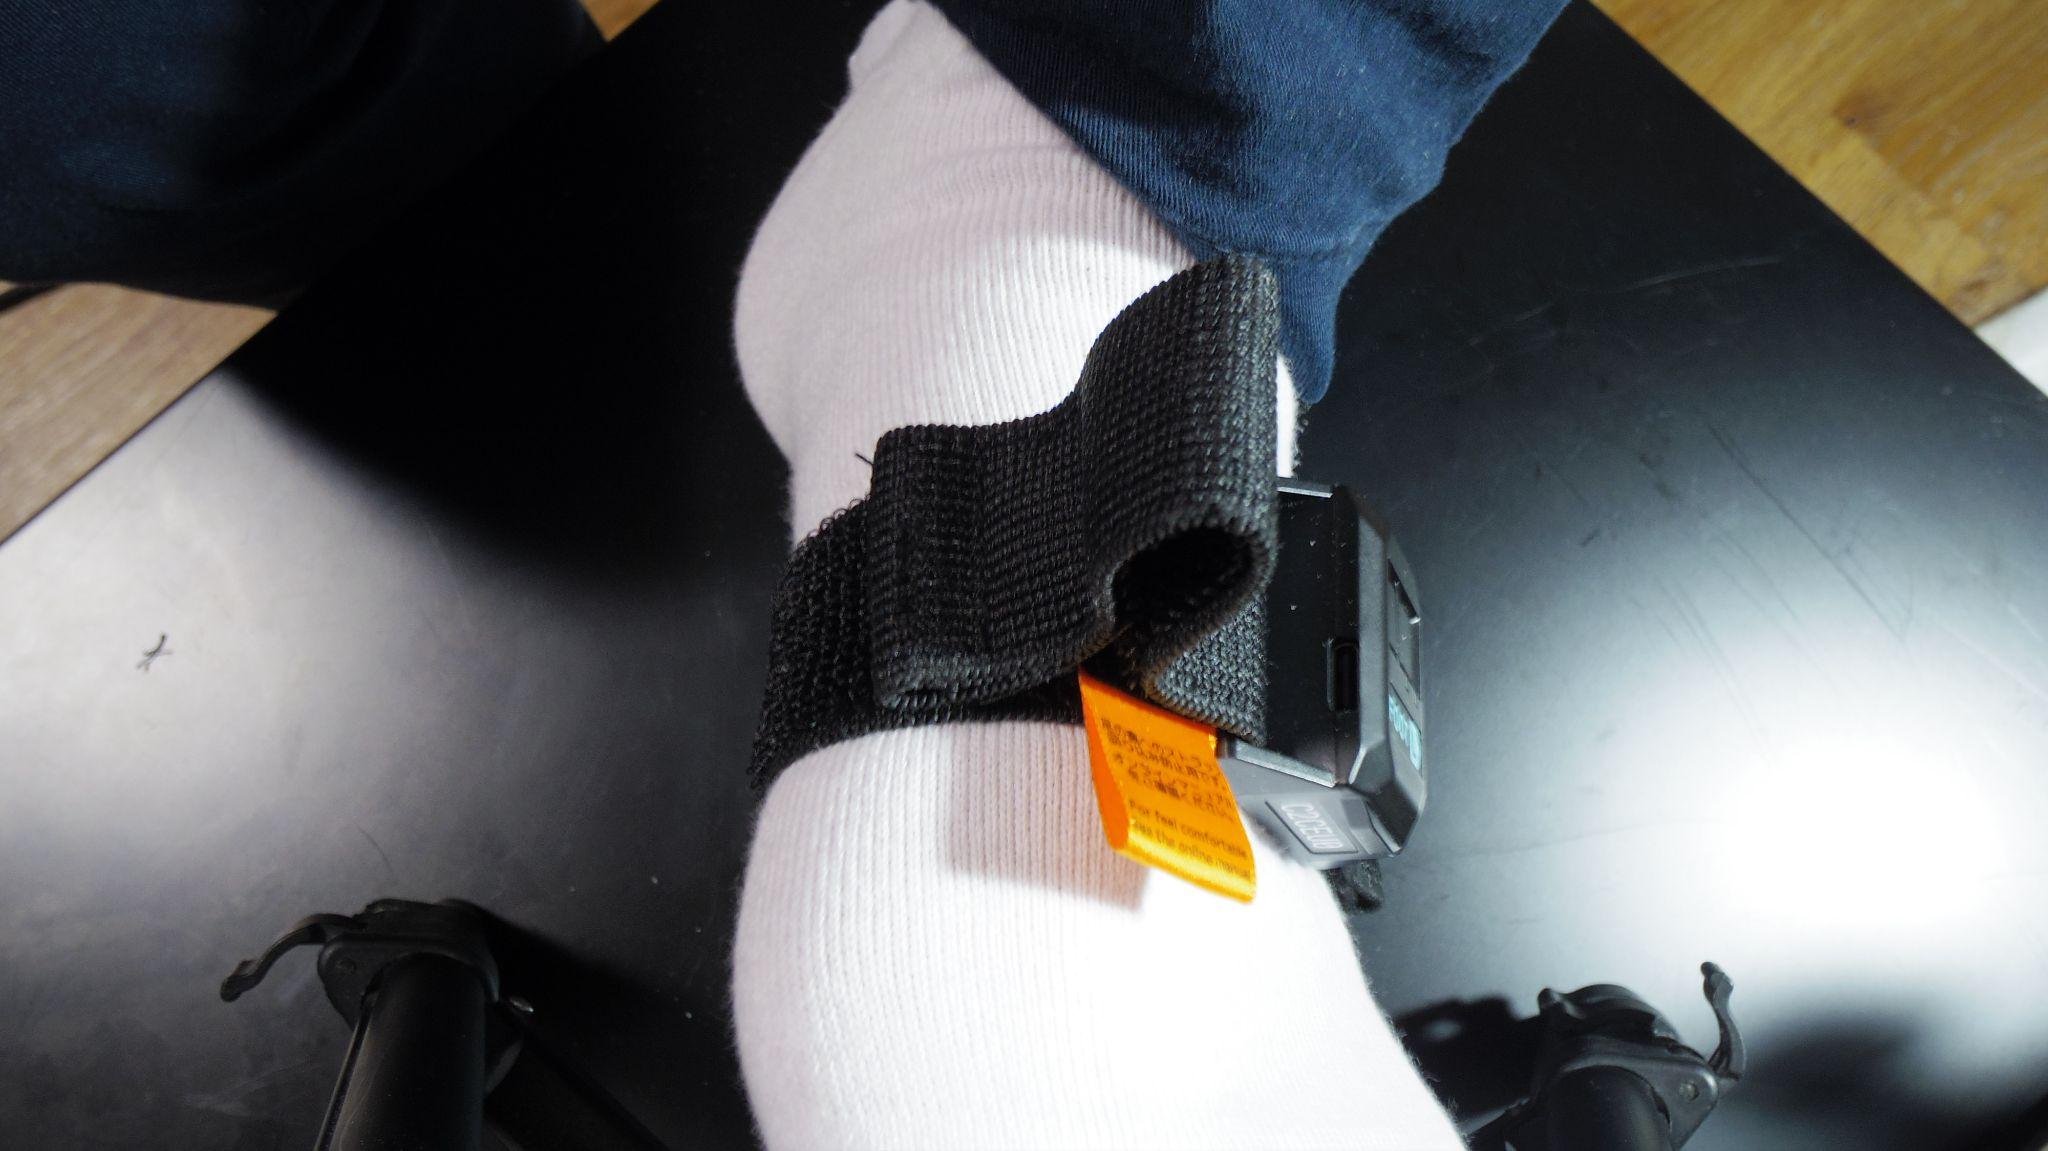
* If the hook-and-loop fastener is not properly adjusted, the fastened area may end up on the sole of your foot depending on your foot size, which can cause discomfort or pain while walking.
* If the attached foot belt shifts during use or does not stay securely in place, please use the included foot strap to provide additional support and ensure the sensor remains firmly fixed.
7. How to use
Section titled “7. How to use”Instructions on how to use the sensors.
7.1 Charging
Section titled “7.1 Charging”7.1.1 Charge method
Section titled “7.1.1 Charge method”Please charge the battery before use.
Use the included USB charging cable to charge the sensor.
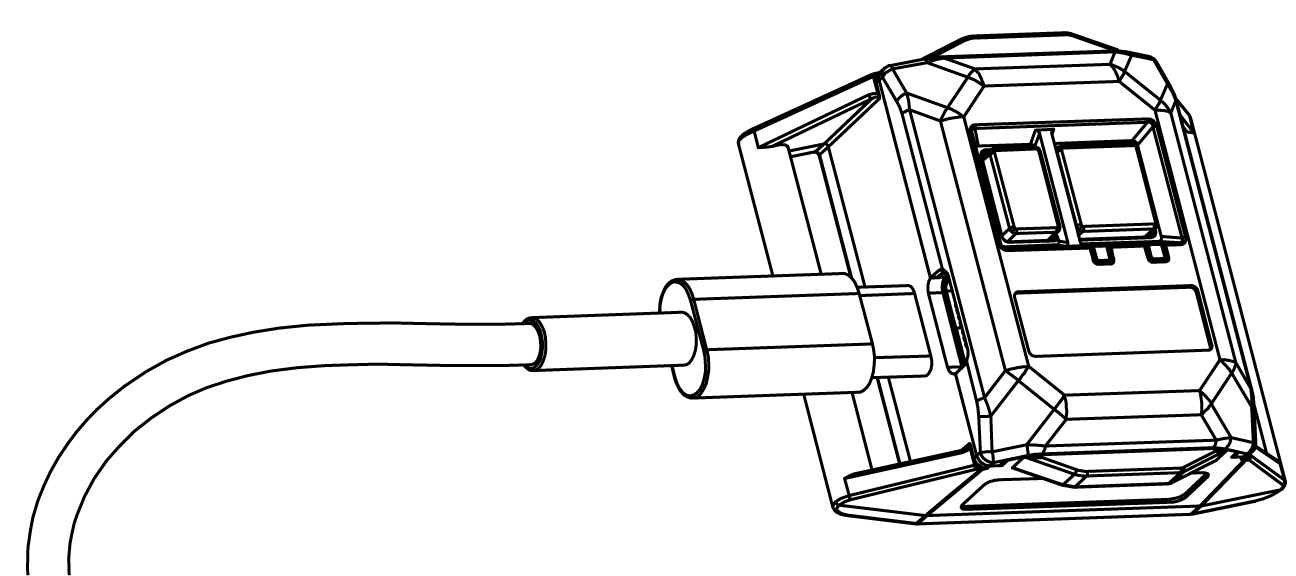
- Red LED lights up while charging.
- It takes about 2 hours and 30 minutes from empty to fully charged (with power off).
- Red LED turns off when charging is complete.
[Notes about USB cable]
- Hold the USB plug in your hand and insert/remove it straight.
- If you use a USB charger with an output of less than 5V/2.0A per port,It may not be able to charge, or may cause the USB charger to malfunction, overheat, or catch fire. Be sure to charge with a USB charger with an output of 5V/2.0A or more.
[Notes when charging]
- Charge the battery in a location with an appropriate ambient temperature (10°C to 30°C / 50°F to 86°F).
- Please read [Safety Instructions/Consignes de sécurité/Sicherheitshinweise/Istruzioni di sicurezza/Instrucciones de seguridad] also.
7.2 How to operate the sensor
Section titled “7.2 How to operate the sensor”7.2.1 Power ON
Section titled “7.2.1 Power ON”Press the main button of the sensor for 3 seconds or more, and turn the power on. Red LED and Green LED lights up for 2 seconds. After the green LED starts blinking slowly. It will be in “waiting for connection” state. [Video]
When the connection is established, the green LED will quickly blink twice in succession and then turn lights off for 1 second. [Video]
7.2.2 Power OFF
Section titled “7.2.2 Power OFF”If you press and hold the main button for more than 3 seconds, the power will turn off. [Video]
*If the sensor unit is not connected to the Shiftall VR Manager and left on for 20 minutes, the sensor unit will automatically turn off.
7.2.3 Power OFF(Forced shutdown)
Section titled “7.2.3 Power OFF(Forced shutdown)”If you press and hold the main button for more than 15 seconds. the power will be forcibly turned off.
7.2.4 Check the communication mode
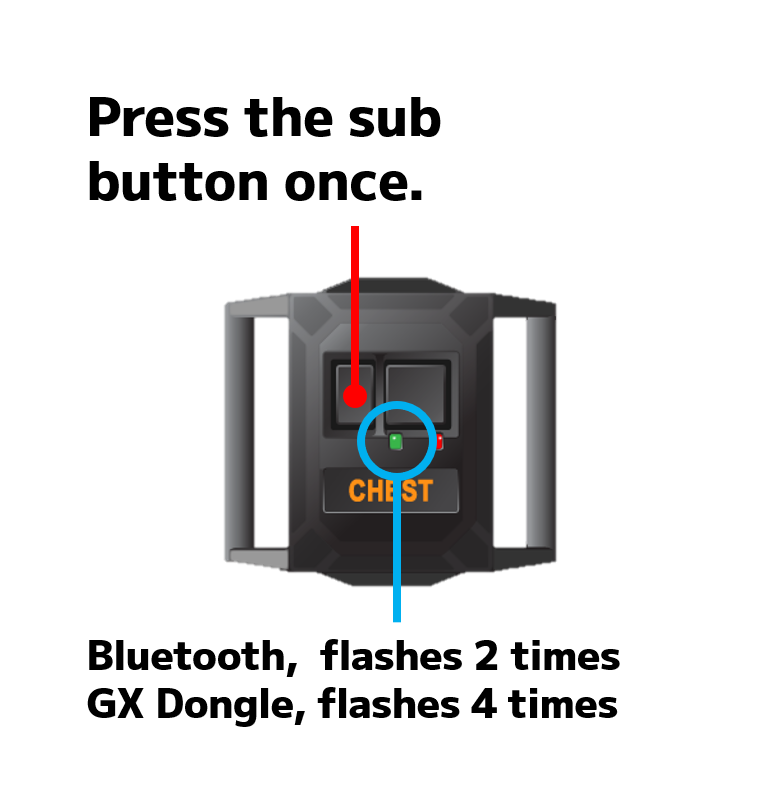
Section titled “7.2.4 Check the communication mode”Click the sub button once during power on.
It is possible to check the current communication mode by the number of times the green LED flashes.
- When it flashes 2 times, it means “Bluetooth communication mode”
- When it flashes 4 times, it means “GX Dongle Mode”
7.2.5 Switch the communication mode
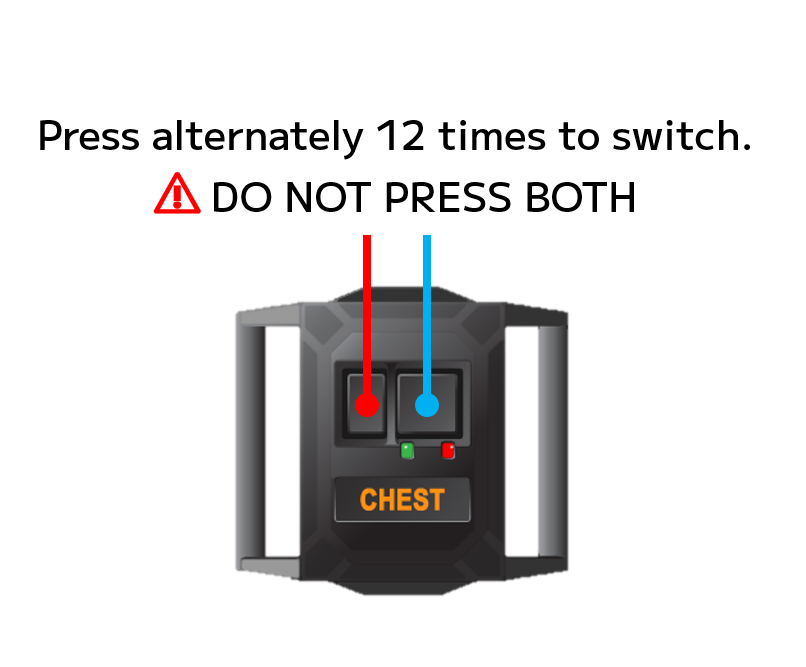
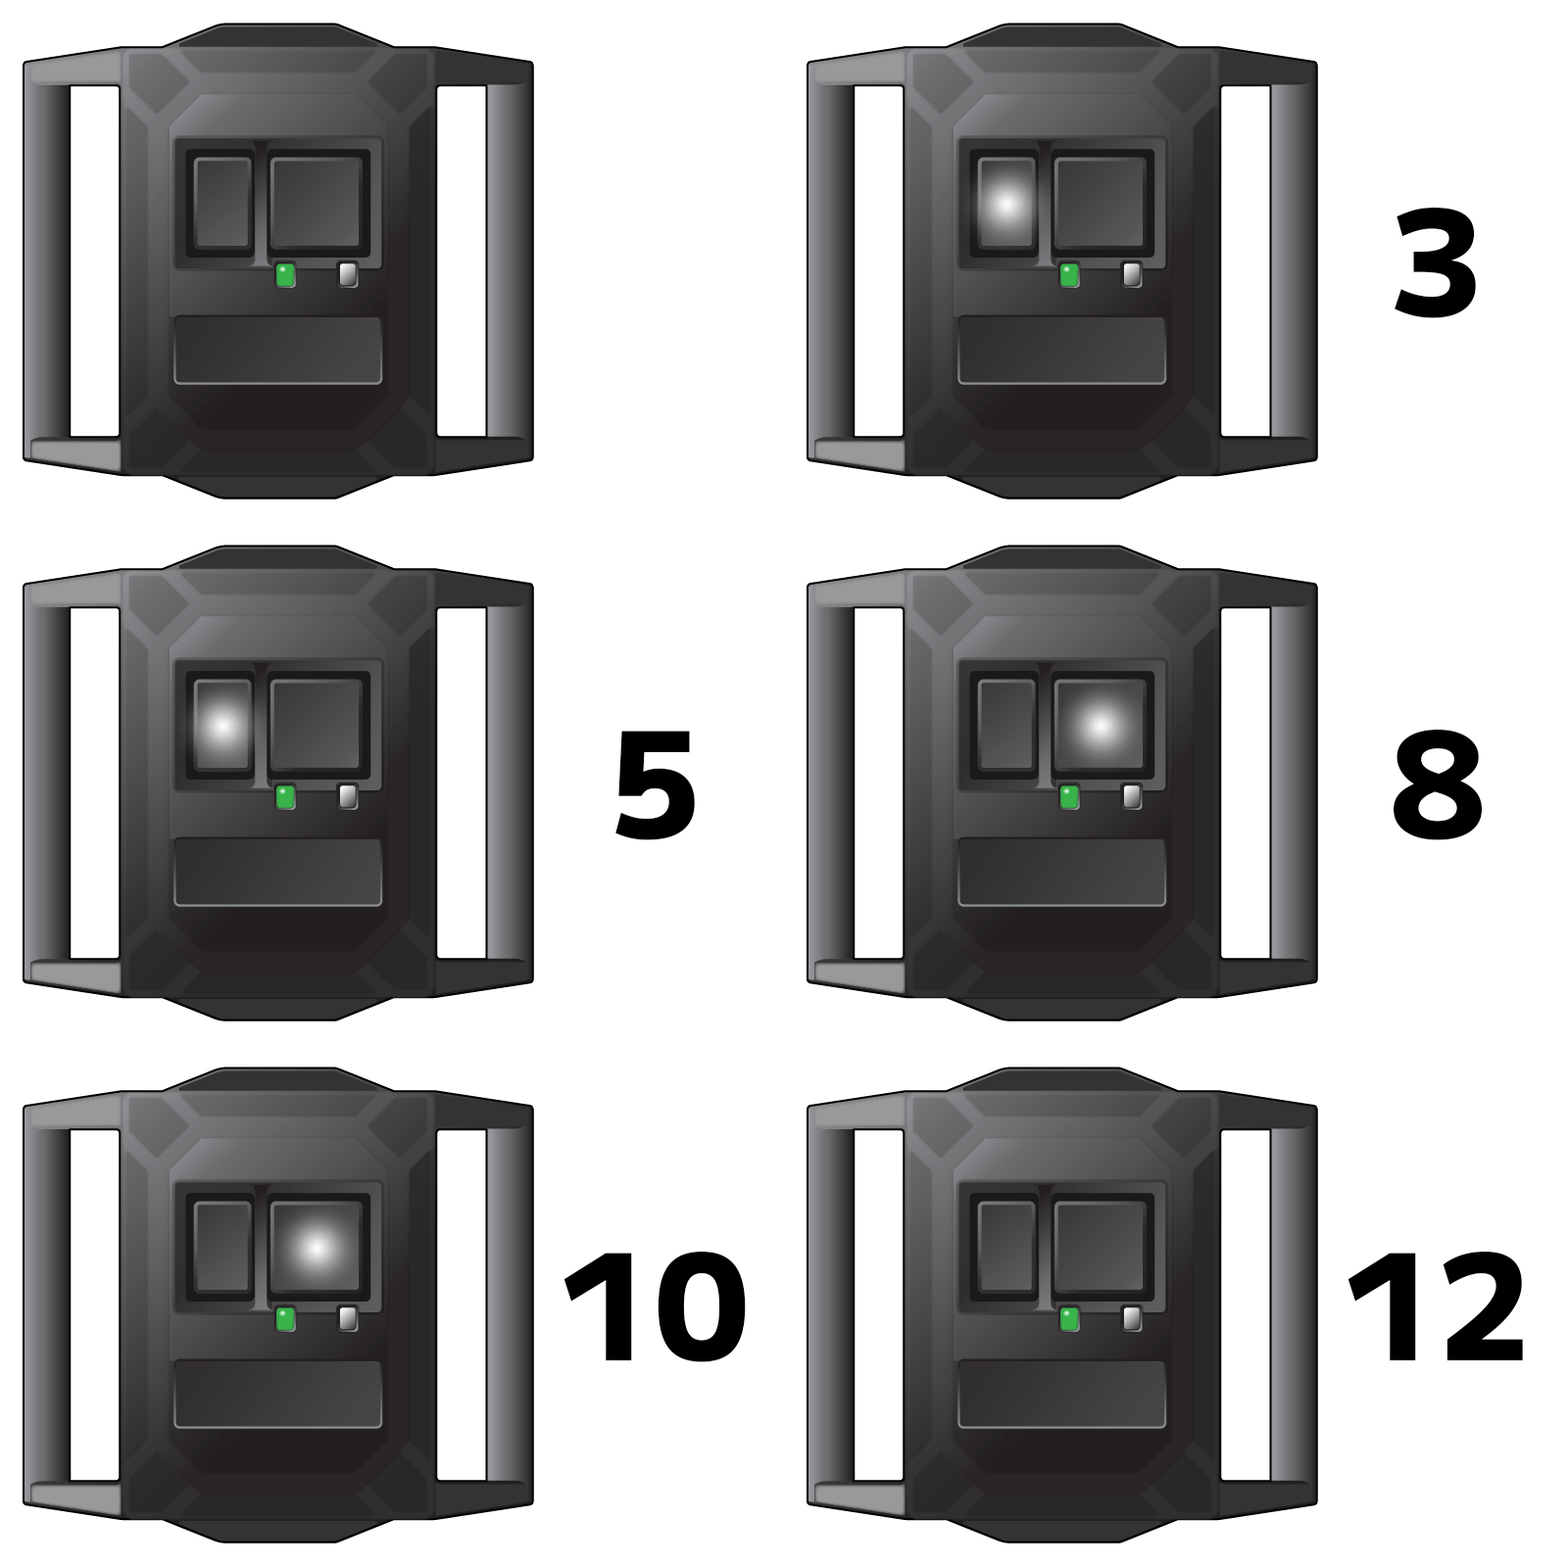
Section titled “7.2.5 Switch the communication mode”Click the main button and the sub button alternately a total of 12 times to switch between Bluetooth communication mode and GX Dongle mode.
8. Calibration Posture
Section titled “8. Calibration Posture”Calibration for HaritoraX 2 Pro
Perform both calibrations in order as shown in the figure below.
① Standing Pose Calibration
While standing upright, point the controllers downward and press the trigger three times.
Calibration is complete when you hear the announcement “Standing Pose Calibration.”
② Ski Pose Calibration
Bend your knees, lean your chest forward, raise your heels, then point the controllers downward and press the trigger three times.
Calibration is complete when you hear the announcement “Ski Pose Calibration.”
* To prevent falling, please support yourself against a wall or similar surface.
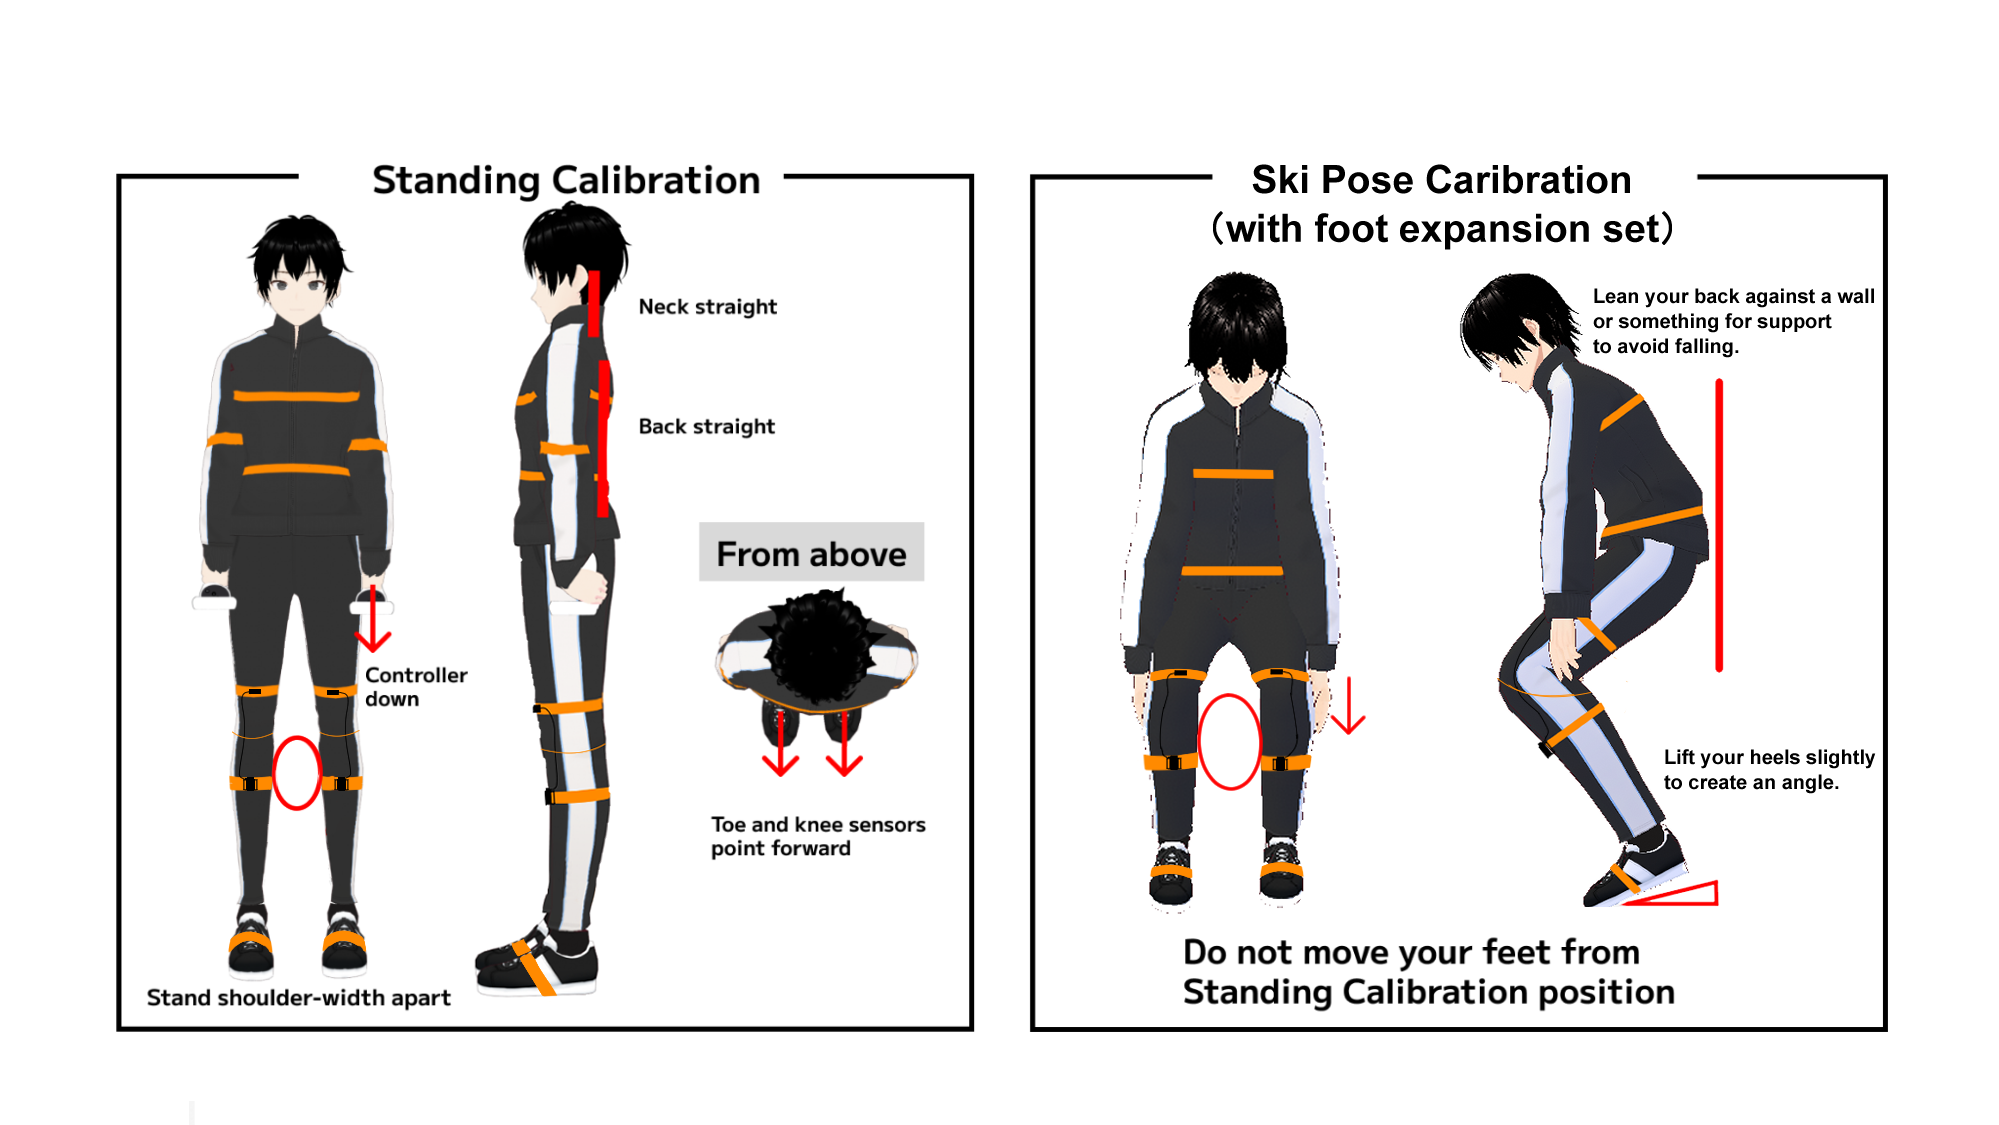
* If standing on tiptoe during the ski pose is difficult, you can switch to a mode where you perform the tiptoe action during standing pose calibration instead.
This option can be changed in Shiftall VR Manager under “Advanced Settings > Calibration > Foot Tiptoe Calibration.”
* When using elbow sensors, the posture required for ski pose calibration is different.
Please be careful and refer to the Shiftall VR Manager Online Manual for details.
9. Windows PC Settings
Section titled “9. Windows PC Settings”Read Shiftall VR Manager online manual.
Instructions for use with VRChat are also provided in the manual above.
10. FAQ・Troubleshooting
Section titled “10. FAQ・Troubleshooting”| Questions/symptoms | Answers/Causes and countermeasures |
| What is the product warranty period? | The warranty period for this product is one year from the date of purchase. If you have made a reservation purchase, it is one year from the date of shipment of the product. |
| There is no store name or other information on the warranty card, is that okay? | If you purchased from the Shiftall website, we know the date of purchase, so we do not fill in the warranty card. If you purchased at a store, etc., you can receive a warranty within the warranty period without entering the store name and purchase date by presenting a document that proves the date of purchase. |
| can not turn on | The battery may be empty. Connect the charging USB cable and press the main button for about 3 seconds while the red LED lights and charging starts. Also, after performing a forced shutdown (press and hold the main button for 30 seconds), connect the USB charging cable again. If the power does not turn on after forced shutdown, remove the USB cable and then turn on the power. If the above method does not improve the symptoms, please contact support. |
| It takes a long time to charge | If you use a USB charger with an output of less than 5V/2.0A per port,It may not be able to charge, or may cause the USB charger to malfunction, overheat, or catch fire. Be sure to charge with a USB charger with an output of 5V/2.0A or more. |
| Red LED does not light up while charging | Is the USB charging cable firmly connected? Please check "Charging". Charge the battery at a room temperature of 10°C to 30°C (50°F to 86°F). When charging is complete, the red LED will turn off. If the above method does not improve the symptoms, please contact support. |
| Red LED flashes fast while charging | The sensor's charging system or battery may be malfunctioning. If symptoms occur frequently, please take a video showing the sensor status and contact support. |
| Fast periodic green LED flashing. | If the green LED flashes faster than other sensors, and "HaritoraX2-Update" appears in the list of "App Settings" → "Sensor Update" in Shiftall VR Manager when the sensor is turned on, it is possible that the firmware update of the sensor has not completed properly and remains in standby state. While the firmware update is in standby mode, normal shutdown, battery charging, connection with software, and communication mode switching do not work. If the above is true, select "HaritoraX2 - Update" in "Sensor Update" of Shiftall VR Manager and perform the update again. When the firmware update is completed successfully, the normal green LED will flash slowly. |
| Shorter operating time | If the charging time and operating time become shorter, the internal battery may be exhausted. |
| Power turns off by itself | If the power of the sensor unit continues for 20 minutes without being connected to the Shiftall VR Manager, the power of the sensor unit will automatically turn off. |
| Firmware update cannot be performed | ・If your PC does not have Bluetooth connection, you cannot perform firmware update. (Not available for dedicated communication dongle GX6/GX2) ・Use a compatible USB Bluetooth adapter. ・Make sure that the sensor mode is set to "Bluetooth communication mode." For mode switching and verification methods, refer to here. |
| Bluetooth connection is not possible | Please turn off Bluetooth once from Windows settings and turn it on again. 15 seconds after turning it on, try connecting with Shiftall VR Manager.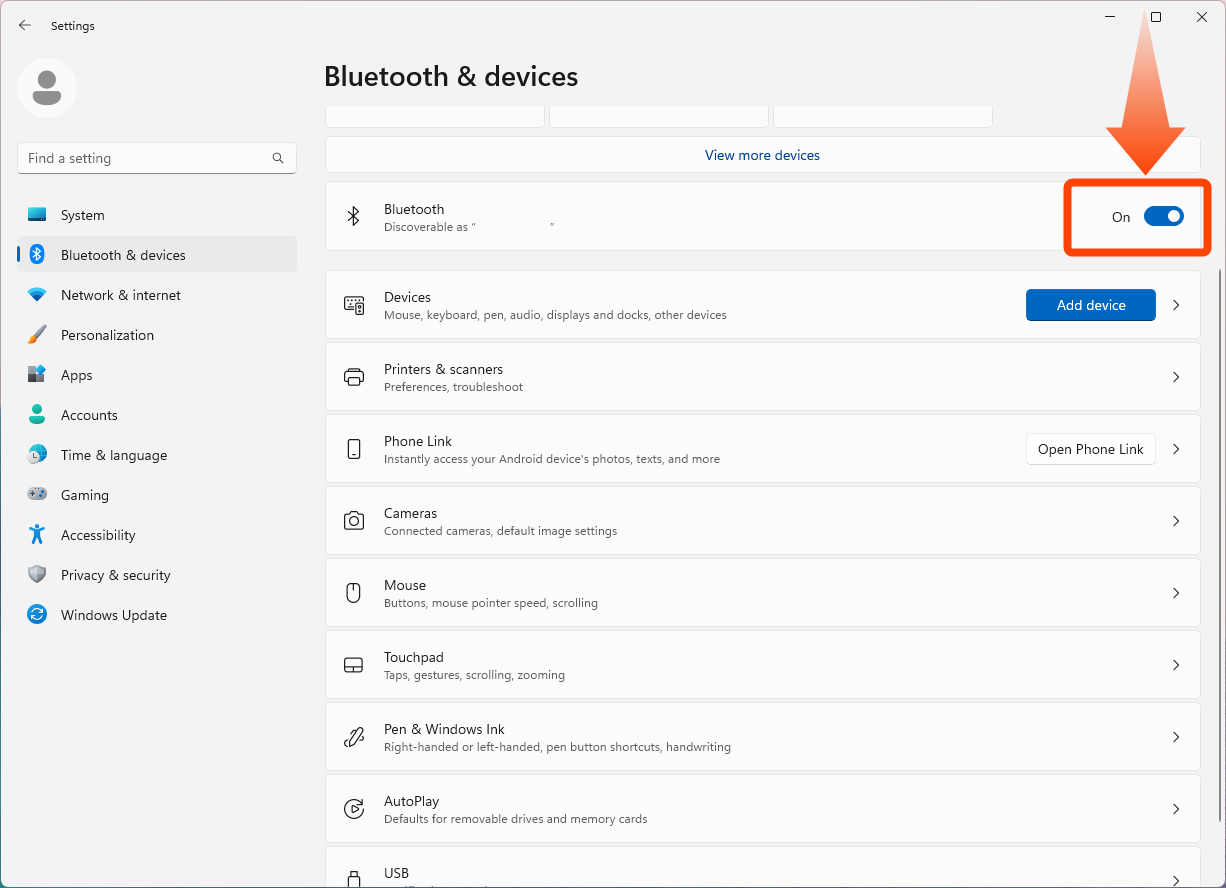 If you still can't connect, try restarting your PC once. When the Bluetooth surroundings are unstable, restarting is the best. If this does not solve the problem, we have prepared a troubleshooting page for when Bluetooth connection is not possible. Here Please read. |
| Bluetooth connection is possible, but it is easy to break off. immediately disconnected | If the distance between the PC and the Bluetooth USB adapter is too close, the Bluetooth connection may be easily interrupted depending on the environment. Use a USB extension cable like the one below and keep the Bluetooth USB dongle away from your PC. USB extension cable here. Also, the Bluetooth connection may be interrupted in the following cases. ・The body is positioned to cover the sensor ・The Bluetooth USB adapter is covered by an object, or there is a metal object nearby. ・Multiple other Bluetooth devices are connected at the same time Connect the main unit to the Haritora configurator with the main unit close to the Bluetooth adapter without wearing it on your body, and check if the same symptoms occur. |
| I don't know the startup order of each application | The order in which the applications are started does not matter, but it is recommended to start the Haritora Configurator after the VR headset is recognized by SteamVR, connect Bluetooth, and then start the final application (VRChat, cluster, etc.). You can also launch VRChat, enter the instance in VR mode, and then launch the Haritora Configurator to become FBT. It's useful to remember in case you need to enter the instance in a hurry. |
| Can't calibrate with controller trigger. | HaritoraX 2 can be calibrated only within VR applications such as VRChat. Please note that calibration cannot be performed while the SteamVR menu or Oculus menu is displayed. Please do the following within your VR application: With both hands holding the controller facing vertically downward, press the trigger on the controller 5 to 7 times in a row (calibration). Instructions in the video here. |
| Your legs and hips keep spinning in a certain direction after only a few minutes of use | Normally, the sensor reset operation is not necessary, Please do not perform it unless instructed to do so by Shiftall Customer Support. When you fail to reset the sensor properly, the situation becomes worse. "Drift" is the rotation of sensor tracking over time. The drift phenomenon can be suppressed by the sensor reset function and/or selecting appropriate tracking mode. <What is sensor reset?> This task is to compensate for the gyro and accelerometer sensors of the HaritoraX 2. It is not necessary to perform it before use since it is performed before shipment from the factory. However, performing it when you feel that the sensor accuracy is not good may lead to the improvement of the accuracy.
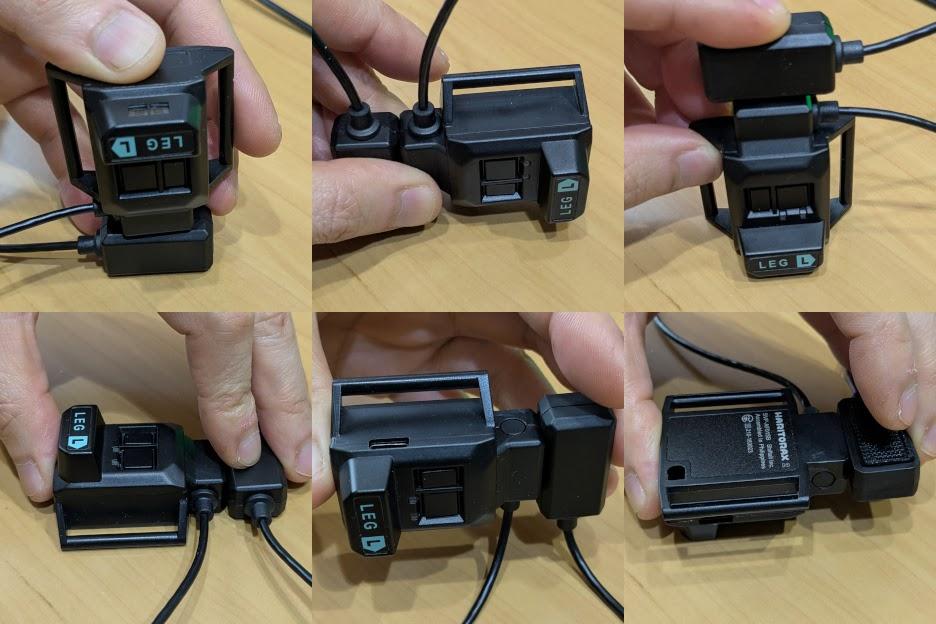
Due to the characteristics of the IMU tracking device, the drift cannot be reduced to zero. Also, depending on the location you are using, there are environments where drift is likely to occur and environments where drift is unlikely to occur. In an environment where the geomagnetic field is stable, the drift phenomenon can be greatly reduced by setting the mode to Mode1 and completing the Mode1 calibration. Learn more about Mode1 calibration. |
| The geomagnetic status of the sensor displayed on the Shiftall VR Manager Home screen remains the same as Bad or Very Bad. | Please check the [Negative environment/Environnement négatif/Nachteiliges Umgebung/Ambiente sfavorevole/Entorno negativo] and if applicable, avoid the condition as much as possible. |
| Want to know the length of the belt and the corresponding body size. | The data of belt length itself is not disclosed because it is meaningless because the corresponding body size depends on the length of the sensor body, size adjuster portion and hook and loop fastener sewn portion (no stretch here) and an elastic belt part. The belt can be stretched to about 1.8 to 2 times its length, so it can be used for a wide range of body size. Please note that if you use the belt in a size close to maximum length, you may feel a little tight and uncomfortable, depending on the individual. |
| I would like to know which Bluetooth adapters have been confirmed to work. |
|
| I want to know which VR headsets have been tested to work. | Operation-confirmed VR headset:MeganeX / MeganeX superlight 8K / VIVE / VIVE Pro / VIVE Pro2 / Valve index / Meta Quest 3 / Meta Quest 3S / Meta Quest Pro / Meta Quest 2 / PICO 4 / PICO 4 Ultra |
For all other inquiries, please contact Shiftall Customer Support.
Shiftall Support Contact Form
https://forms.gle/WMU54Jz6RN5dU84XA
All company names, system names, and product names mentioned in this manual, with the exception of Shiftall and HaritoraX, are registered trademarks or trademarks of their respective companies, and are not the property of our company.
In principle, “TM” and ”®” are omitted in the text and figures.

Shiftall Inc. 2025-10