
meganex-8k-mark-ii-en

Produced by: Shiftall Inc.
■Setup
Section titled “■Setup”1. Installation Overview
Section titled “1. Installation Overview”You can start using the device in four steps:
- Install MeganeX 8K Mark II Configurator.
- Connect MeganeX 8K Mark II to your PC.
- Complete the tutorial in the MeganeX 8K Mark II Configurator software.
- Launch SteamVR™ and connect your VR controllers to begin using the headset.
2. Preparation / Before Use
Section titled “2. Preparation / Before Use”2.1 Introduction
Section titled “2.1 Introduction”Thank you for purchasing the MeganeX 8K Mark II. Please read this manual carefully, observe the precautions, and use the product correctly and safely. Be sure to read the “Safety Precautions” before use.
2.2 Items that need to be prepared
Section titled “2.2 Items that need to be prepared”To use MeganeX 8K Mark II, the following items are required
- Base Station1.0 or 2.0
- SteamVR™ Controller
- Windows PC(minnimum required performance)
| Processor | Intel ® Core™ i3-8100T or AMD Ryzen™ 3 2300X equivalent or better |
| GPU | NVIDIA RTX Ampere architecture series / NVIDIA Turing GPU architecture / NVIDIA Ada Generation GPUs / NVIDIA GeForce RTX 3070 equivalent or better *It will not work with GPUs other than those listed above, such as the AMD Radeon series. *The number of monitors that can be connected simultaneously with MeganeX 8K Mark II depends on the GPU's capabilities. |
| Memory | 8 GB RAM |
| Video out | DisplayPort 1.4 |
| USB terminal | USB 2.0 |
| OS | Windows® 10 |
2.3 Safety Precautions
Section titled “2.3 Safety Precautions”次の事項を必ずお守りください。
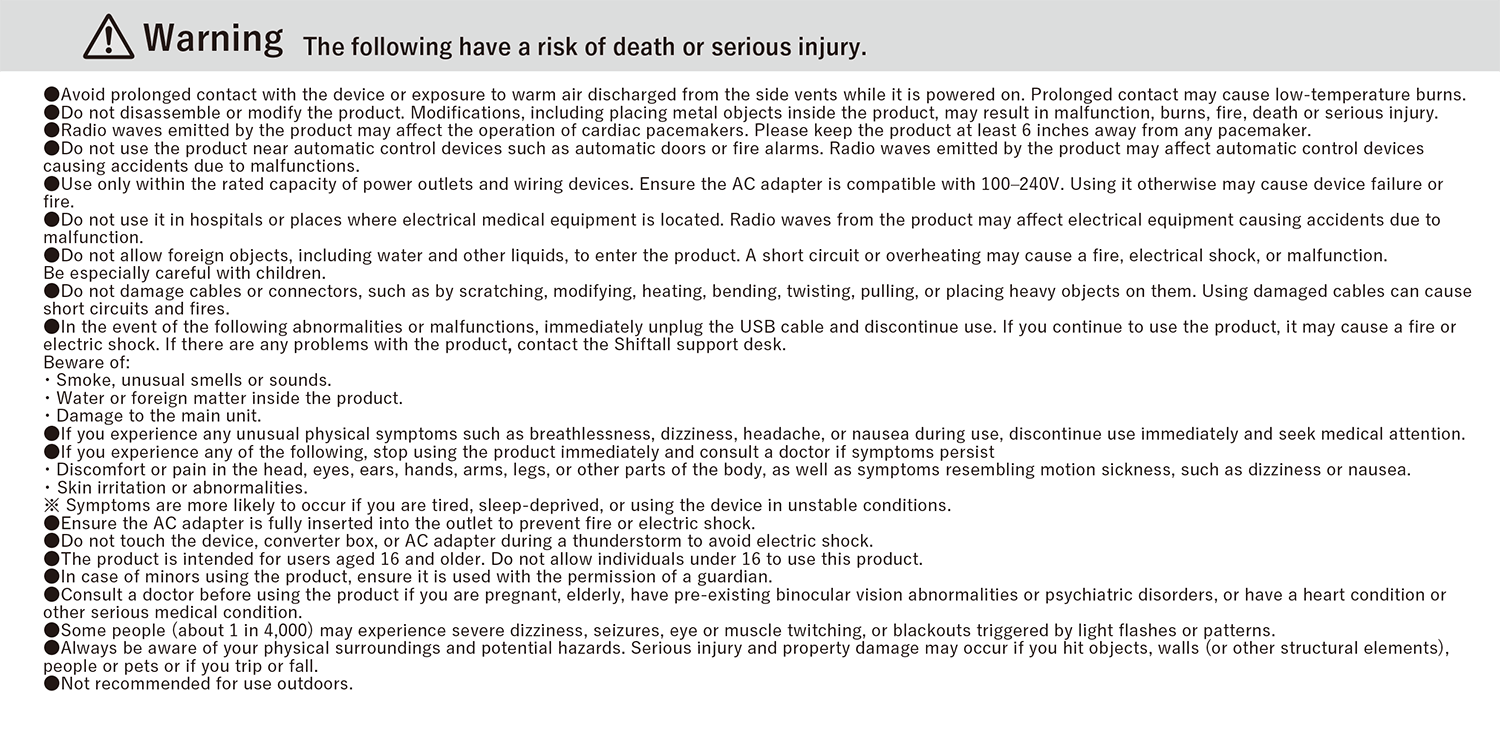

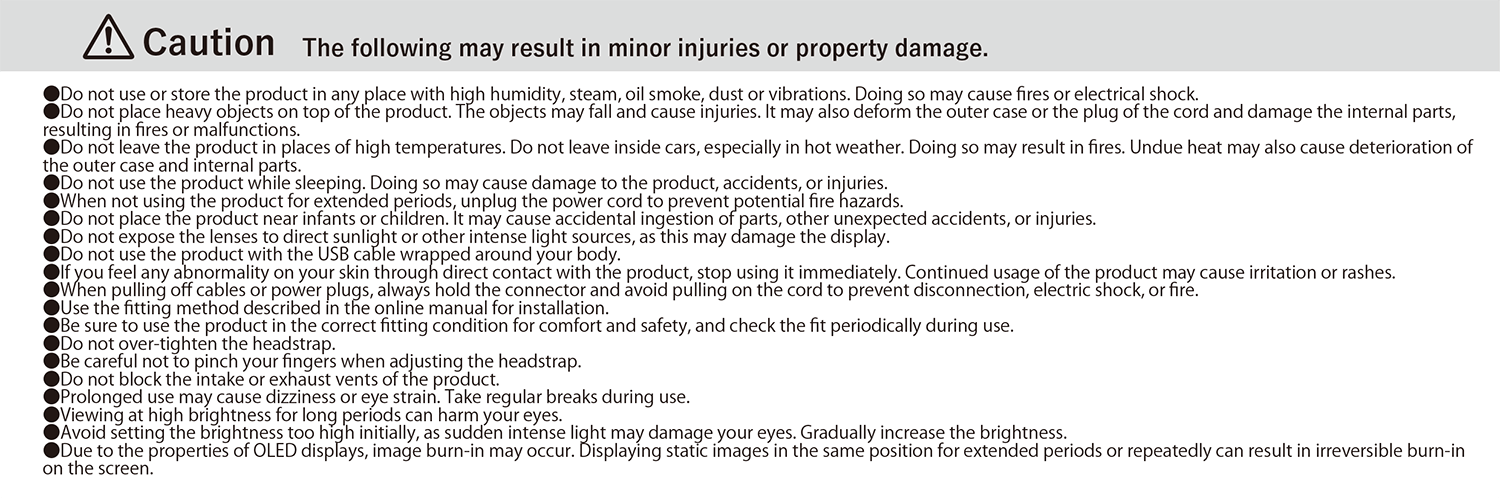
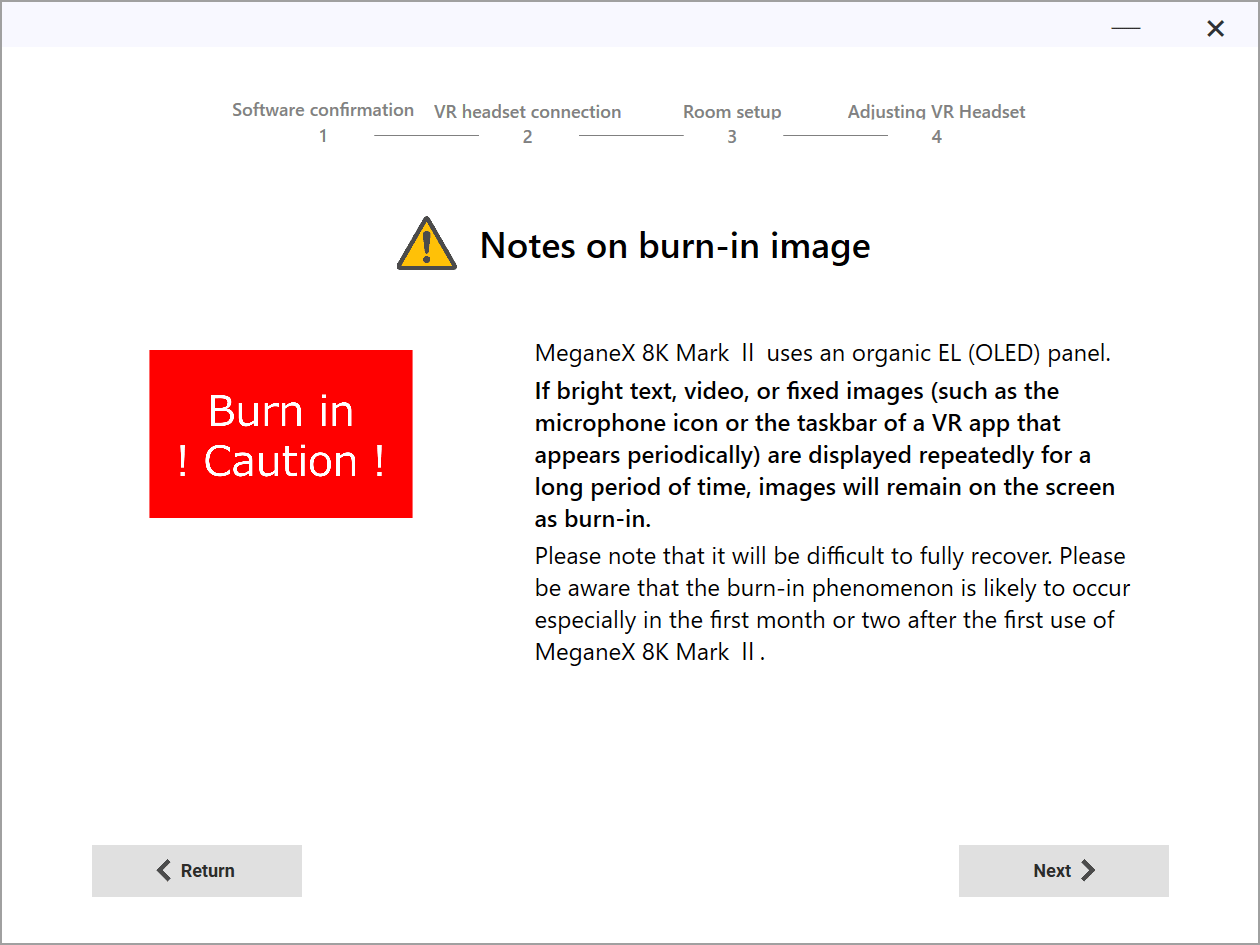
⚠️ Notes on burn-in image
Burnin!Caution!
MeganeX 8K Mark II uses an organic EL (OLED) panel.
If bright text, video, or fixed images (such as the microphone icon or the taskbar of a VR app that appears periodically) are displayed repeatedly for a long period of time, images will remain on the screen as burn-in.
Please note that it will be difficult to fully recover. Please note that burn-in phenomenon is more likely to occur, especially within the first one to two months after first use of the MeganeX 8K Mark II.
⚠️ Notes on electrostatic sensitive device
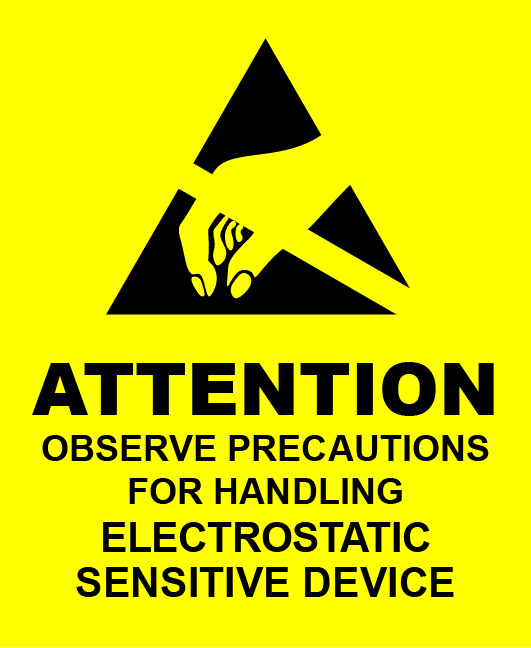
MeganeX 8K Mark II may experience malfunctions due to static electricity. If a malfunction occurs, please reset the system.
2.4 Contents
Section titled “2.4 Contents”- MeganeX 8K Mark II:1unit
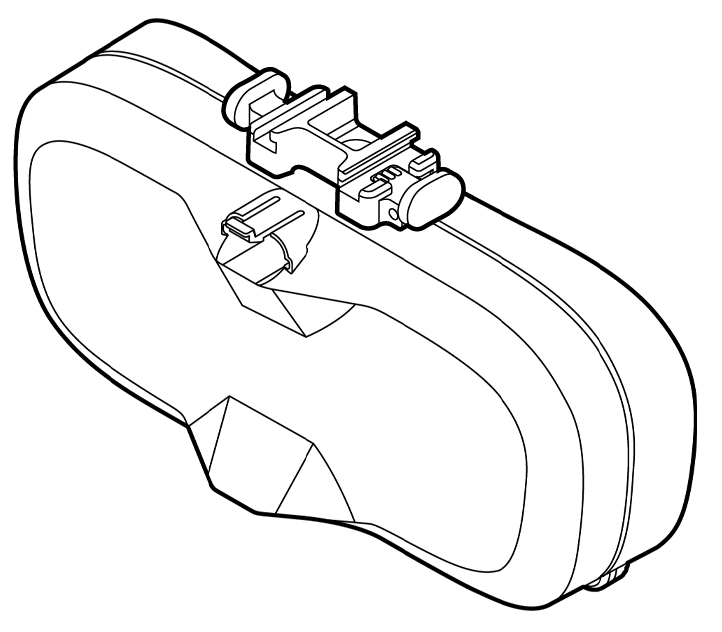
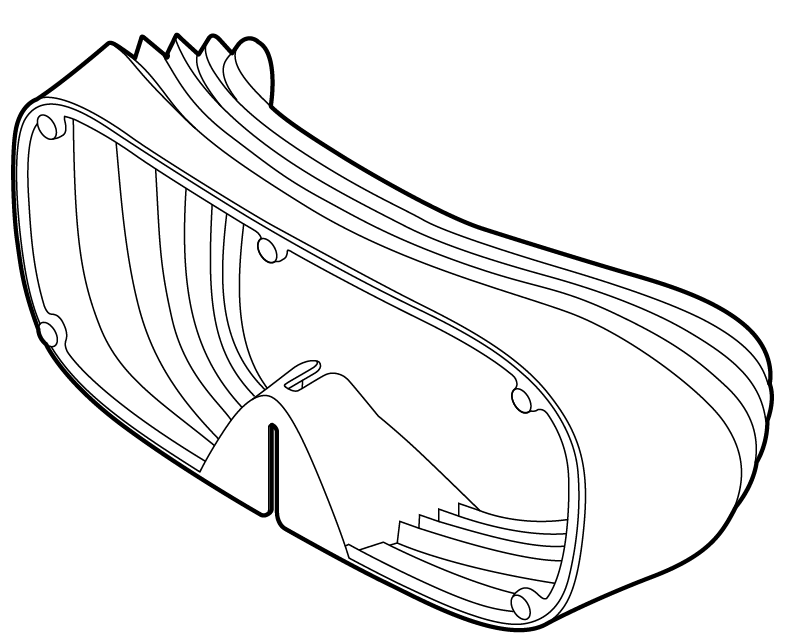
- Light shade: 1 unit
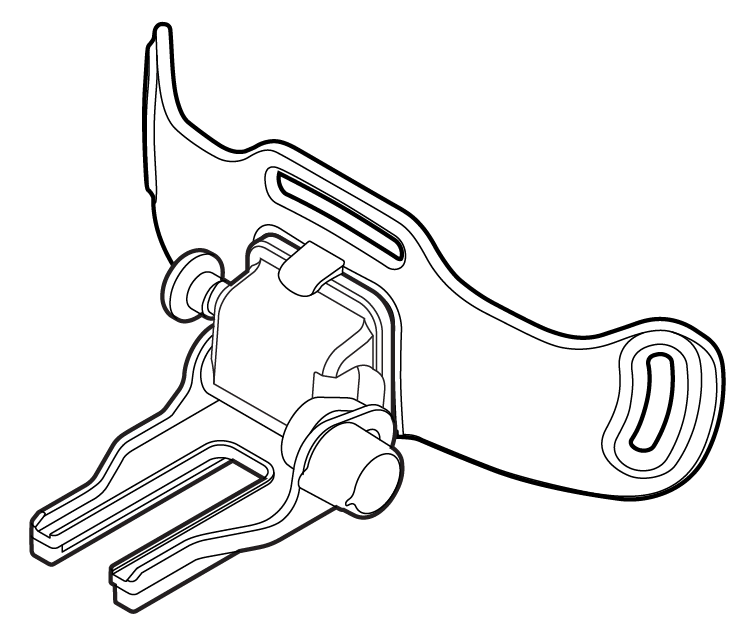
- Forehead unit: 1 unit
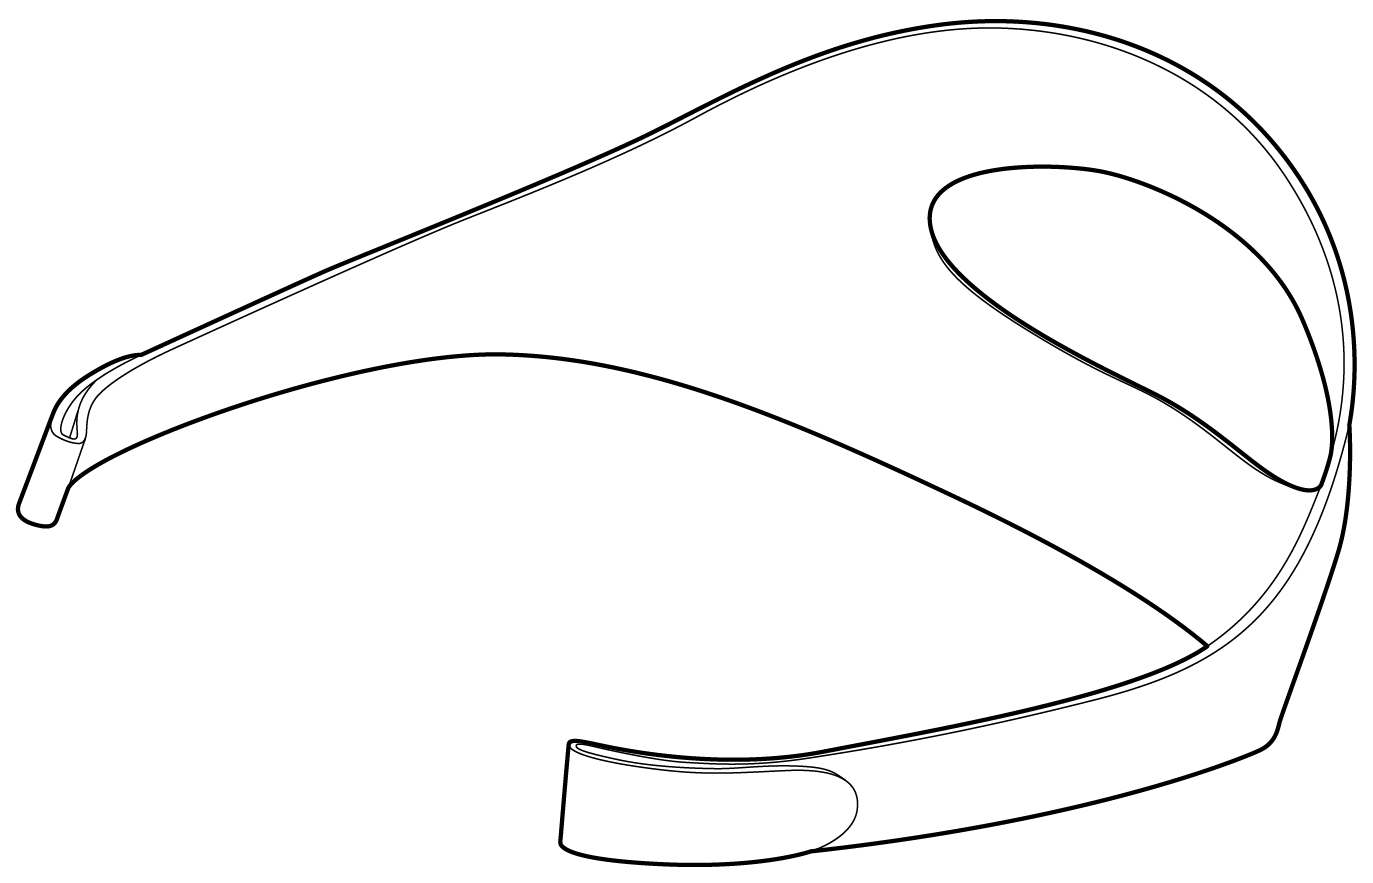
- Head strap: 1 unit
- Cable fastening tape: 1 piece is pre-attached.

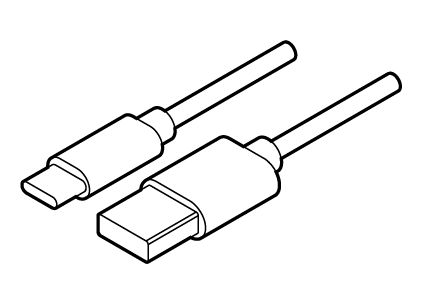
- USB Type-C to Type-C cable 3m: 1 cable
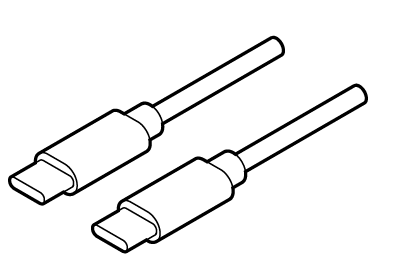
- USB Type-C Connector cable 1m: 1 cable
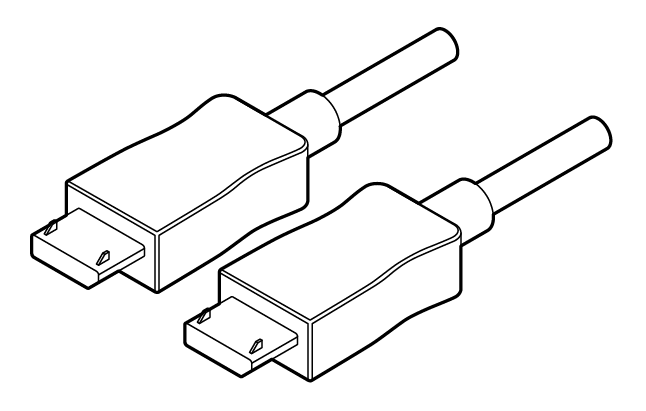
- DisplayPort cable:1 cable
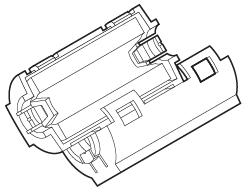
- Ferrite core (included only in the JP/EU/UK): 1 piece
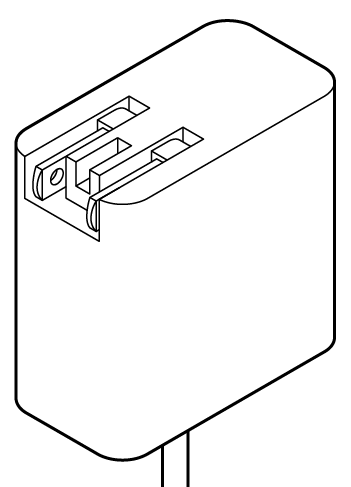
- AC Adapter:1 unit
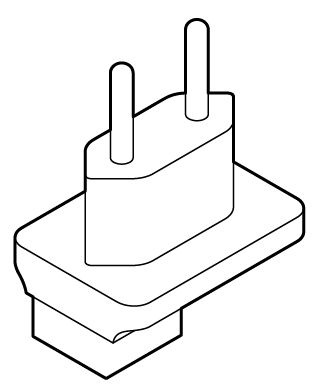
- EU plug
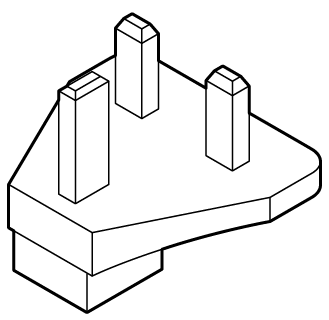
- UK plug
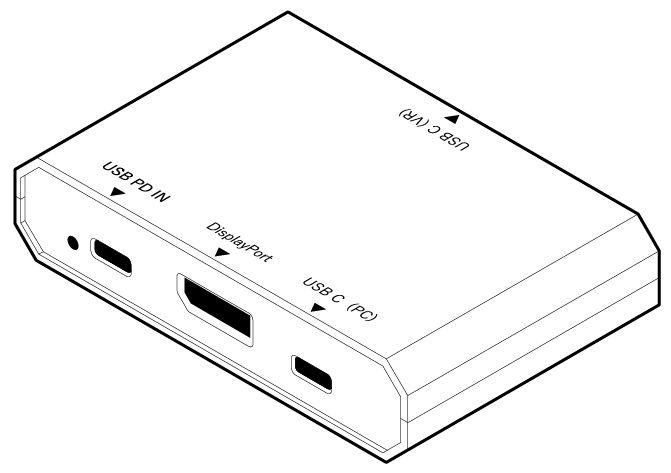
- Converter box: 1 unit
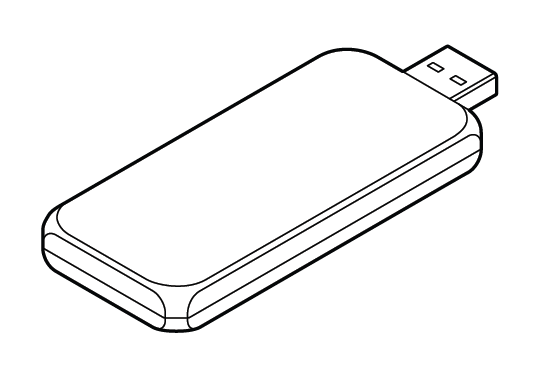
- Dongle for SteamVR™ controllers (the type included may vary depending on when you purchased the product)
・X1 Dongle: 2 unit
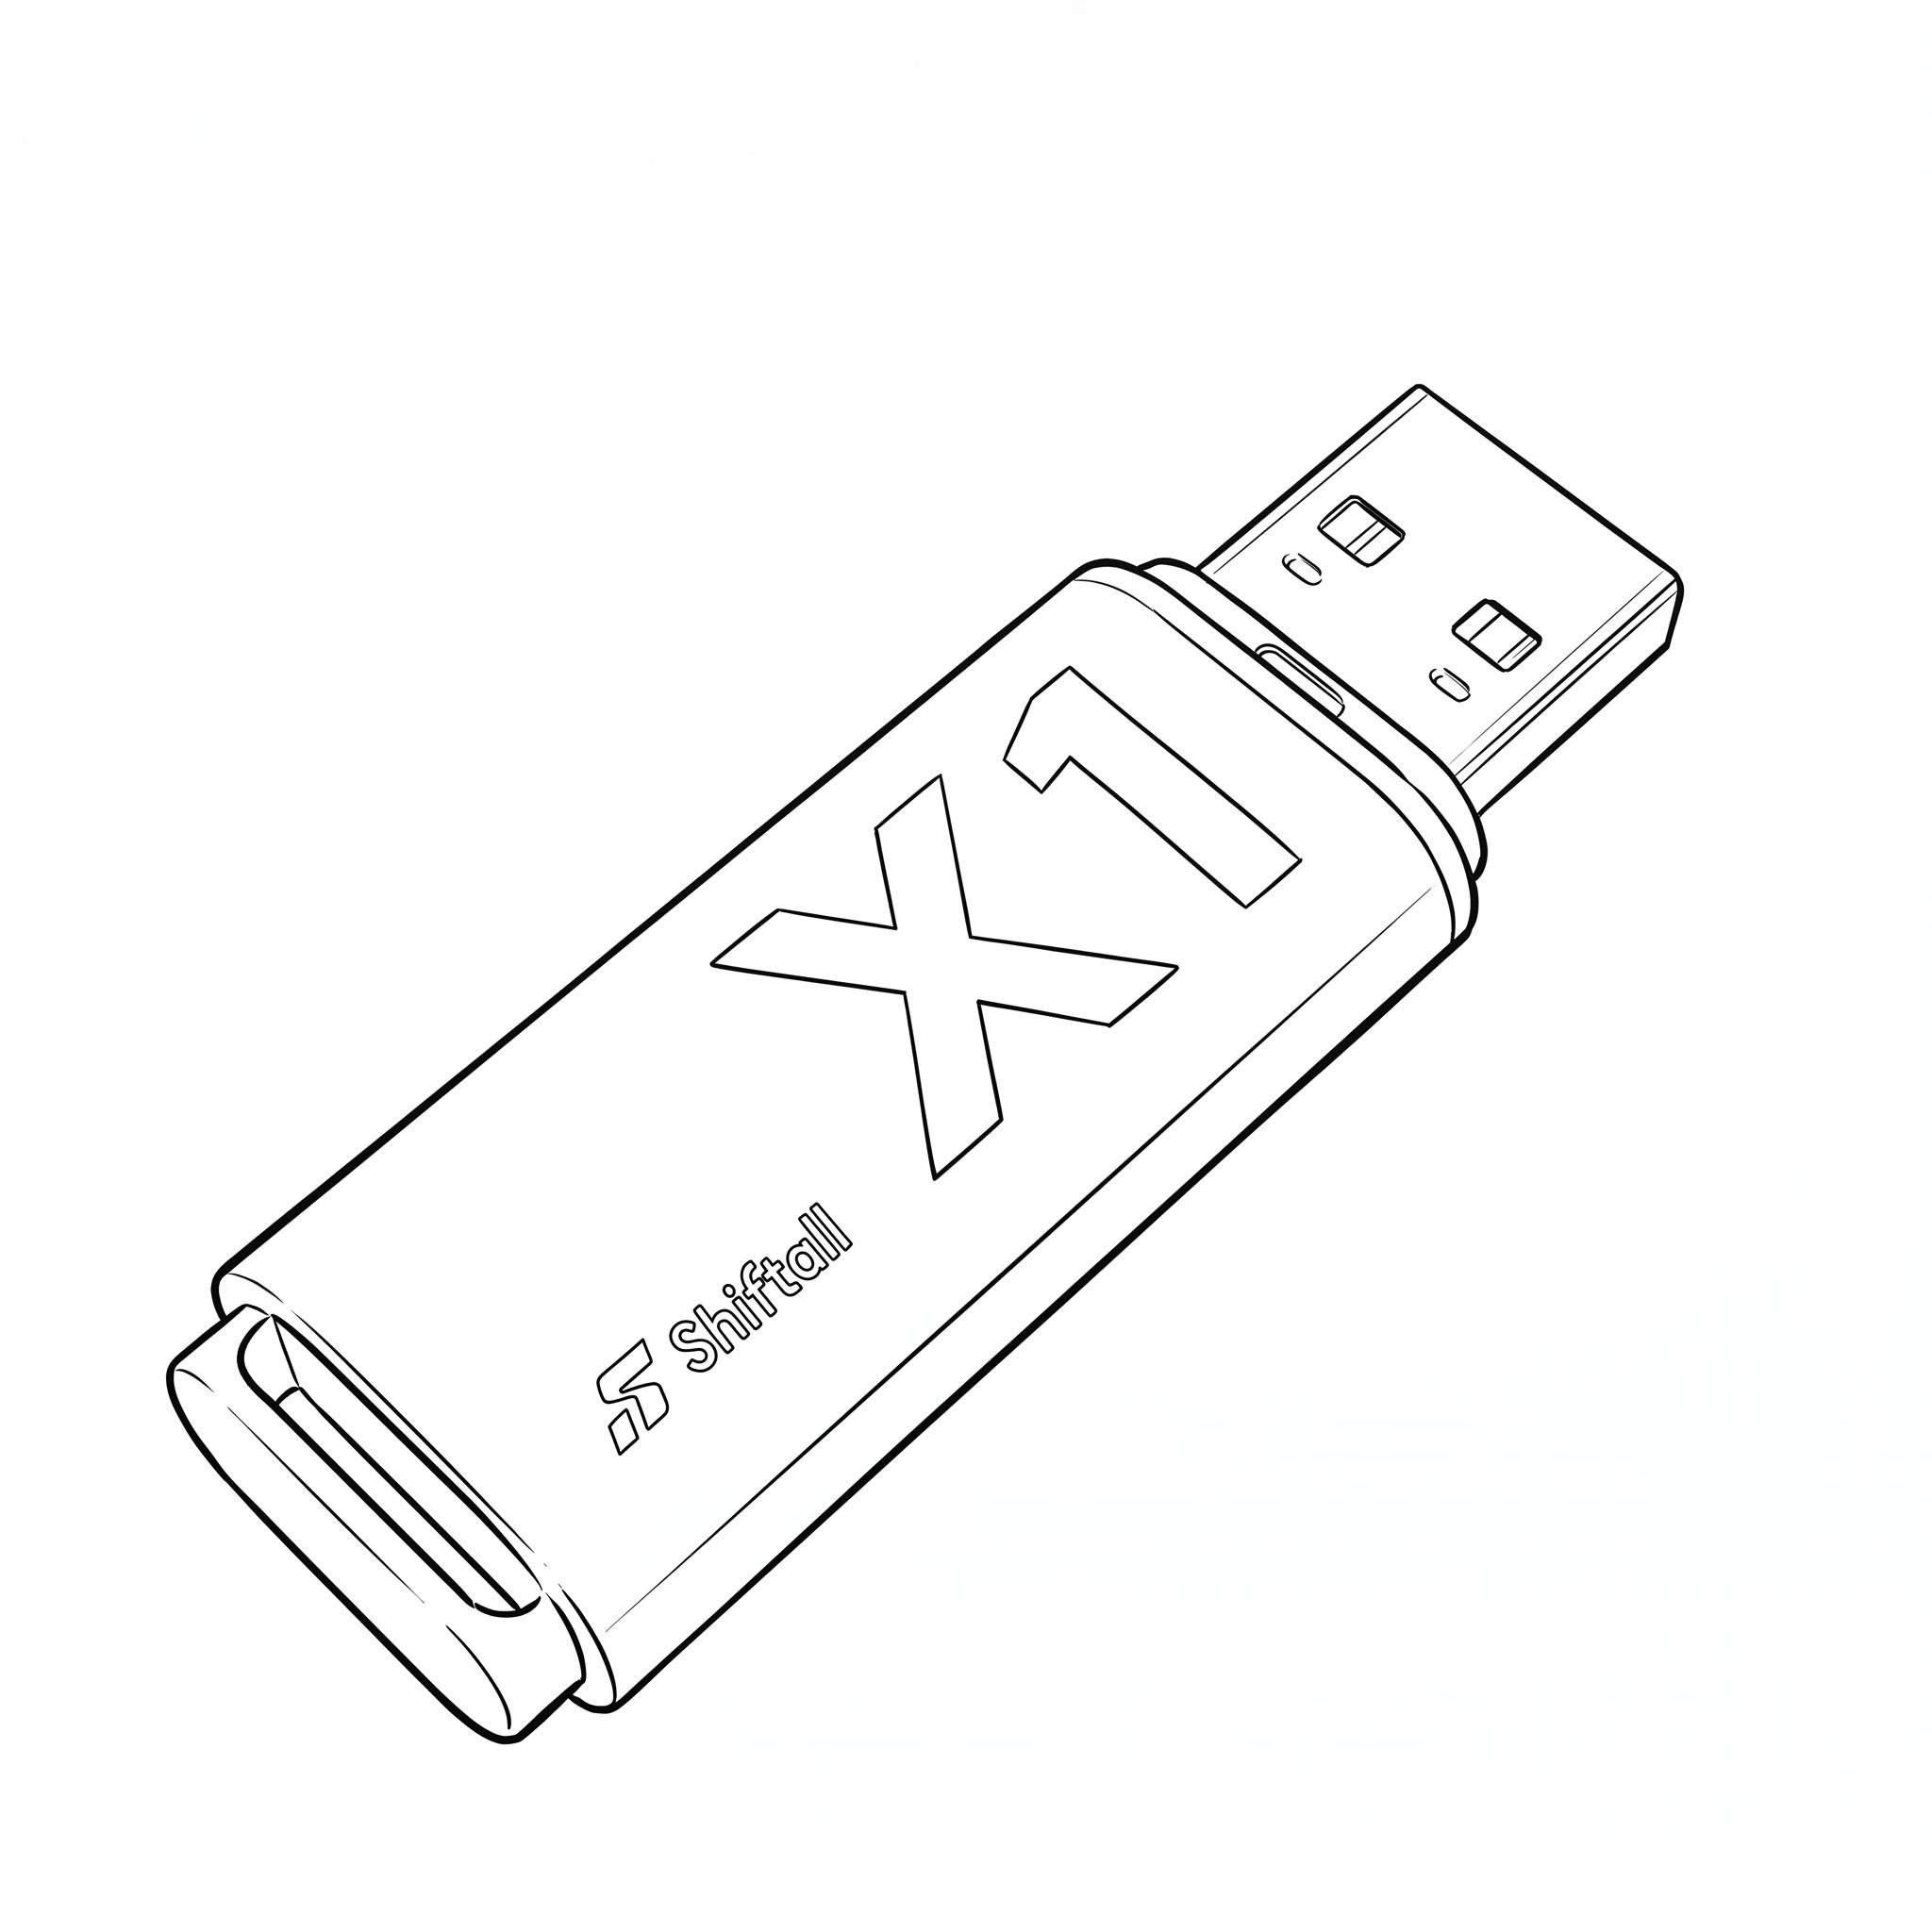
・X2 Dongle: 1 unit
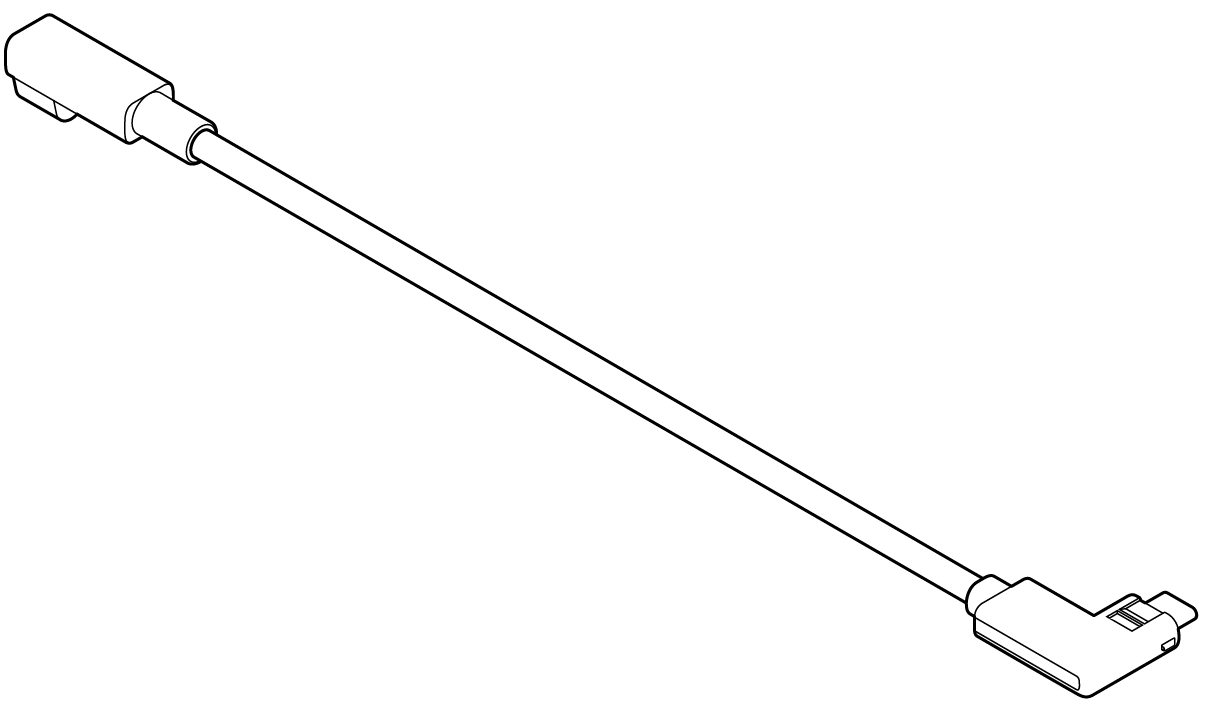
- USB Type-C Connector: 1 piece
- Handheld stick adapter: 1 unit
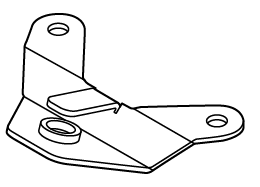
- Mounting screws: 2 pieces

- Safety Precautions/Warranty
3. Setting up the Windows PC and operating environment
Section titled “3. Setting up the Windows PC and operating environment”3.1 Software Installation
Section titled “3.1 Software Installation”To use MeganeX 8K Mark II, you need to install the following apps and software.
3.1.1About MeganeX 8K Mark II Configurator
Section titled “3.1.1About MeganeX 8K Mark II Configurator”This software is required when using MeganeX 8K Mark II.
- From this page, please download the “MeganeX 8K Mark II Configurator”.
- Run the downloaded file.
- After the installation is complete, make sure to restart your PC.
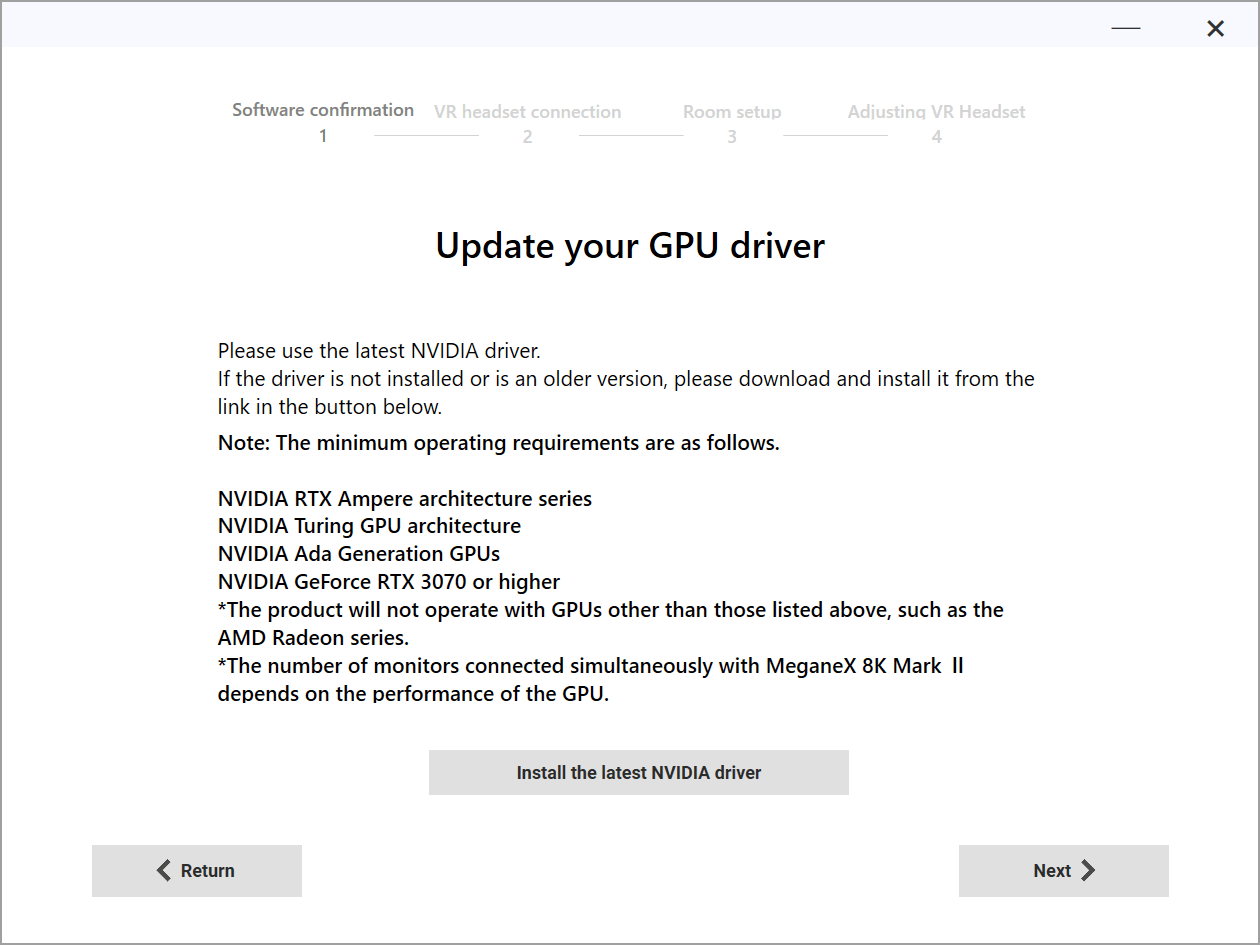
3.2 Update your graphics driver to the latest version
Section titled “3.2 Update your graphics driver to the latest version”MeganeX 8K Mark II requires NVIDIA graphics driver 591.44 or newer.
Please download the latest version or update from the NVIDIA website.
3.3 Setting Base Station
Section titled “3.3 Setting Base Station”Please set the Base Station
- Check that the status light is green.
- For setting instructions, refer to the base station manual.
3.4 Converter Box Connection
Section titled “3.4 Converter Box Connection”3.4.1 Connect the cable to the connector on the converter box
Section titled “3.4.1 Connect the cable to the connector on the converter box”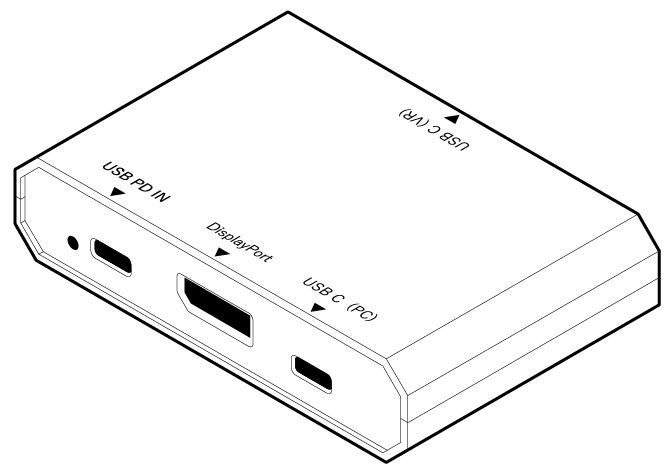
- USB PD IN
Connect the AC adapter. Insert the power cord into the outlet at the power-on timing described in 5.1 Connecting earphone or USB device
- DisplayPort
Connect the DisplayPort cable.
- USB C (PC)
Please connect USB Type-A to Type-C cable 1m.
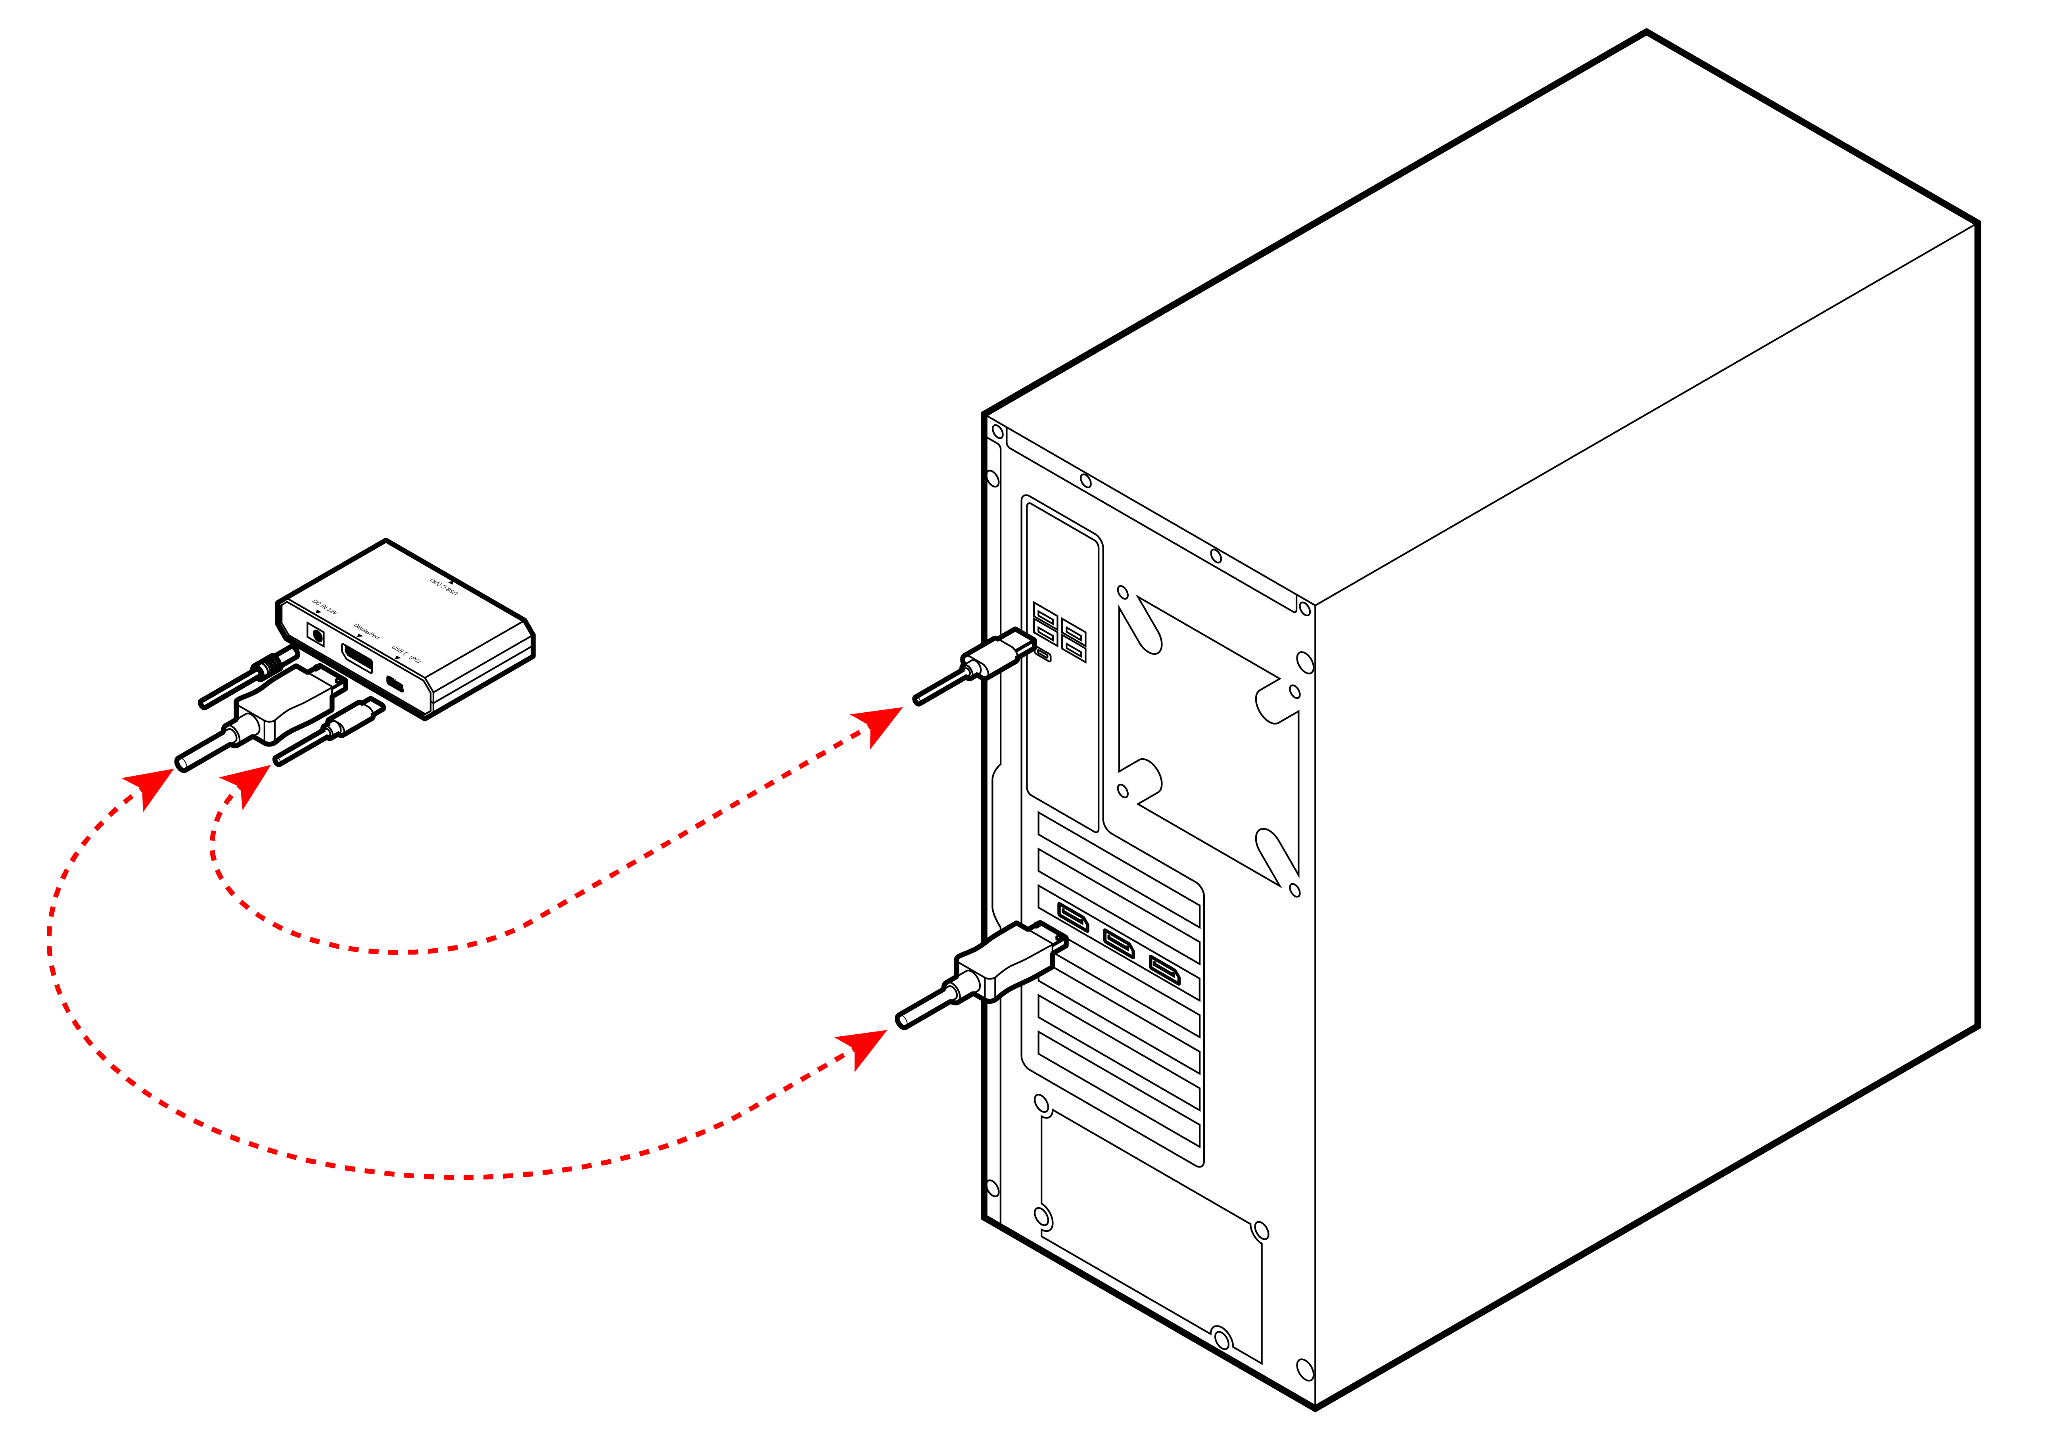
3.4.2 Connect the converter box to the PC
Section titled “3.4.2 Connect the converter box to the PC”- Connect the USB Type-A to Type-C cable 1m to the USB-C (PC) port on the converter box, and then connect the other end of the cable to the USB port on your PC.
- Connect the DisplayPort cable, which is plugged into the DisplayPort on the converter box, to the DisplayPort port on your PC’s graphics card.
⚠️ Important
Do not use the DisplayPort connector on the motherboard. Connect to the DisplayPort connector on the NVIDIA graphics card.
4. Initial settings for MeganeX 8K Mark II
Section titled “4. Initial settings for MeganeX 8K Mark II”4.1 Connector Installation
Section titled “4.1 Connector Installation”Connect the USB Type-C connector to the USB Type-C port on the MeganeX 8K Mark II main unit.
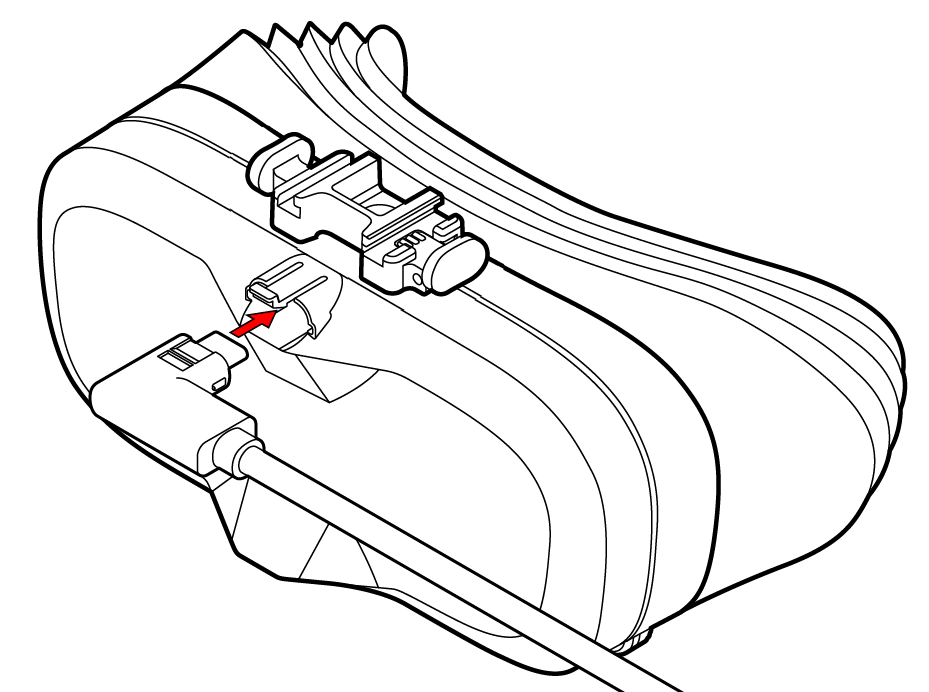
4.2 Attaching the forehead pad
Section titled “4.2 Attaching the forehead pad”Attach the forehead pad to the main unit. Align the forehead pad rail with the groove on the main unit rail, and slide the forehead pad rail from the base to the tip while pressing the button on the side of the main unit rail. (It cannot be attached from the tip.)
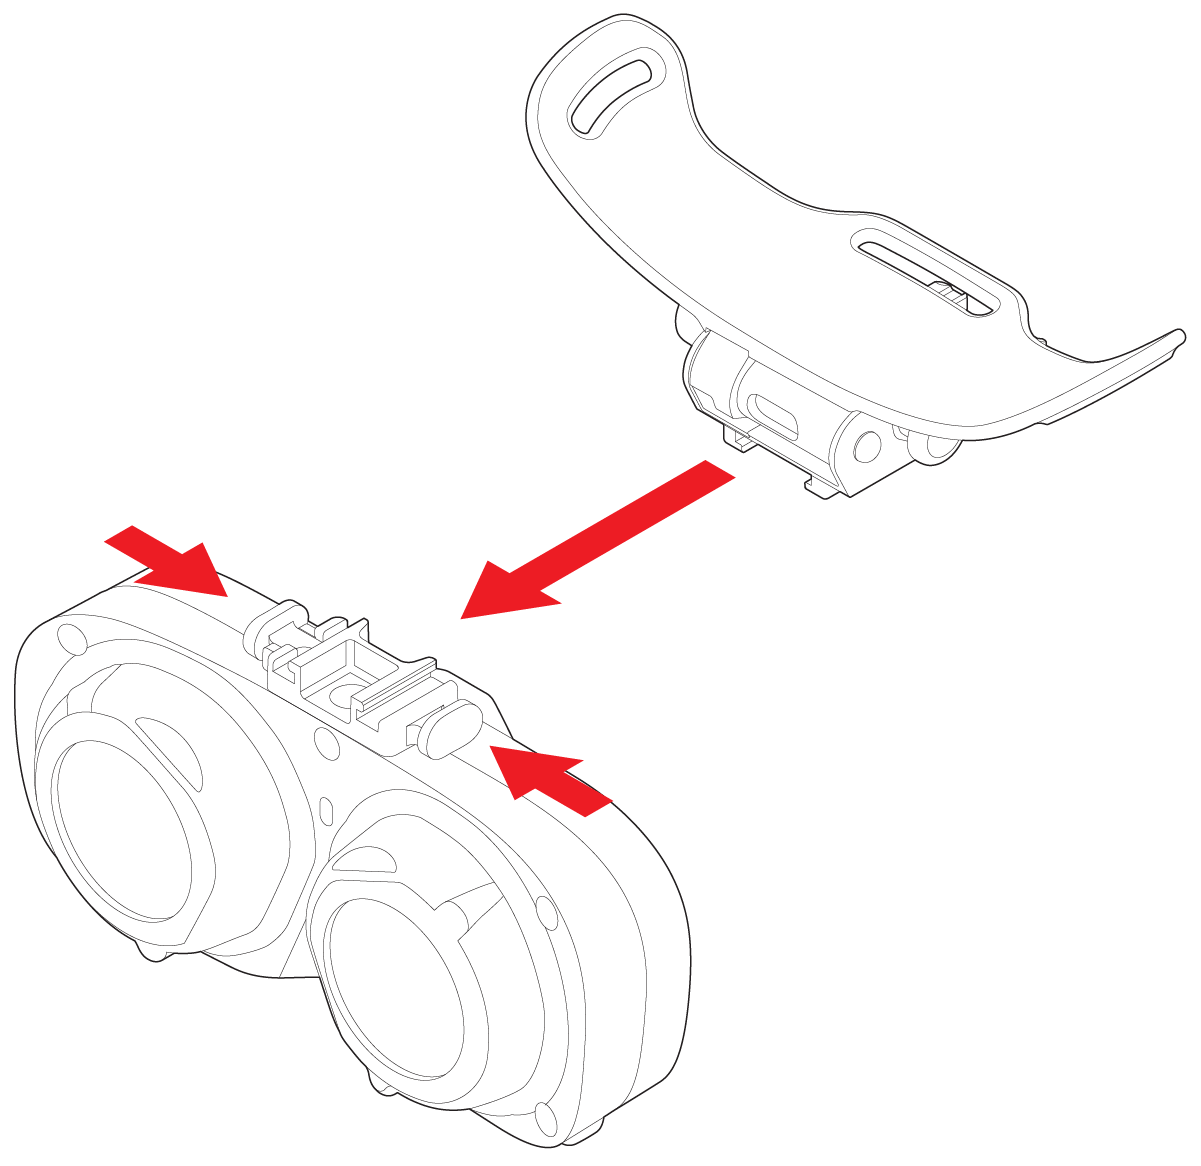
4.3 Attaching the Light Shade
Section titled “4.3 Attaching the Light Shade”Attach the light shade to the main unit. Align the magnets on the light shade and the main unit to attach it.
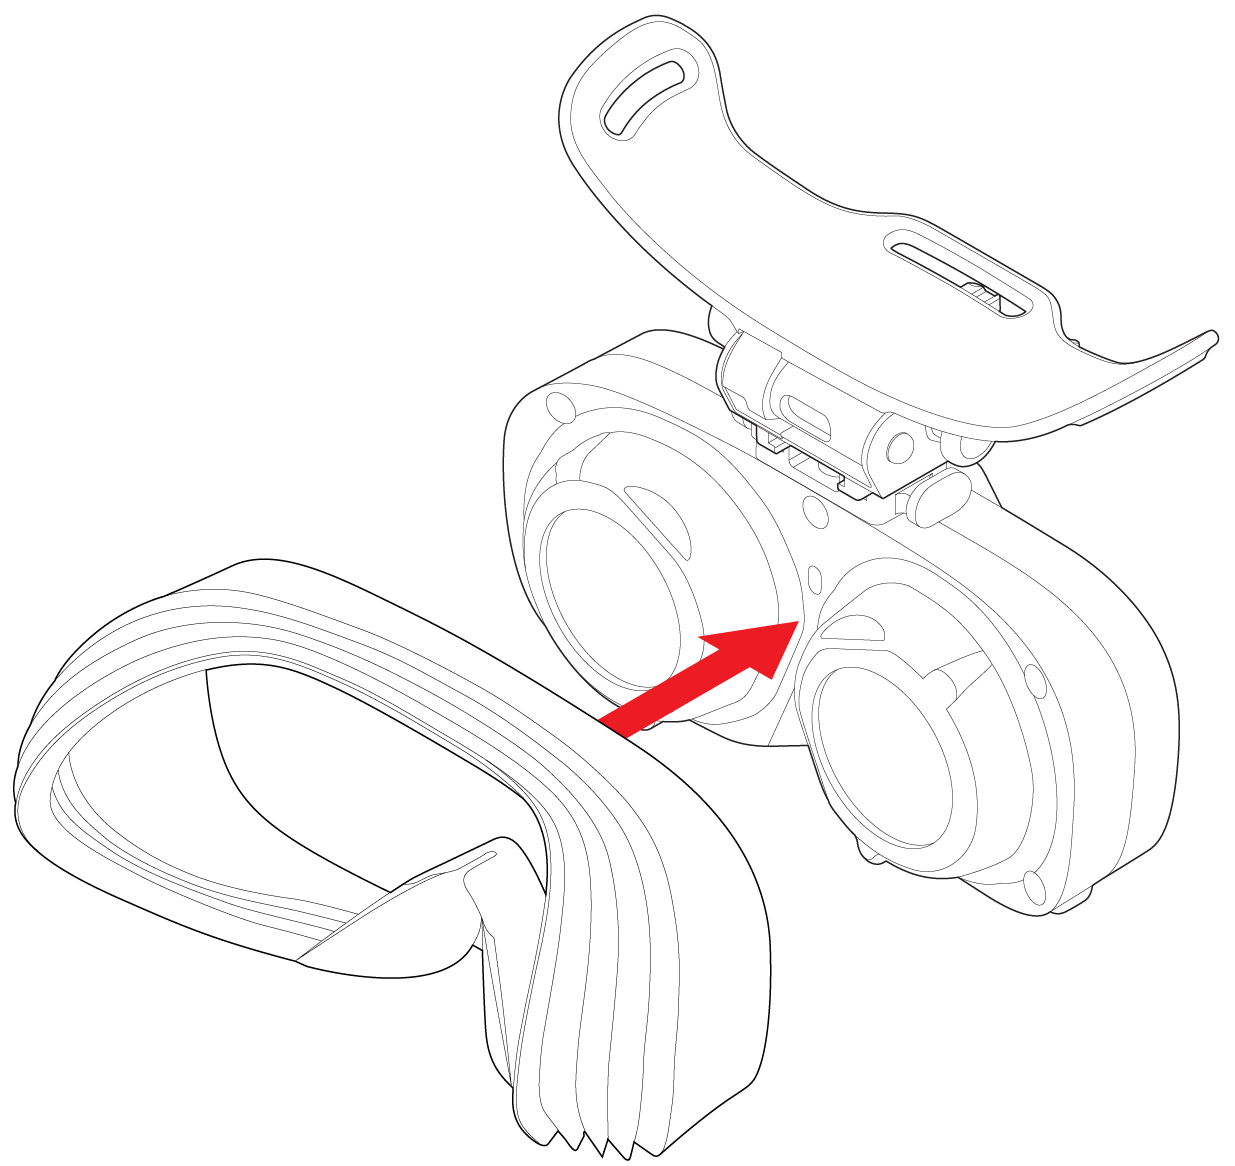
4.4 Attaching the head strap
Section titled “4.4 Attaching the head strap”Attach the head strap to the forehead pad. Pass the ends of the strap through the slits on both sides of the forehead pad from the inside.
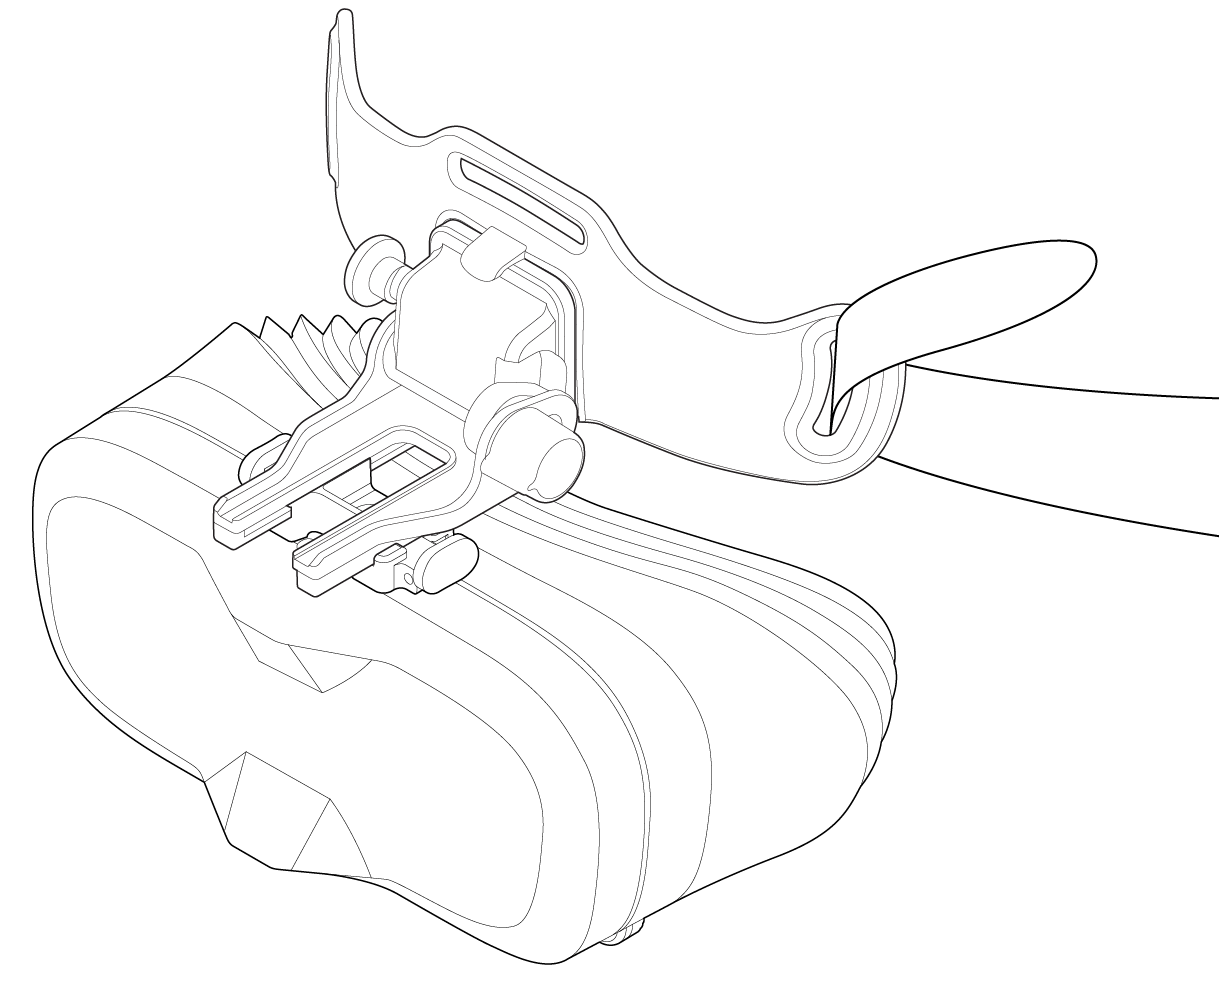
■How to Use
Section titled “■How to Use”5. Turn on the MeganeX 8K Mark II.
Section titled “5. Turn on the MeganeX 8K Mark II.”5.1 Connecting earphone or USB device
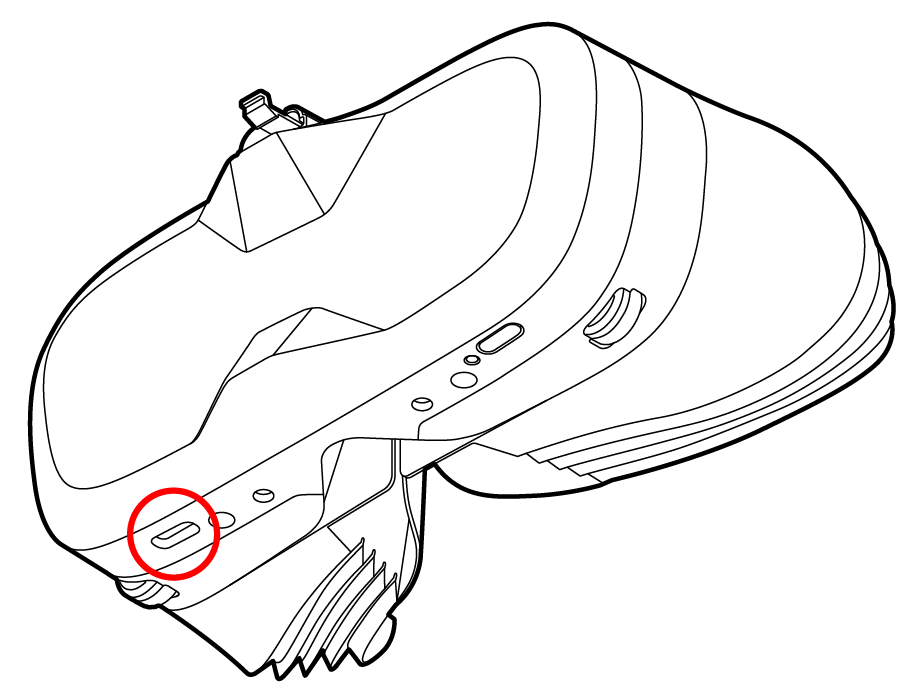
Section titled “5.1 Connecting earphone or USB device”You can connect USB Type-C-compatible earphones or USB devices to the USB Type-C port located on the bottom of the MeganeX 8K Mark II.
Devices connected to this USB Type-C port will be recognized by Windows as USB devices.
5.2 Power On
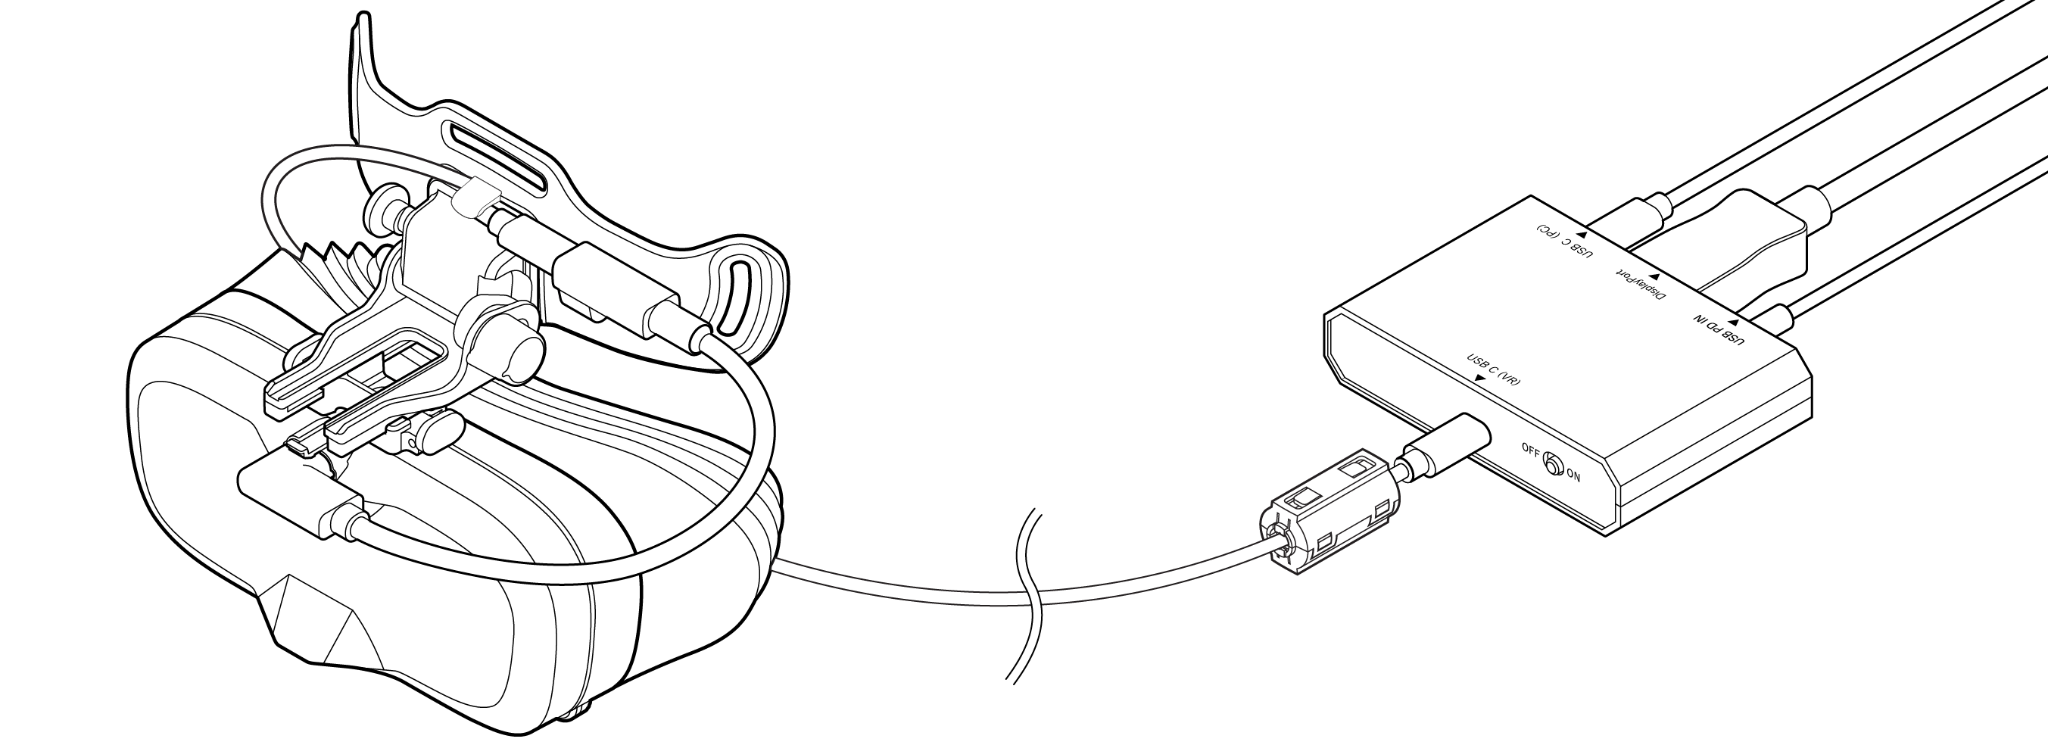
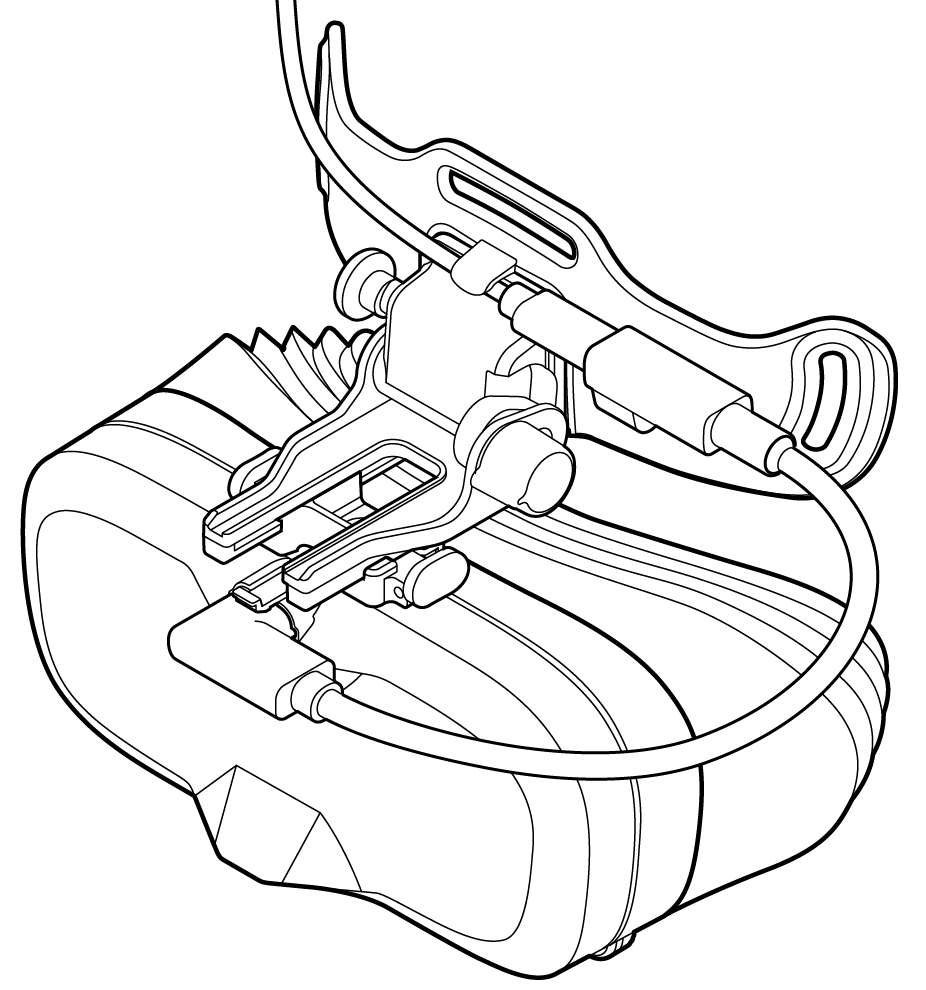
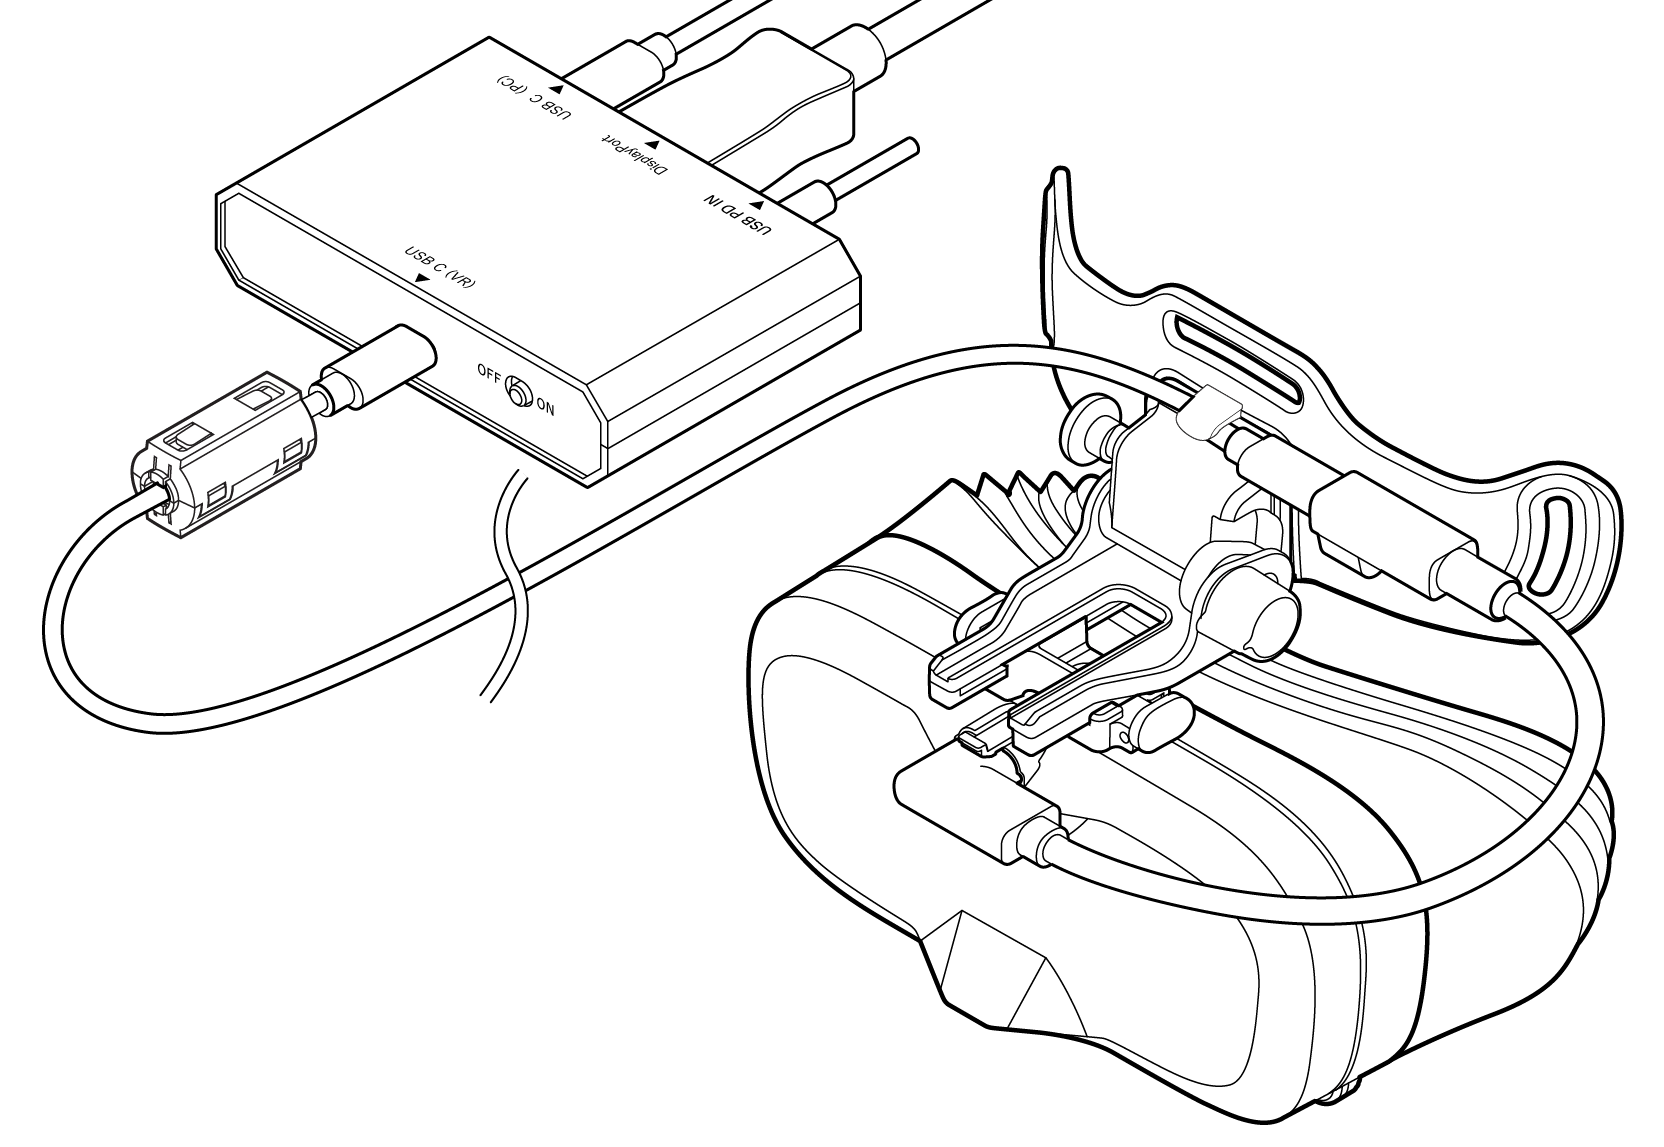
Section titled “5.2 Power On”- Connect the 3m USB Type-C to Type-C cable to the USB Type-C connector attached to the MeganeX 8K Mark II. Attach the cable to the hook on the forehead pad.
⚠️ To prevent USB port damage, USB connector breakage, or video output issues, always route the cable through this hook when using the device.
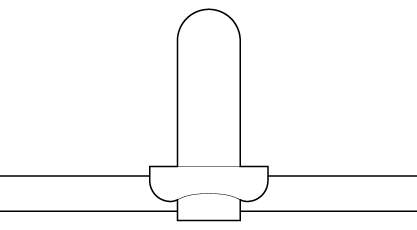
- Please attach the cable fastener Velcro to the cable. The cable fastener Velcro is attached to the head strap.
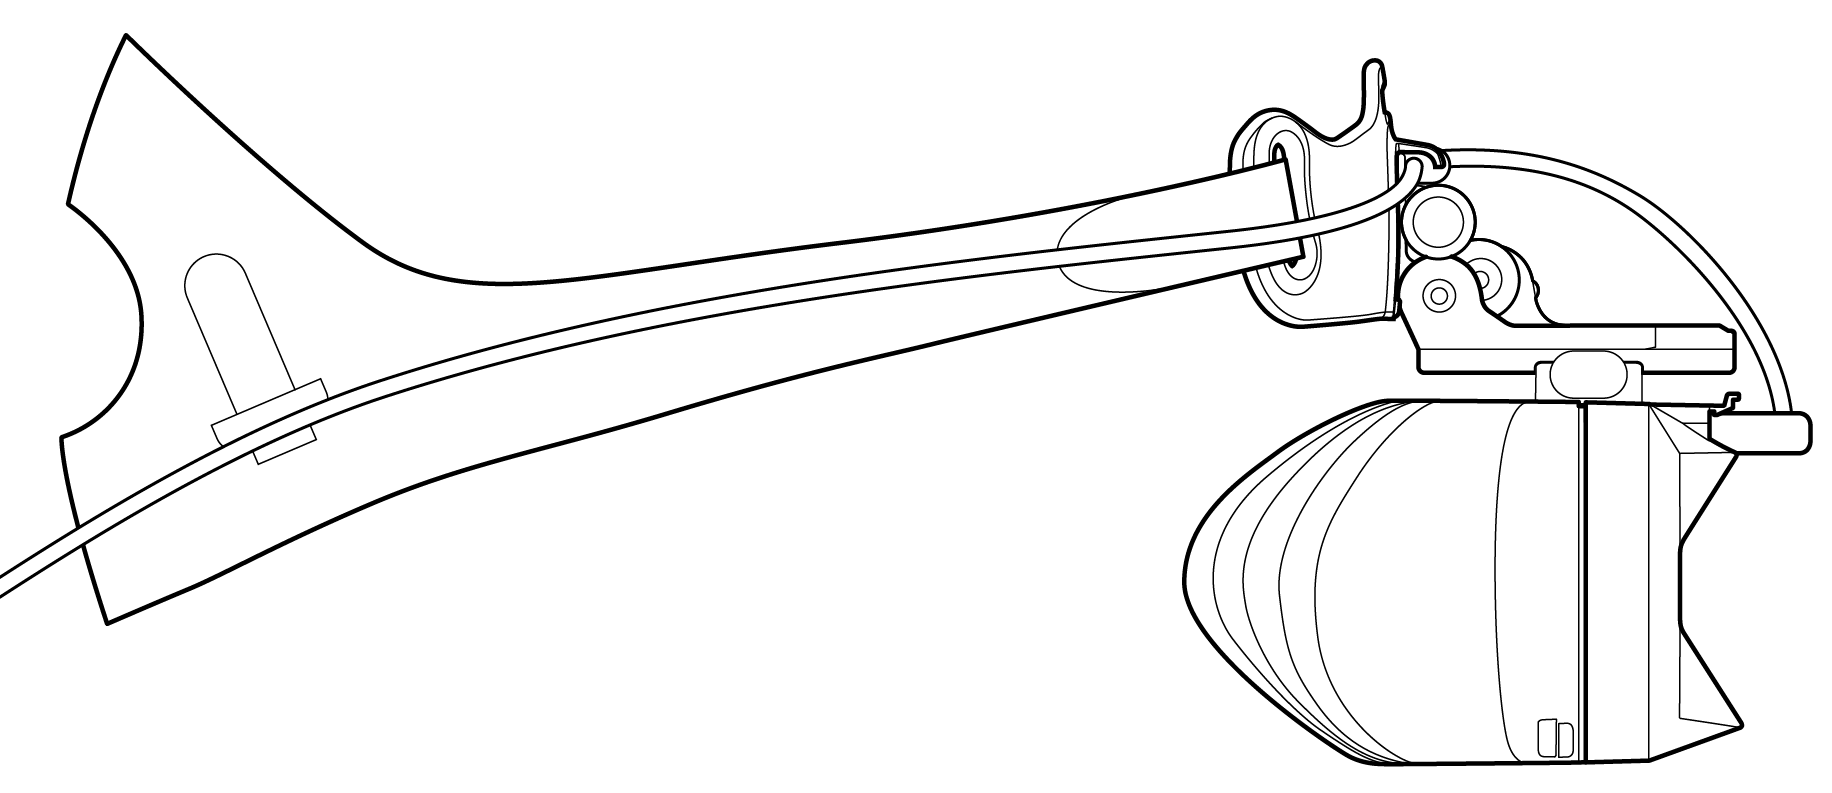
- Secure the cable, which is hooked onto the forehead pad hook, to the head strap using the cable fixing hook-and-loop fastener attached to the head strap.
⚠️ To prevent cable damage or video output issues, be sure to use the cable fastener Velcro as shown in the diagram.
- Attach the ferrite core close to the converter box.
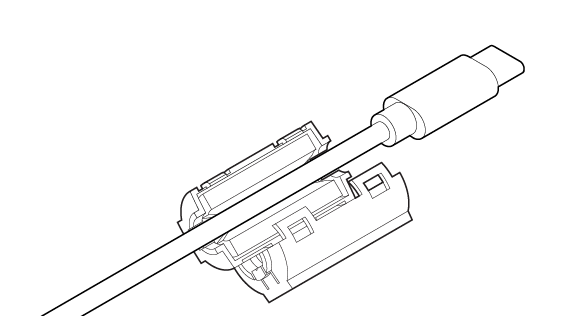
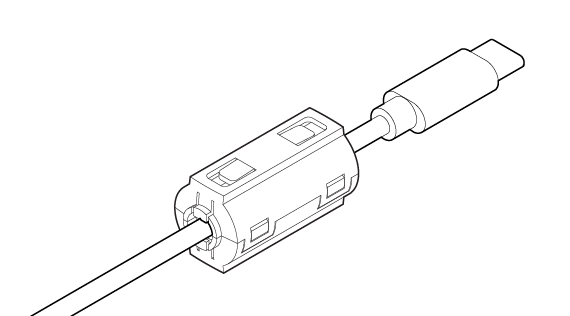
- Connect the USB Type-C to Type-C cable 3m inserted into the USB Type-C terminal on the MeganeX 8K Mark II to the USB C (VR) on the converter box.
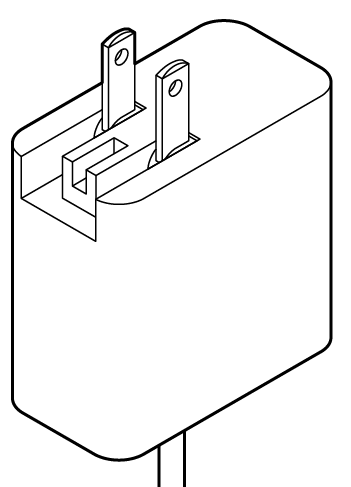
- Connect the AC adapter to a power outlet. Plug the AC adapter into a power outlet.
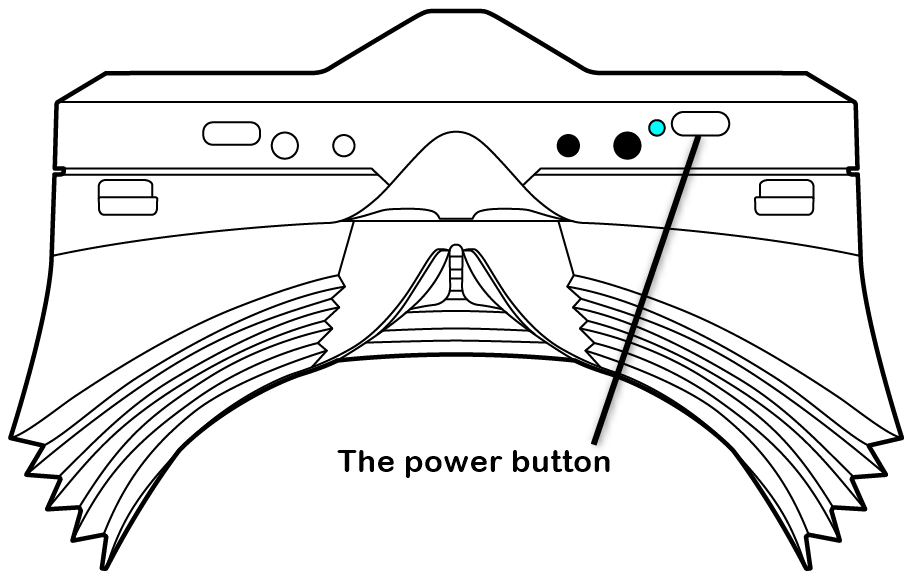
- Power On The device will turn on automatically when the AC adapter is connected to a power outlet. If the adapter is already plugged in, press the power button to turn it on.
5.3 Starting MeganeX 8K Mark II Configurator
Section titled “5.3 Starting MeganeX 8K Mark II Configurator”After installing MeganeX 8K Mark II Configurator, it will automatically launch when the PC starts. If it does not start automatically, click the MeganeX 8K Mark II Configurator icon to launch the software manually. On the first launch, the setup guide screen will appear. Follow the on-screen instructions to complete the setup.
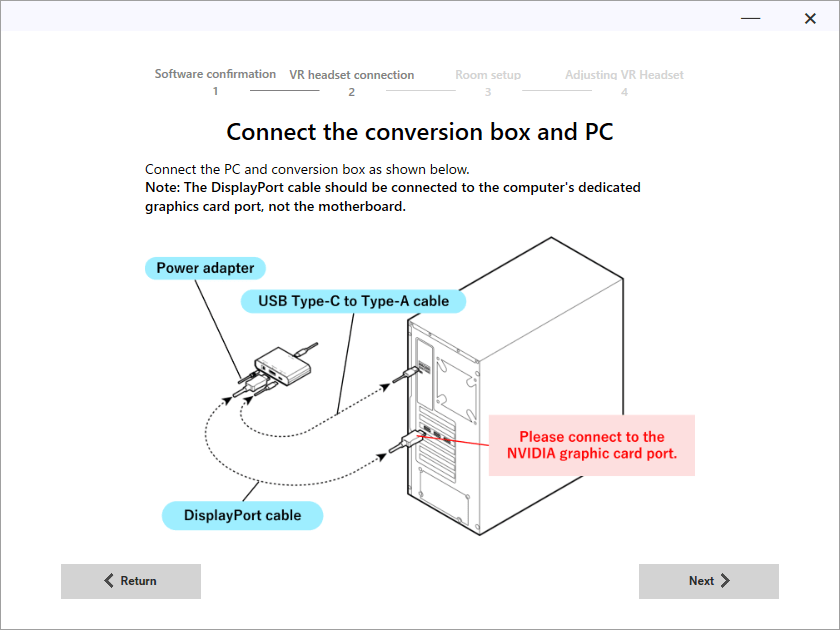
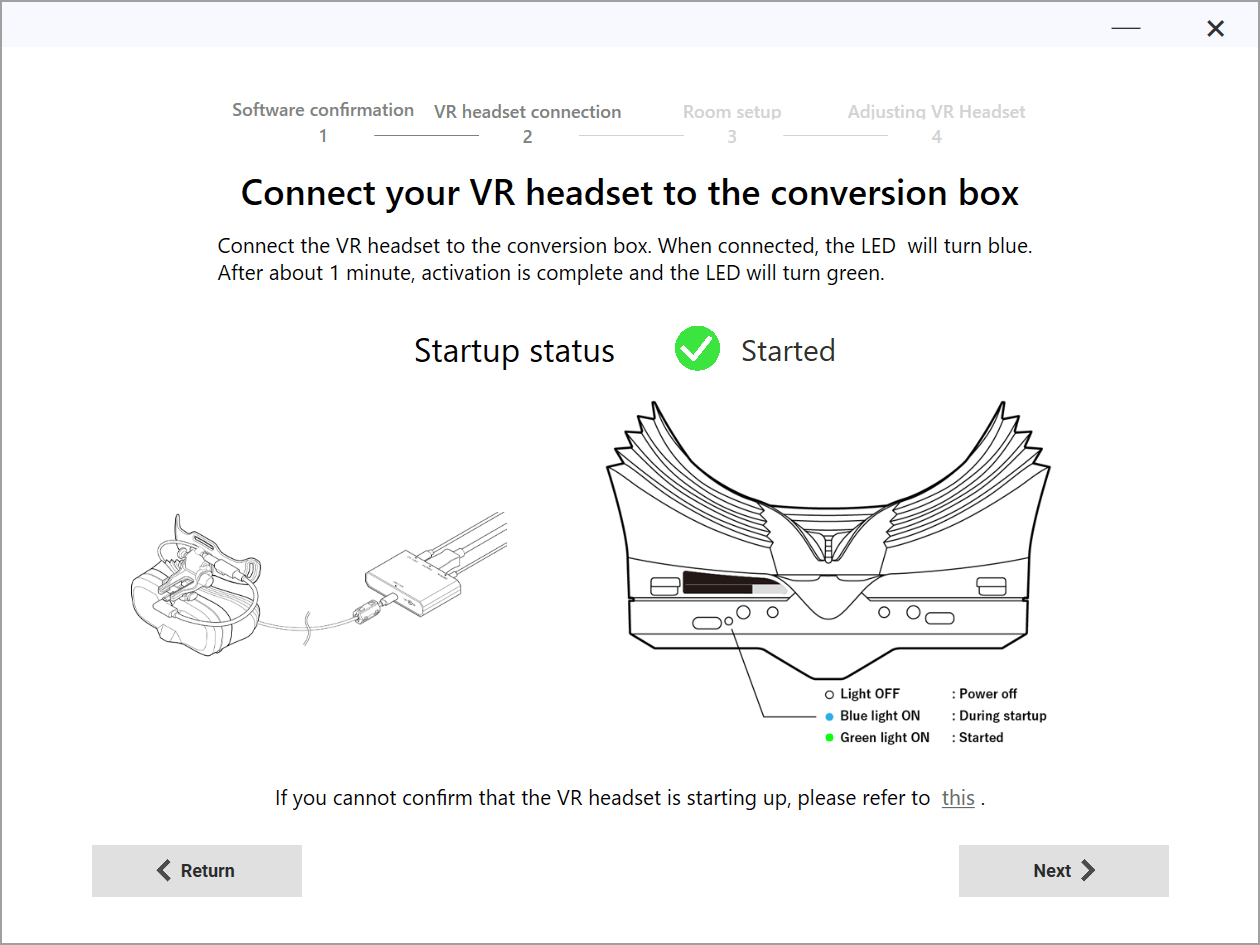
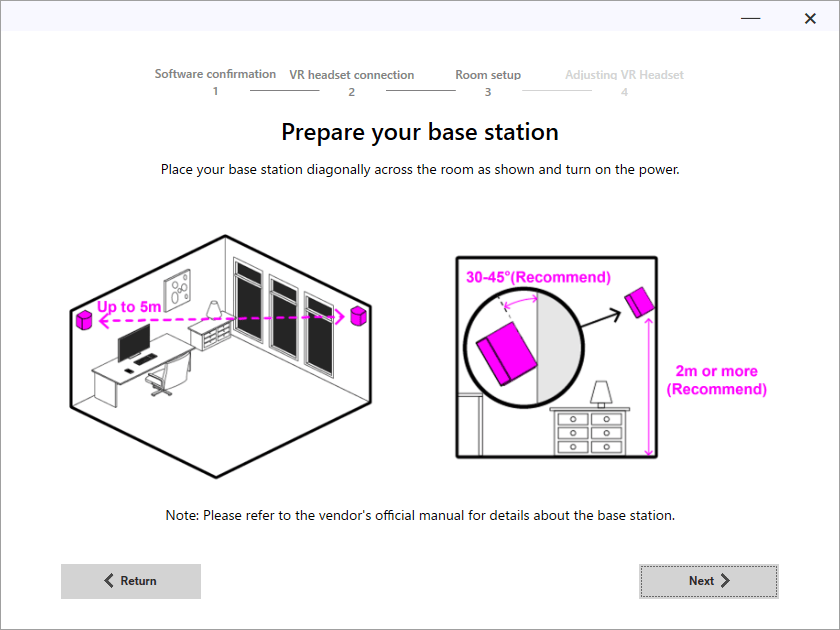
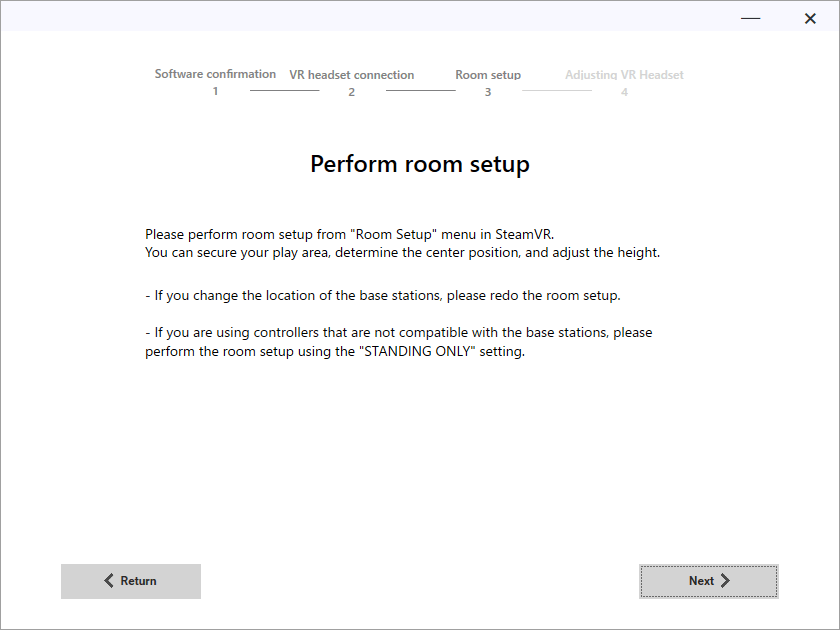
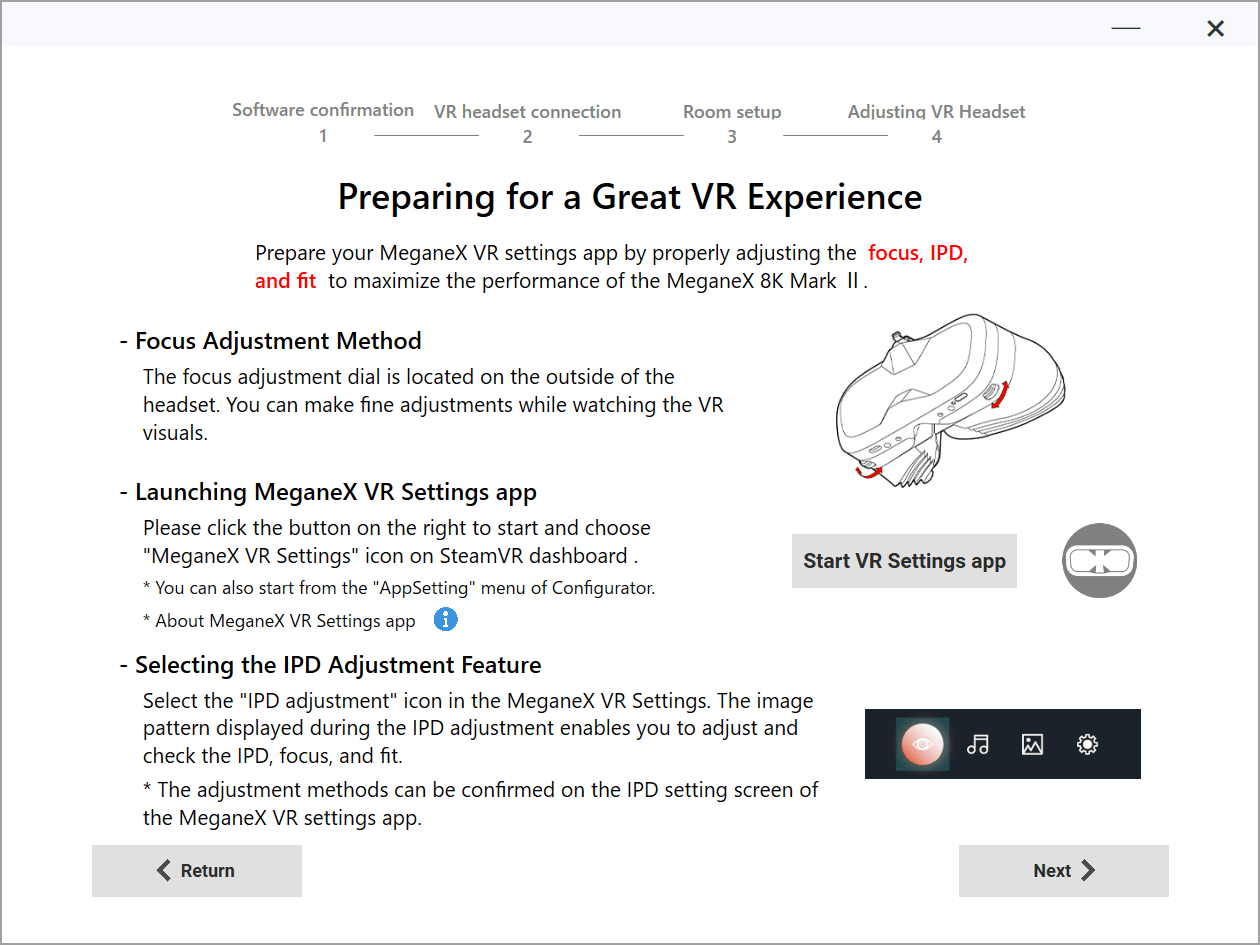
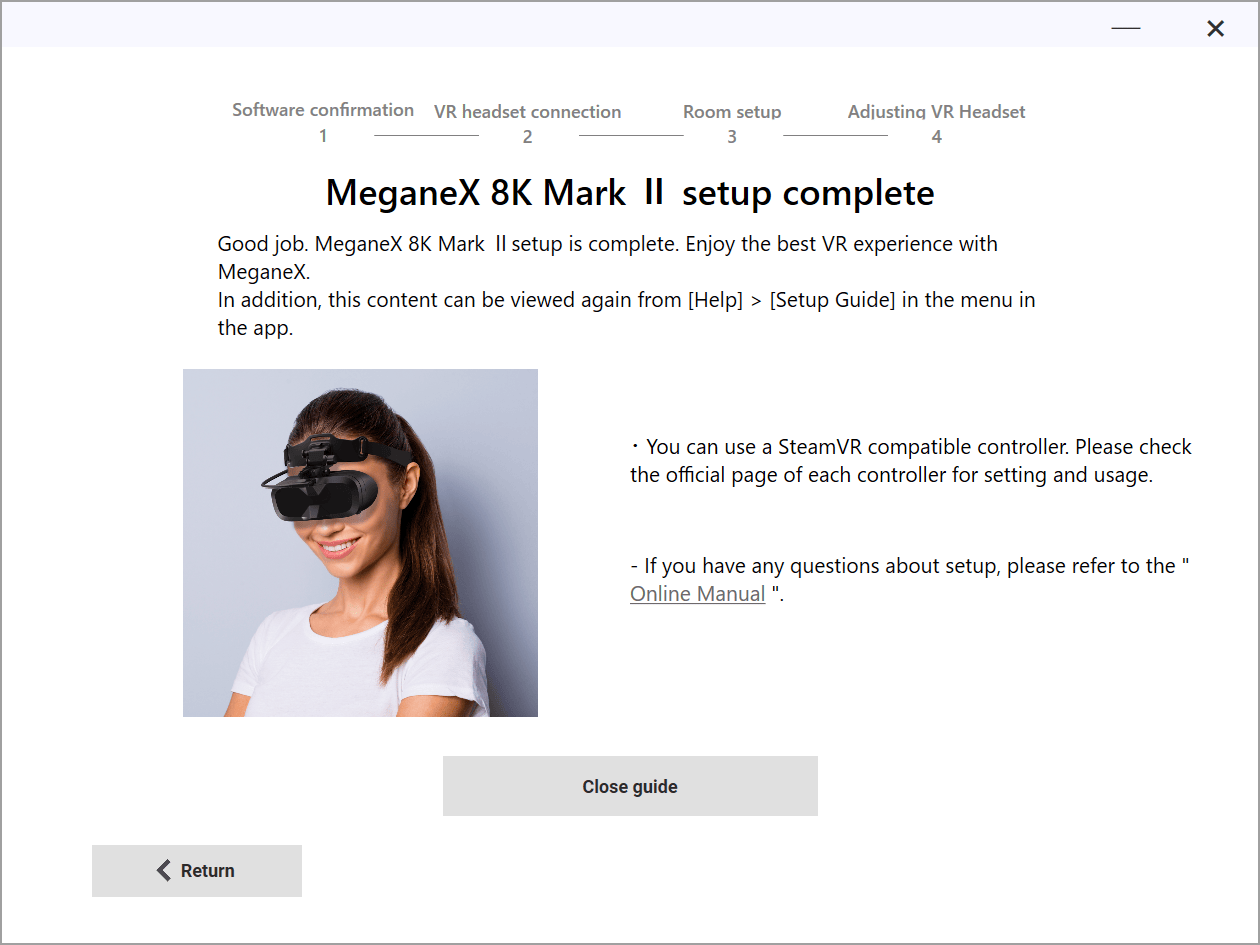
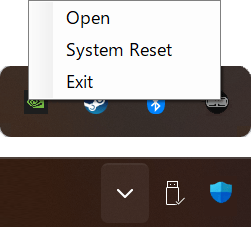
MeganeX 8K Mark II Configurator runs in the background. You can right-click the icon in the task tray to access the options: “Open”, “System Reset” and “Exit”.
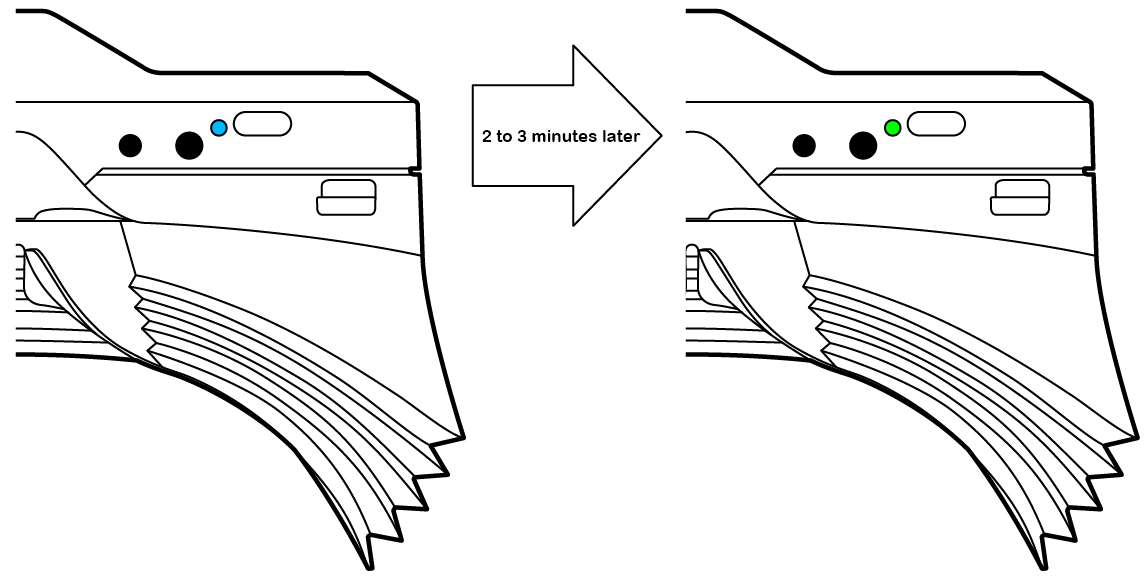
When you turn on MeganeX 8K Mark II, the status LED will blink BLUE. After 2 to 3 minutes, the LED will turn solid GREEN, indicating that the device is powered on. If the LED remains BLUE and does not switch to GREEN, there may be a communication issue between the PC and MeganeX 8K Mark II Configurator. In this case:
- Try connecting the USB Type-A cable to a different port on your PC.
- Right-click the MeganeX 8K Mark II Configurator icon in the system tray and select “System Reset” to restart the software.
5.4 Launch the SteamVR™ application
Section titled “5.4 Launch the SteamVR™ application”Start Steam and launch SteamVR™ from the store. When the MeganeX 8K Mark II is connected to SteamVR, the image will be displayed.
5.5 Connecting the SteamVR™ controller
Section titled “5.5 Connecting the SteamVR™ controller”Connect the controller using the X2 dongle.
Interference between USB 3.0 and the 2.4GHz band may cause connection instability. Use a USB extension cable to place the X2 dongle about 1 meter away from the PC.
Once connected, perform the controller pairing setup in SteamVR™. The X2 dongle can connect up to two SteamVR™ compatible devices.
5.6 Attaching MeganeX 8K Mark II
Section titled “5.6 Attaching MeganeX 8K Mark II”- Hold the main unit with one hand and the head strap with the other hand, and pull the head strap towards the back of your head as if you were putting on goggles while placing the forehead pad on your forehead. If the strap is loose, you can tighten it to prevent MeganeX 8K Mark II from slipping off. Adjust the strap by pulling the tip of the strap attached to the top of the forehead pad on both sides. (It is easier to adjust if you pull the strap while looking down.)
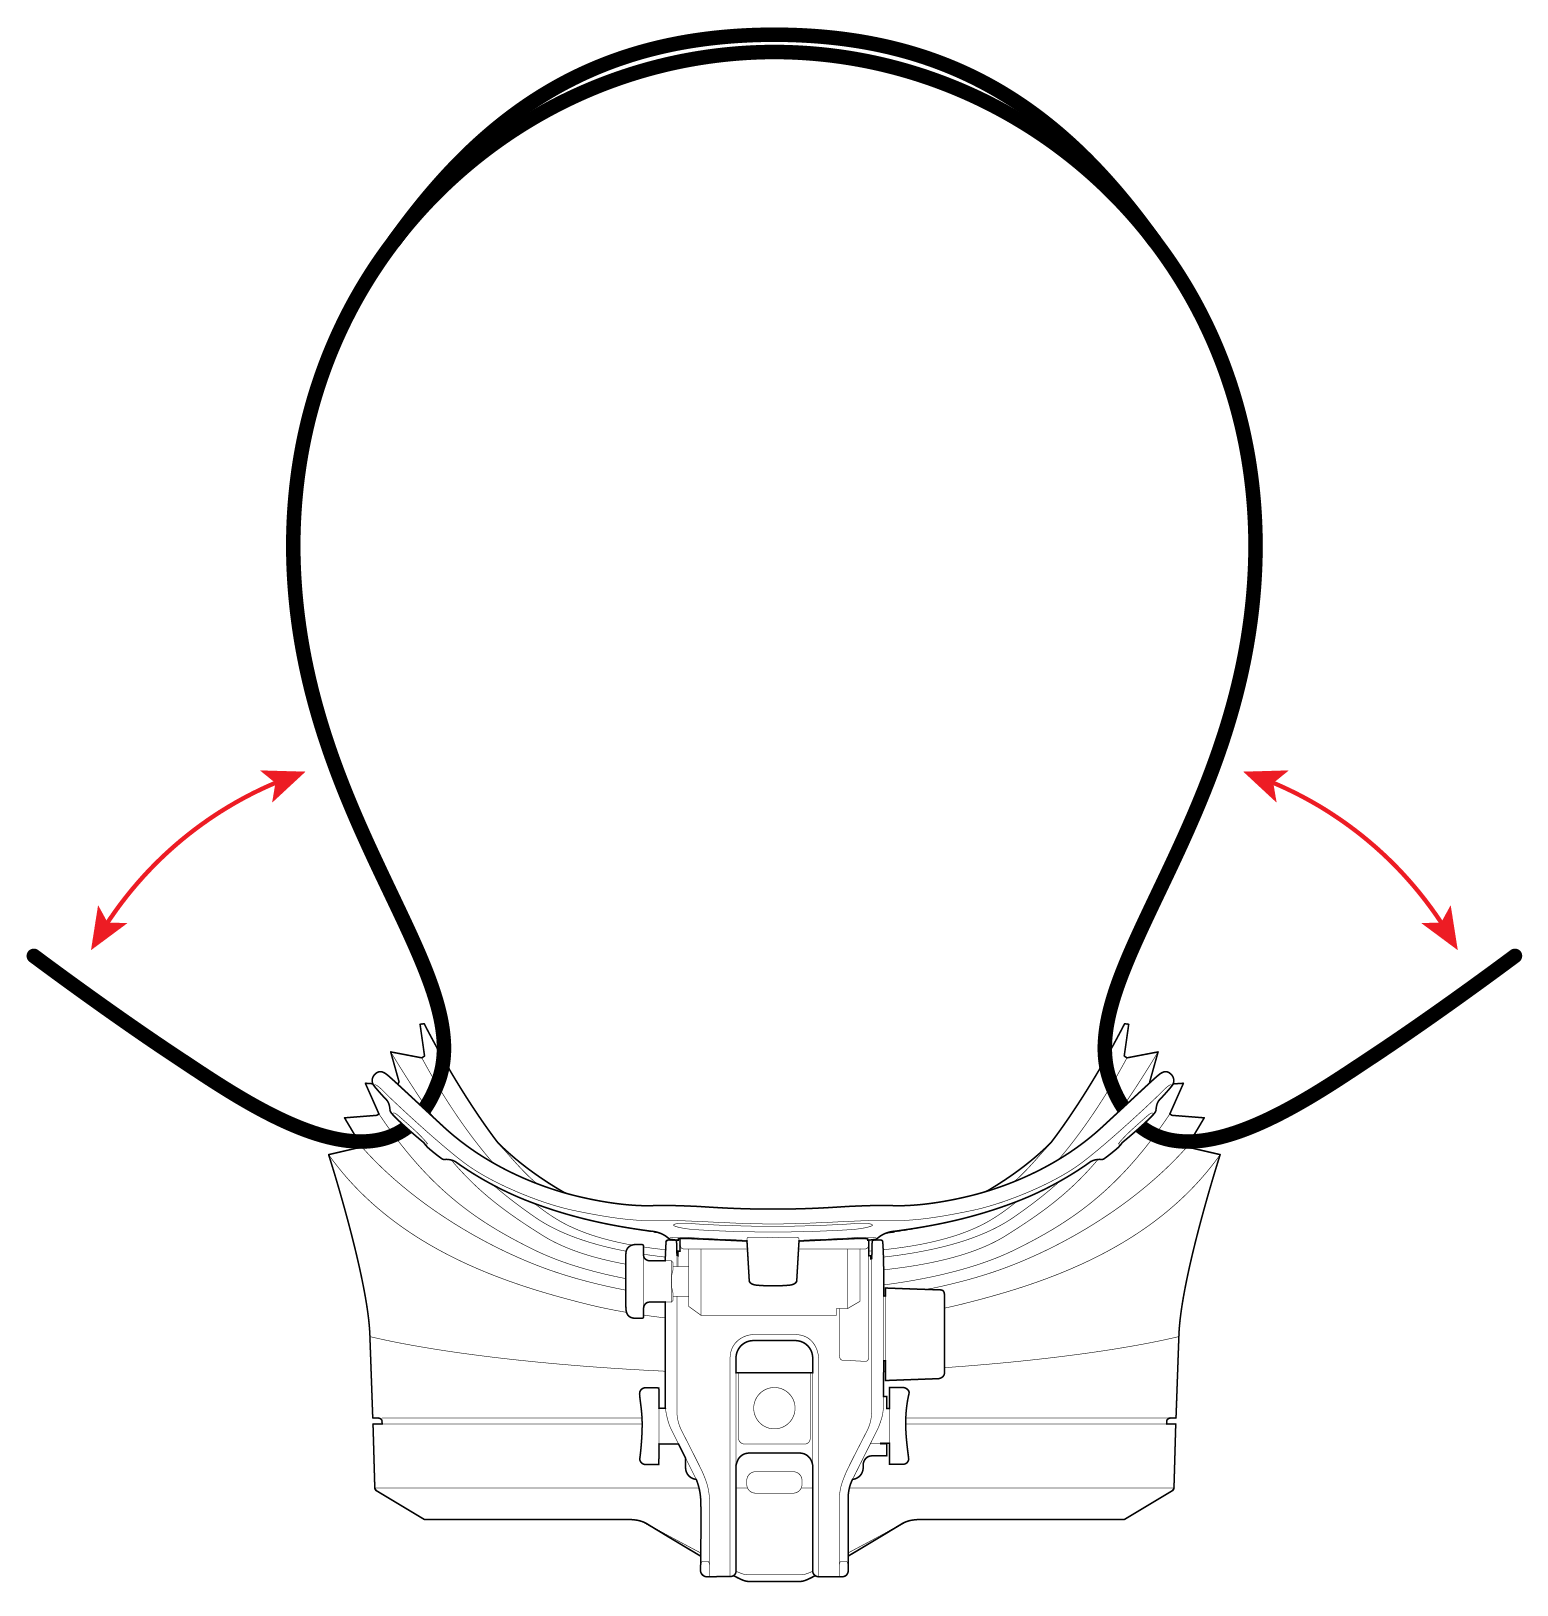
- Hook the cable onto the forehead pad hook, then secure it to the head strap using the cable fastener Velcro attached to the head strap.
⚠️ To prevent cable damage or video output issues, be sure to use the cable fastener Velcro as shown in the diagram.
5.7 Adjusting the focus
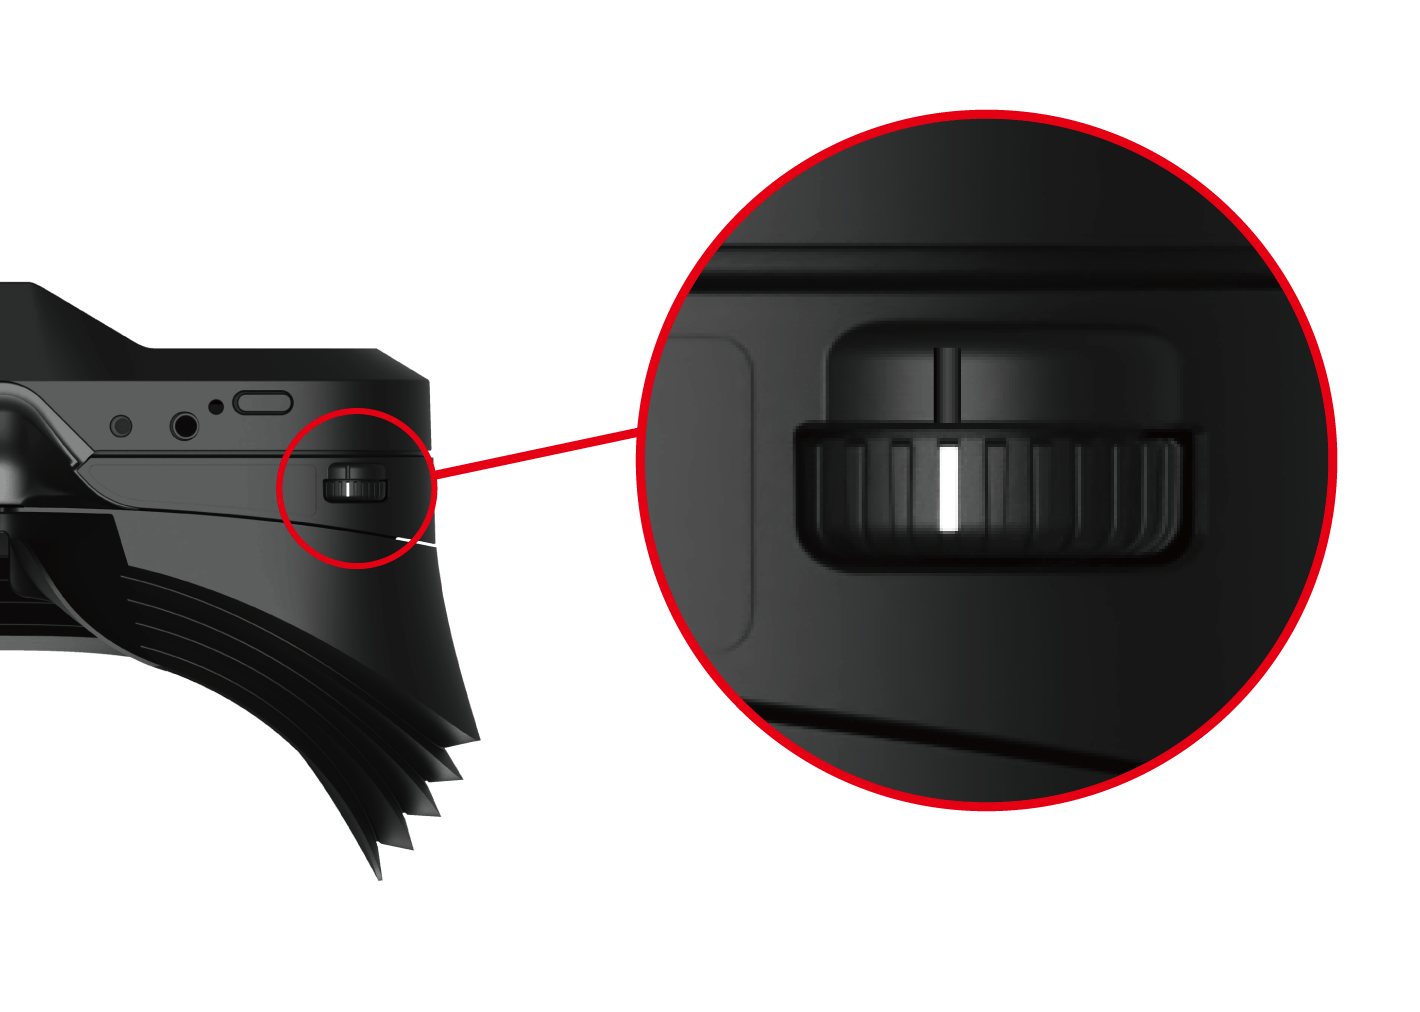
Section titled “5.7 Adjusting the focus”MeganeX 8K Mark II allows you to adjust the focus using the dial on the bottom of the unit. The focus can be adjusted independently for the left and right eyes, so adjust the focus for each eye while looking at the image or text. (Adjustment range: 0D to -7D)
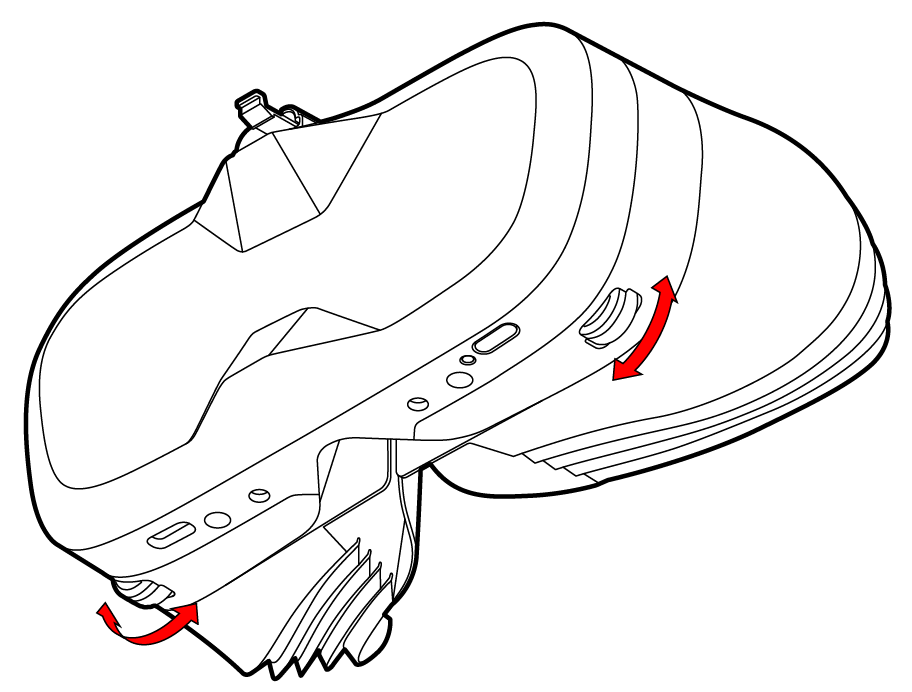
If no focus adjustment is required (0D), please adjust as follows.
Perform this procedure for both the left and right sides.
- Turn the dial fully outward
Turn the dial outward until it stops.
- Align the “protrusion” and the “white line”
Slowly turn the dial back inward and set the position where the protrusion and the white line align as 0D. In some cases, the fully outward position or the second alignment point may correspond to 0D.
If turning the diopter dial doesn’t provide sufficient focus adjustment, or if you have astigmatism, you can still achieve optimal clarity by ordering custom prescription lenses from VR Optician. These lenses allow support for vision outside the headset’s built-in adjustment range.
5.8 Adjusting the lens distance
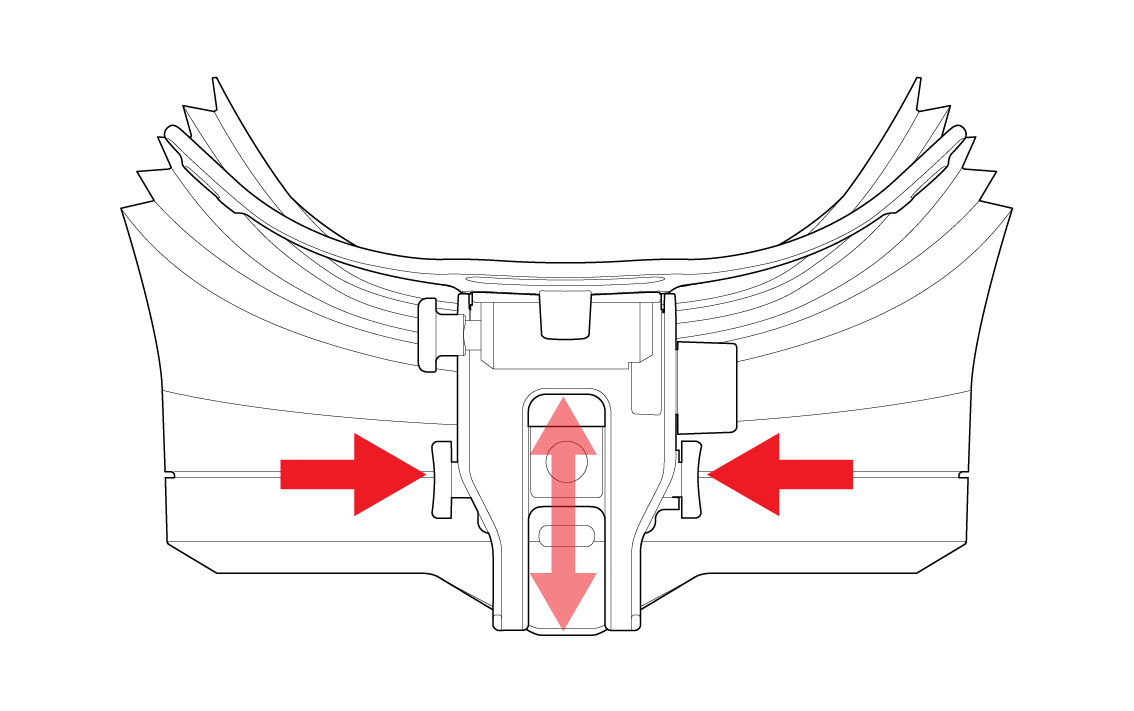
Section titled “5.8 Adjusting the lens distance”The forehead pad can be adjusted by pressing the button on the top and moving it. If the distance between your eyes and the lens is too close or too far, the image will appear distorted or the edges of the image will be blurred.
💡 This adjustment is important, so be sure to perform it after completing all setup and while starting SteamVR™ and watching the screen image.
5.9 Adjusting the angle
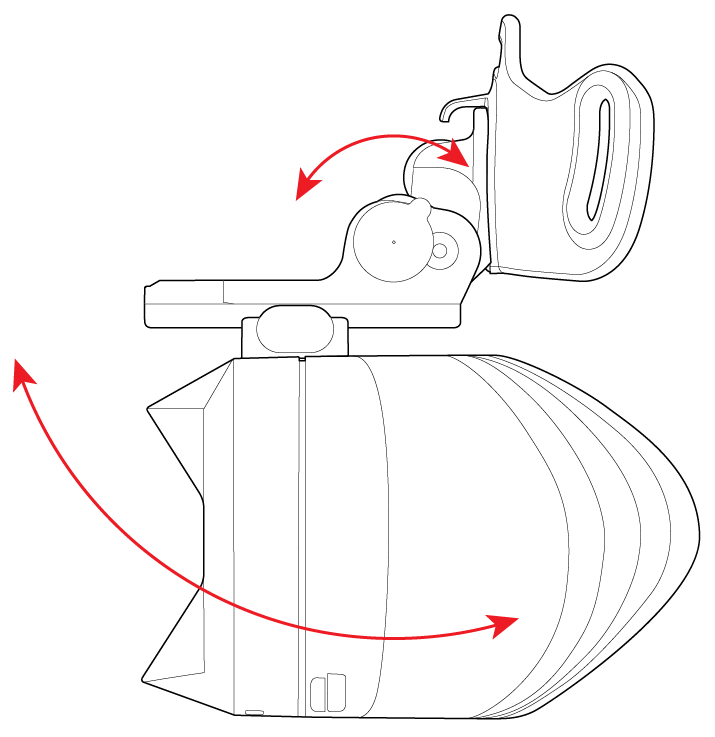
Section titled “5.9 Adjusting the angle”Wear the headset and use the knob on the left side of the forehead pad to adjust its angle. Turn the knob towards you to increase the angle, or turn it away to decrease it. Adjust until the image becomes clear.
5.10 How to adjust IPD
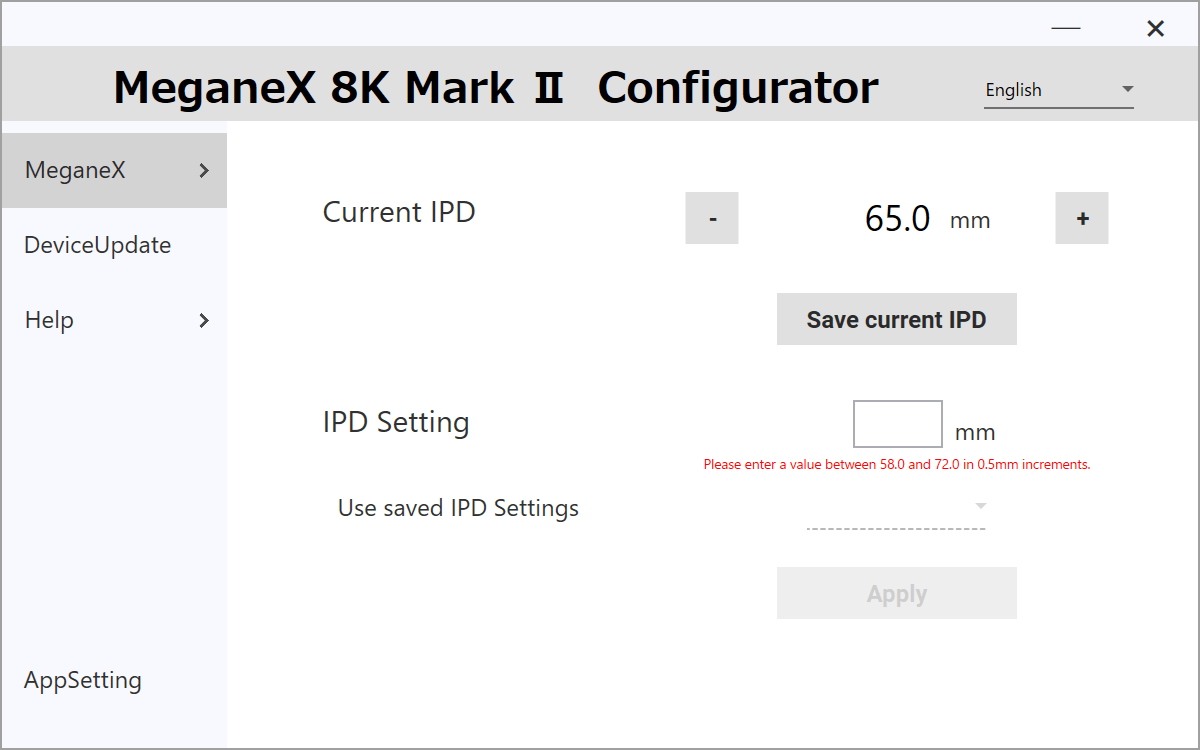
Section titled “5.10 How to adjust IPD”For MeganeX 8K Mark II, adjust the IPD on the IPD adjustment screen in the dedicated software “MeganeX 8K Mark II Configurator”. Click the ”+” button next to “Current IPD” to increase the IPD, and click the ”−” button to decrease it. The lenses will move automatically, so adjust them until the image is clear.
If you would like to adjust the IPD by entering a specific value, input the actual number in the “IPD Setting” section and click “Apply.”
*When you adjust the settings by entering a value, please remove the device from your head.”
This completes the setup.
If you are having problems with the display of your MeganeX 8K Mark II , try the12. FAQ
5.11 Flip function
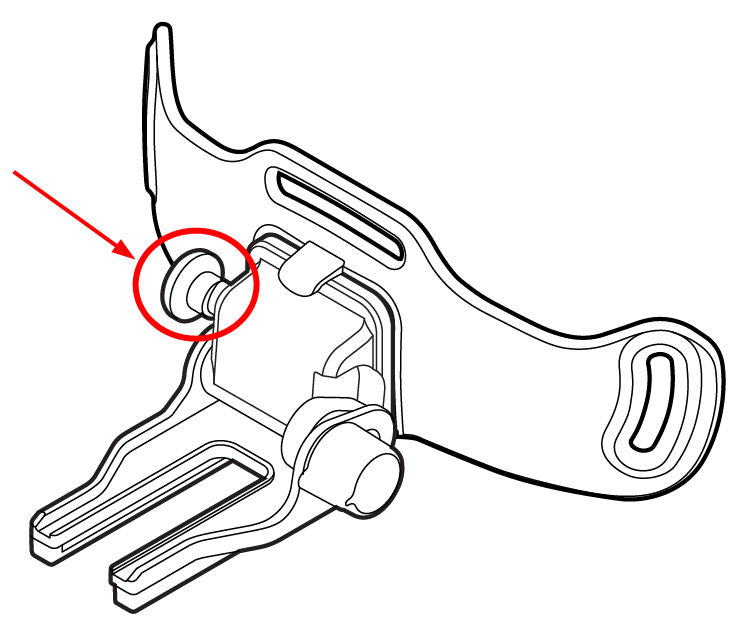
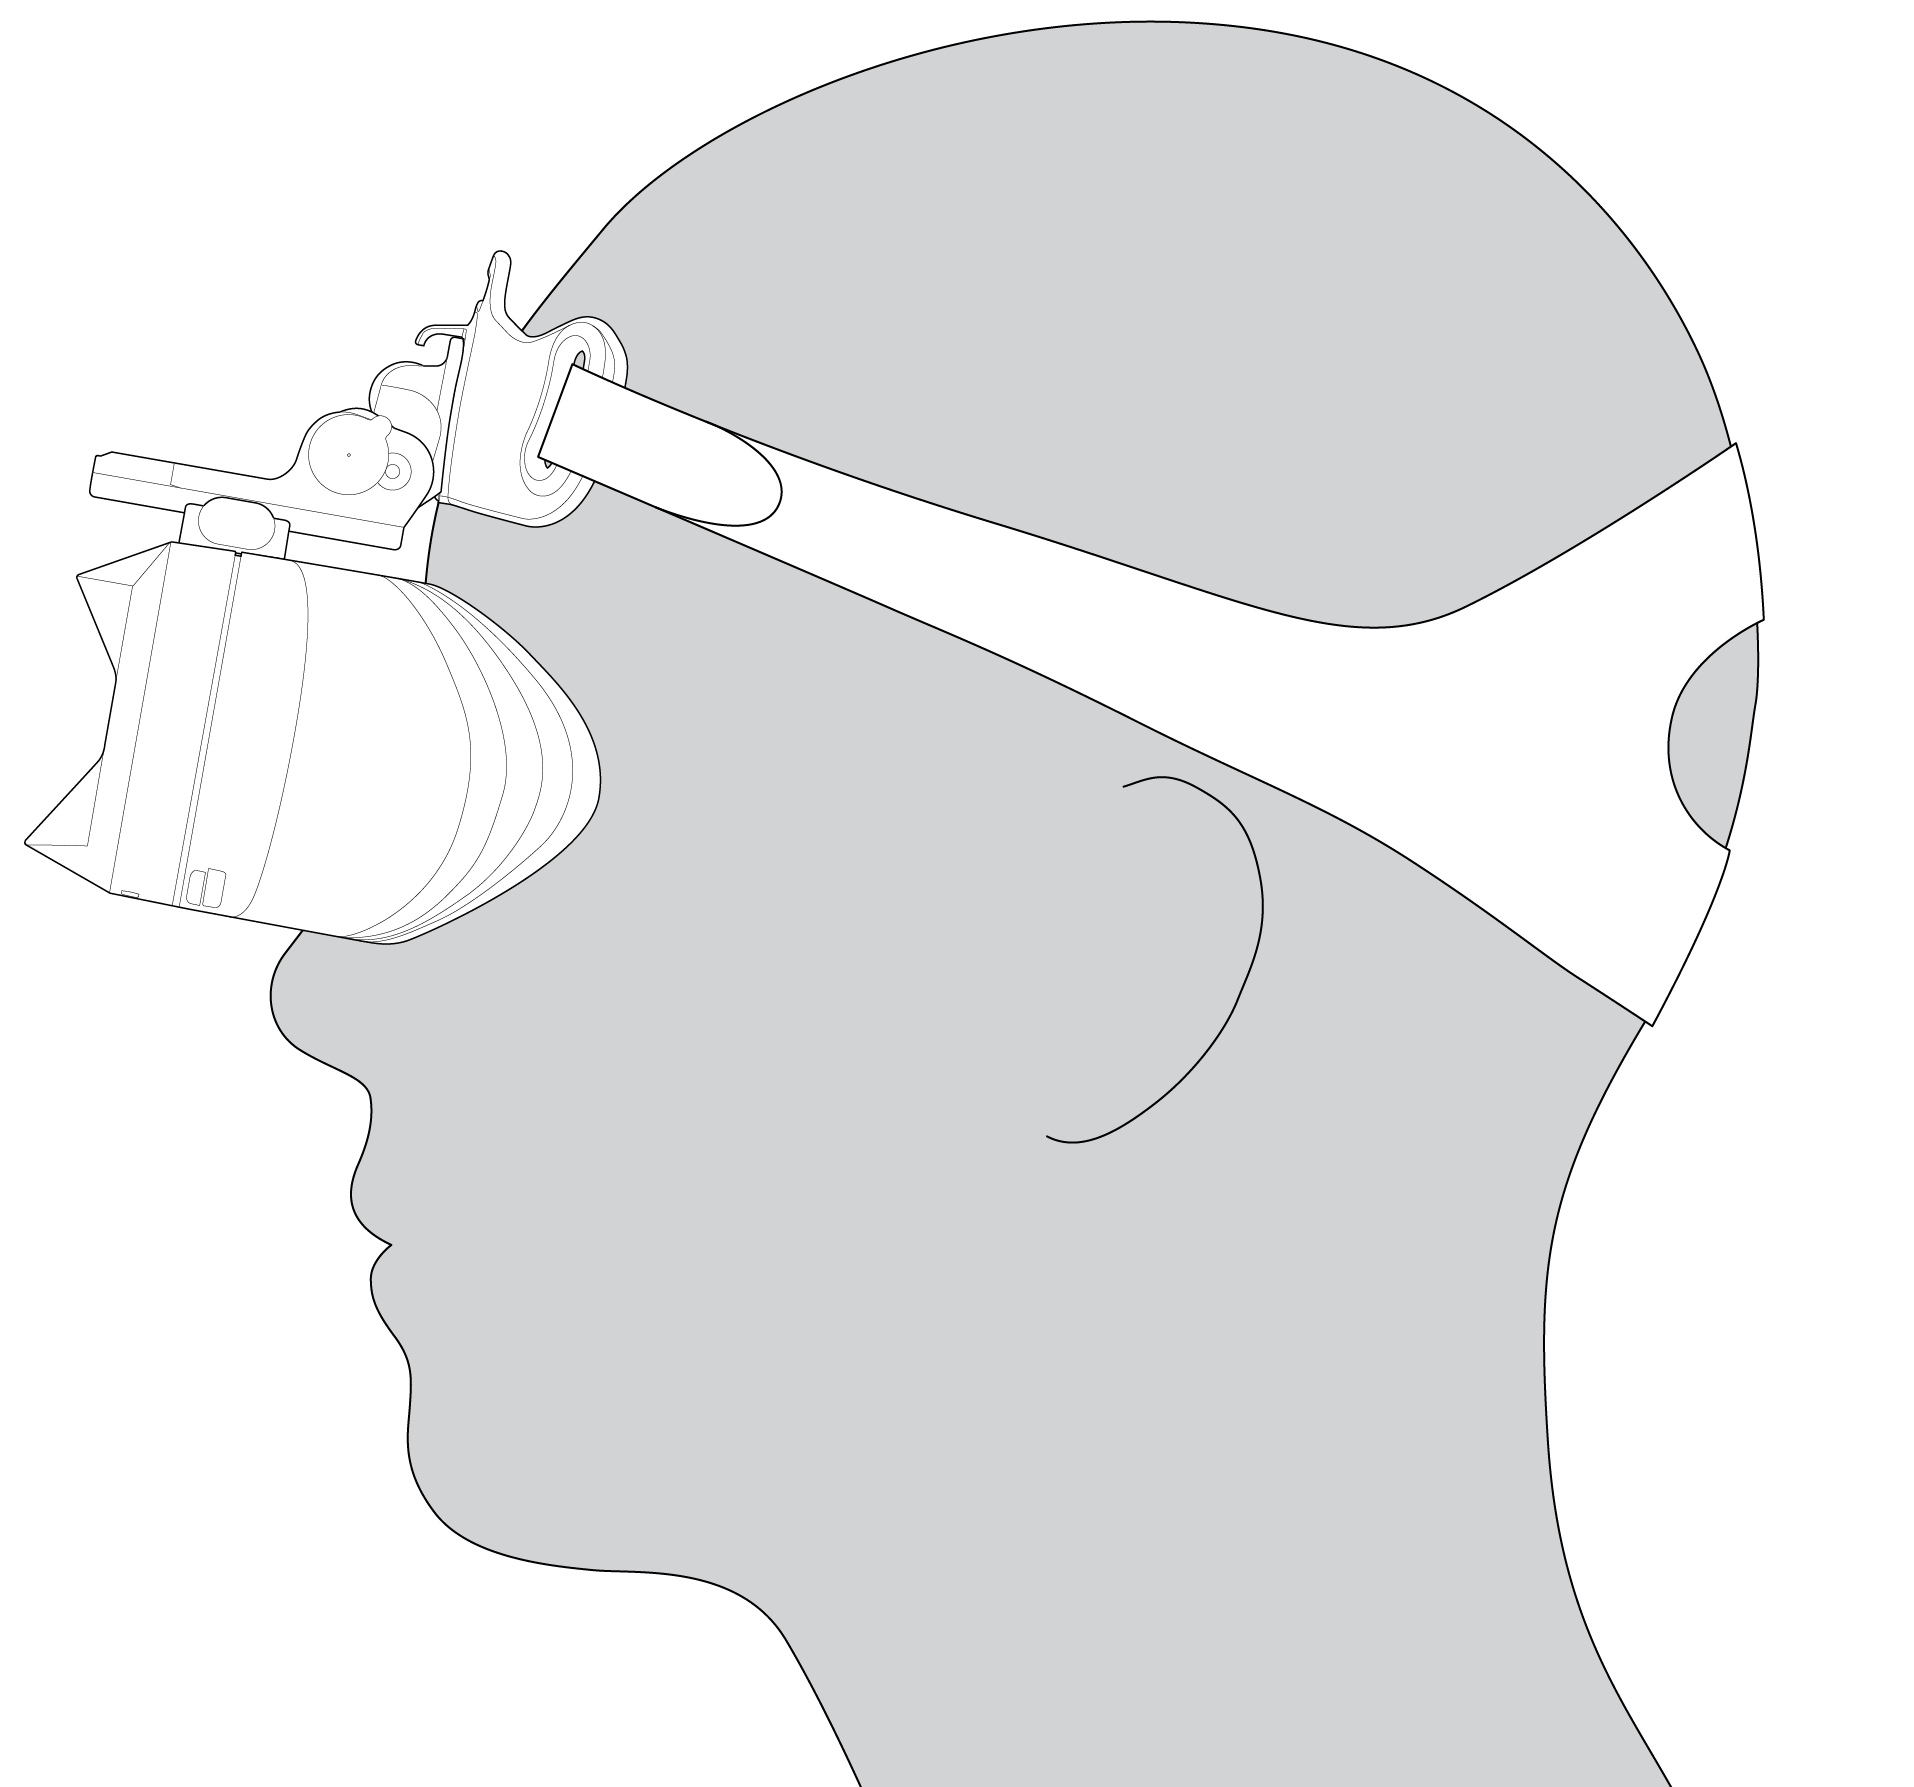
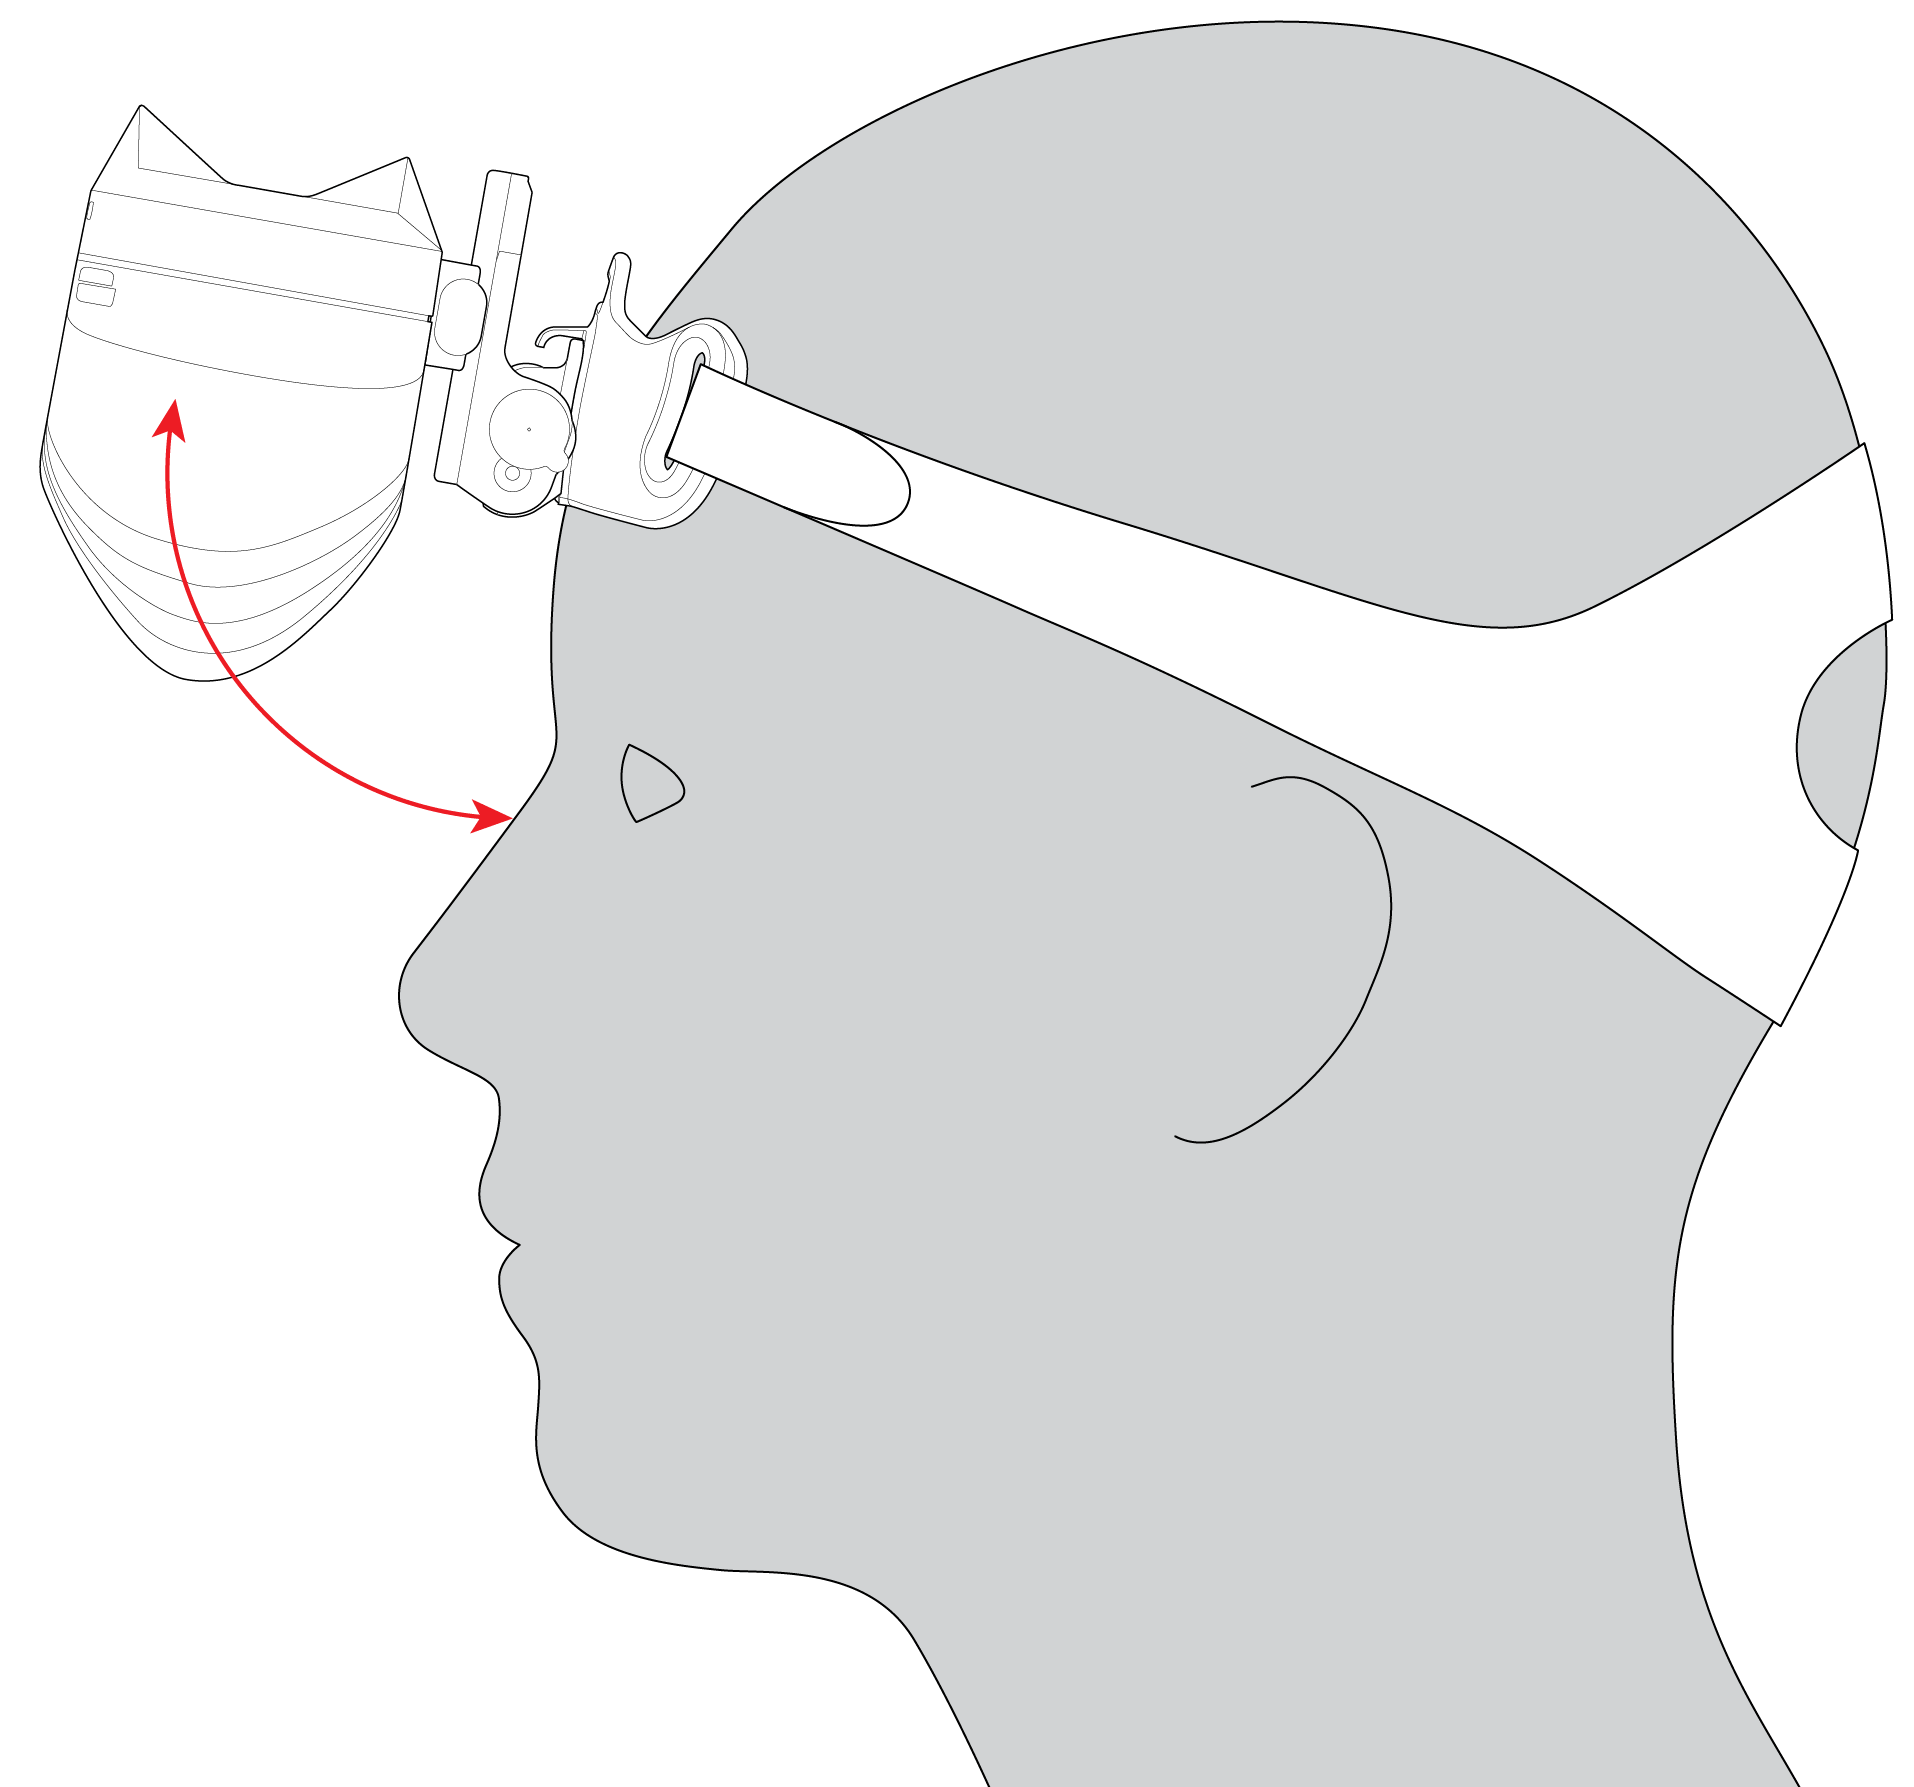
Section titled “5.11 Flip function”When wearing the device, you can flip up the device by pressing the button on the right side of the forehead pad and pushing the device up. Flip the device up to lock it in place at the top. Press the button again to unlock it and return it to its original position.
*If you press only the button that is fixed on the top, the main body may drop down vigorously and hit your eye. Please be sure to hold the main unit while flipping it back up.
*If you try to flip up the main unit without pressing the button, there is a possibility that the moving parts will be damaged. Be sure to hold down the button while flipping up the main unit.
5.12 Handheld stick adapter
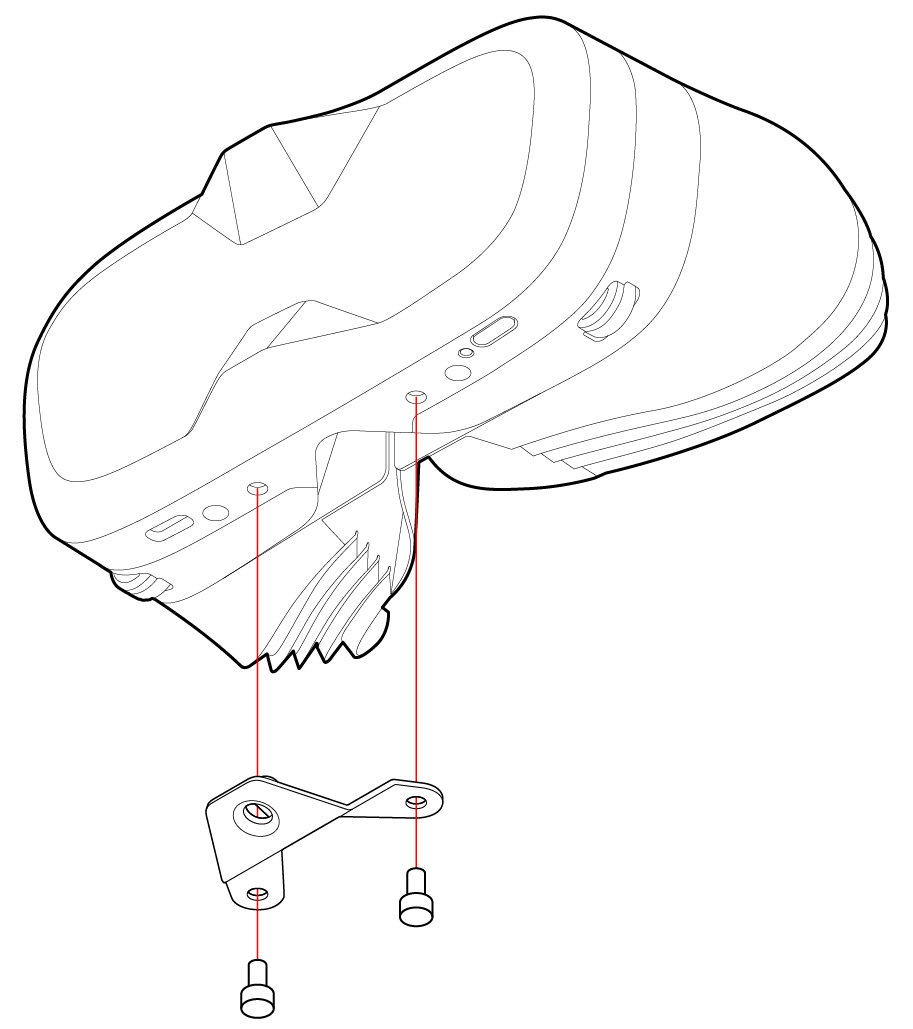
Section titled “5.12 Handheld stick adapter”By attaching the handheld stick adapter to the device, you can mount it on a camera tripod. Use the included screws to fix the handheld stick adapter in the two positions located at the bottom of the device.
6. How to power off MeganeX 8K Mark II
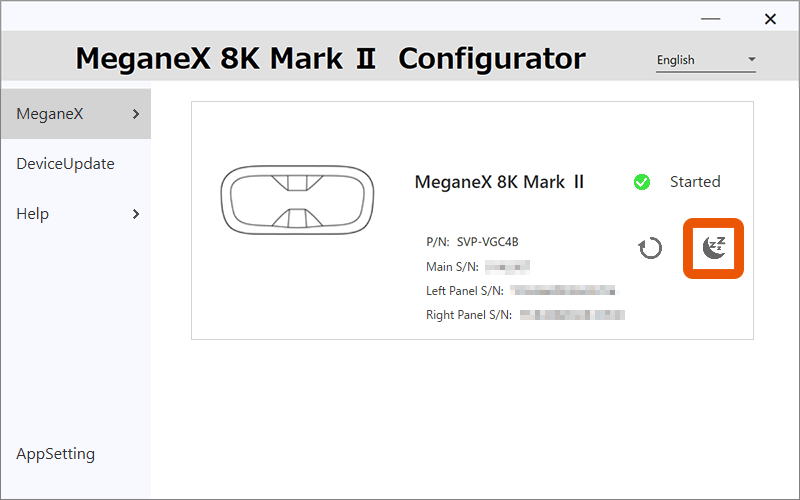
Section titled “6. How to power off MeganeX 8K Mark II”This is an explanation of how to turn off MeganeX 8K Mark II. These versions clarify that it’s a settings reset rather than reinstalling the entire app.
- Power off
Press and hold the power button for 2 seconds to turn off the device.
- Sleep
You can also operate it from the superlight 8K Configurator. Make sure that the operation status display LED is off. In sleep mode, the fan will remain running, which is normal. When turning on the device using the power button, it will start up faster from sleep mode than from a fully powered-off state.
■Functions
Section titled “■Functions”7. Functions of the PC Application (MeganeX 8K Mark II Configurator)
Section titled “7. Functions of the PC Application (MeganeX 8K Mark II Configurator)”This explains the functions available in the MeganeX 8K Mark II Configurator.
7.1 List of functions
Section titled “7.1 List of functions”This is an introduction to the functions available in the MeganeX 8K Mark II Configurator.
7.1.1 Software window
Section titled “7.1.1 Software window”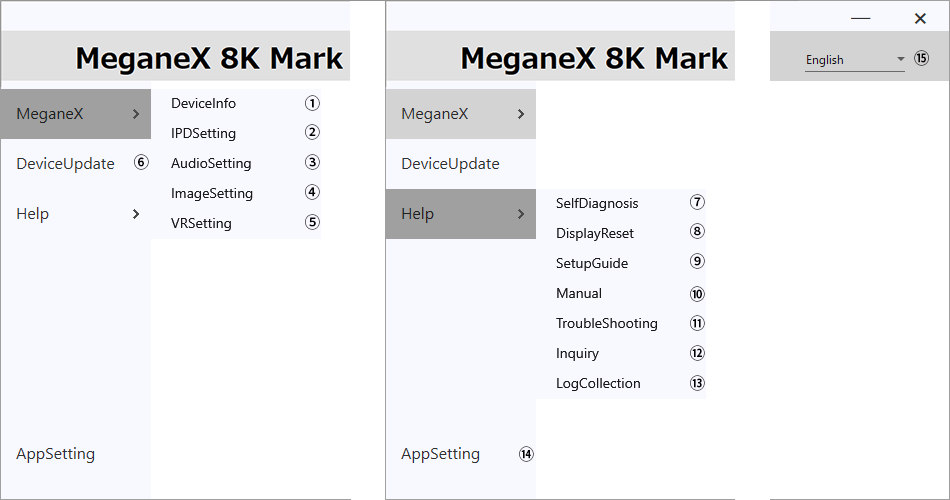
| ① | MeganeX > DeviceInfo | Menu for information about MeganeX 8K Mark II. |
| ② | MeganeX > IPDSetting | Menu for adjusting IPD. |
| ③ | MeganeX > AudioSetting | Menu for microphone and speaker audio settings. |
| ④ | MeganeX > ImageSetting | Menu for adjusting visual quality |
| ⑤ | MeganeX > VRSetting | Menu for adjusting VR visuals. |
| ⑥ | DeviceUpdate | Updates the device firmware. |
| ⑦ | Help > SelfDiagnosis | Diagnoses whether the device has any issues. |
| ⑧ | Help > DisplayReset | Excecute if there are problems with the screen display. |
| ⑨ | Help > SetupGuide | Launches the setup guide. |
| ⑩ | Help > Manual | Links to the online manual. |
| ⑪ | Help > TroubleShooting | Links to the troubleshooting page. |
| ⑫ | Help > Inquiry | Links to the support page. |
| ⑬ | Help > LogCollection | Collects and exports communication logs with MeganeX 8K Mark II. |
| ⑭ | AppSetting | Menu for language settings and display options in MeganeX 8K Mark II Configurator. |
| ⑮ | Change Language | Switches the language of MeganeX 8K Mark II Configurator. |
7.1.2 Task Tray
Section titled “7.1.2 Task Tray”
| Open | Opens the software window. |
| System Reset | Performs a system reset of the software. Use this when the MeganeX 8K Mark II display is distorted. |
| Exit | Closes the software. |
7.2 MeganeX
Section titled “7.2 MeganeX”7.2.1 Device information
Section titled “7.2.1 Device information”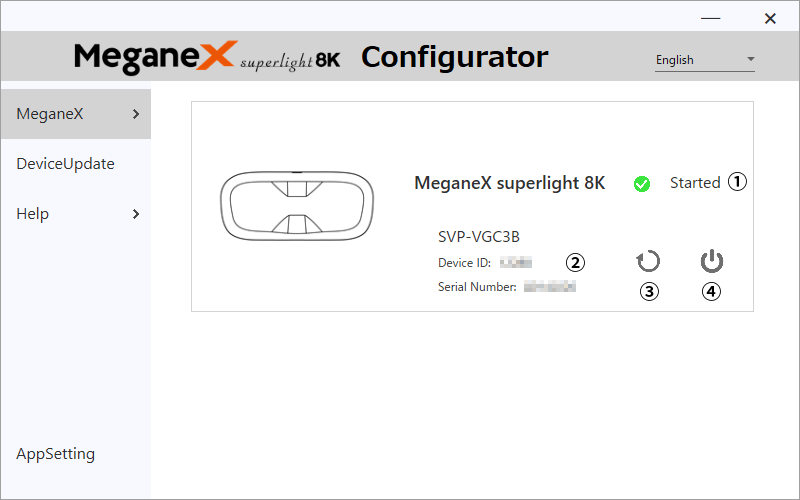
| ① | MeganeX 8K Mark II起動状態 | Displays the startup status of MeganeX 8K Mark II There are three startup status: Power off/During startup/Started |
| ② | MeganeX 8K Mark II Information | Displays the device ID and serial number of the MeganeX 8K Mark II |
| ③ | Restart Button | Restart the MeganeX 8K Mark II. |
| ④ | Sleep Button | Put the MeganeX 8K Mark II to sleep. |
7.2.2 IPD Settings
Section titled “7.2.2 IPD Settings”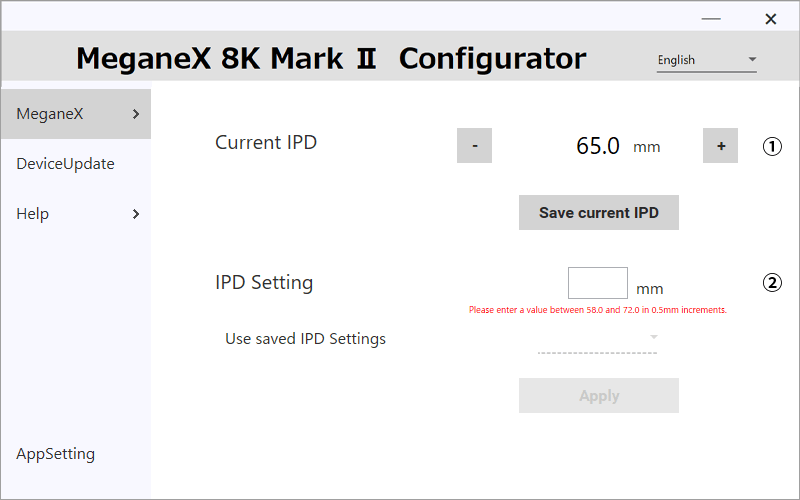
| ① | Current IPD | Displays the current IPD of MeganeX 8K Mark II. You can adjust it by clicking the + and - buttons. Additionally, you can save the current IPD as your IPD setting. |
| ② | IPD Setting | You can set the IPD of MeganeX 8K Mark II by entering a value. When you start MeganeX 8K Mark II, it will automatically adjust to the saved IPD setting. |
For instructions on how to adjust the IPD while viewing the MeganeX 8K Mark II display , check the 8.3 IPD setting.
7.2.3 Audio Settings
Section titled “7.2.3 Audio Settings”You can change the settings for the built-in microphone. Please note that audio devices connected to the Type-C port will not be affected by these settings. If the volume level is set above 50, voices from loud speakers may become distorted. If distortion occurs, set the volume to 50 or lower and adjust the volume within each application.
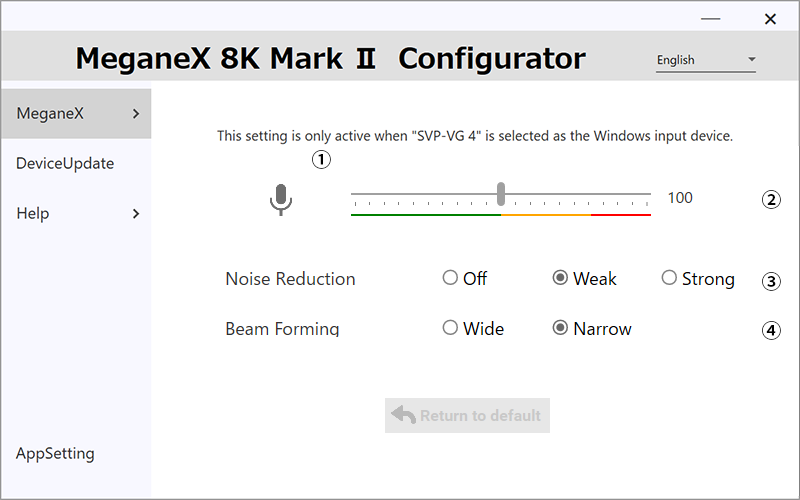
| ① | Microphone Icon | Pressing the microphone icon allows you to mute or unmute the microphone |
| ② | Volume Adjustment | Adjust the microphone volume. If the volume level is set above 50, voices from loud speakers may become distorted. If distortion occurs, set the volume to 50 or lower and adjust the volume within each application. |
| ③ | Noise Reduction | Adjust the strength of the noise reduction. Choose from Weak, Medium, or Strong. *Stronger levels may cause the sound to become muffled. |
| ④ | Beam Forming | Choose between Wide and Narrow to adjust the microphone sound pickup range. *Choosing Wide may increase picking up background noise. |
7.2.4 ImageSetting
Section titled “7.2.4 ImageSetting”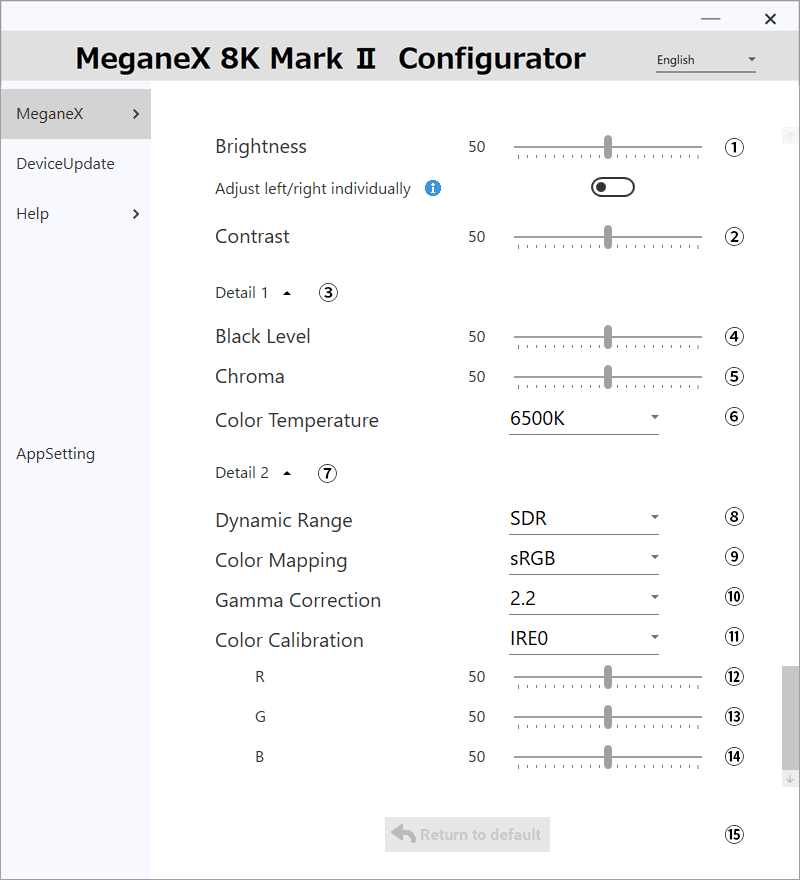
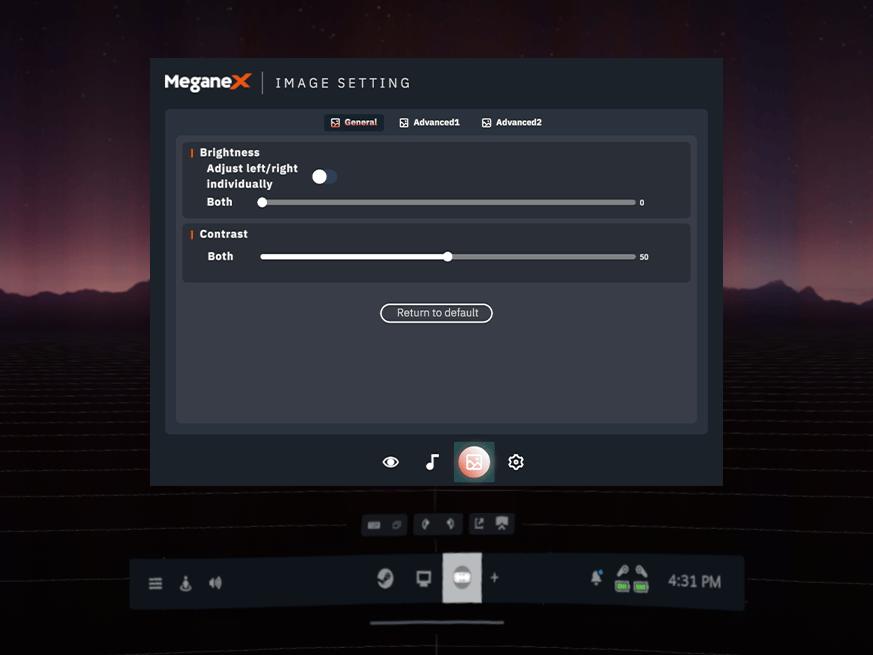
| ① | Brightness | Adjusts the brightness. You can also adjust the left and right individually. | |
| ② | Contrast | Adjusts the contrast. | Can be selected when the compositor is set to MeganeX. |
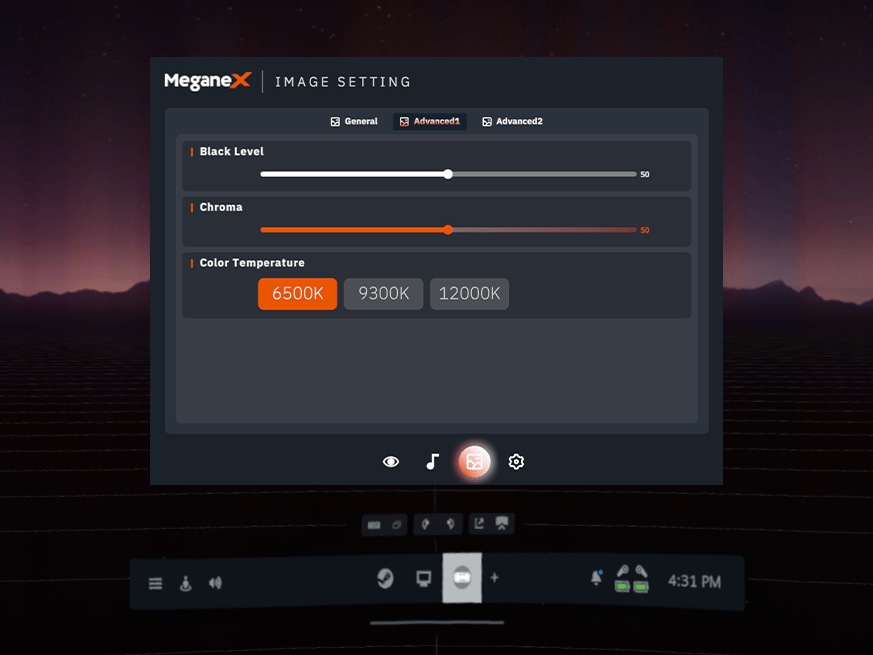
| ③ | Detail 1 | Click ▼ to expand Detail 1, where you can adjust black level, saturation, and color temperature. | Can be selected when the compositor is set to MeganeX. |
| ④ | Detail 1 > Black Level | Adjusts the black level. | Can be selected when the compositor is set to MeganeX. |
| ⑤ | Detail 1 > Chroma | Adjusts the chroma. | Can be selected when the compositor is set to MeganeX. |
| ⑥ | Detail 1 > Color Temperature | Selects a color temperature from 6500K / 9300K / 12000K. | Can be selected when the compositor is set to MeganeX. |
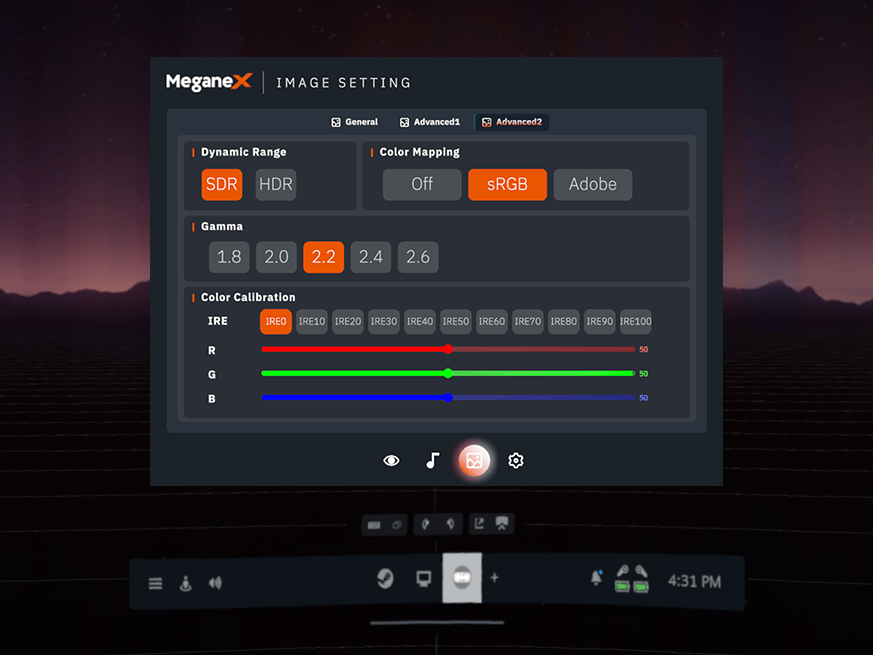
| ⑦ | Detail 2 | Click ▼ to expand Detail 2, where you can adjust dynamic range, color mapping, gamma correction, and color calibration. | Can be selected when the compositor is set to MeganeX. |
| ⑧ | Detail 2 > Dynamic Range | Selects the dynamic range from SDR / HDR. | Can be selected when the compositor is set to MeganeX. |
| ⑨ | Detail 2 > Color Mapping | Selects the color mapping from Off / sRGB / Adobe. | Can be selected when the compositor is set to MeganeX. |
| ⑩ | Detail 2 > Gamma Correction | Selects gamma correction from 1.8 / 2.0 / 2.2 / 2.4 / 2.6. | Can be selected when the compositor is set to MeganeX. |
| ⑪ | Detail 2 > Color Calibration | Adjusts color calibration in increments of 10 within a range of IRE 0 to IRE 100. | Can be selected when the compositor is set to MeganeX. |
| ⑫ | Detail 2 > R | Adjusts RED. | Can be selected when the compositor is set to MeganeX. |
| ⑬ | Detail 2 > G | Adjusts GREEN. | Can be selected when the compositor is set to MeganeX. |
| ⑭ | Detail 2 > B | Adjusts BLUE. | Can be selected when the compositor is set to MeganeX. |
| ⑮ | Reset to Default | Restores settings to their default values. |
7.2.5 VRSetting
Section titled “7.2.5 VRSetting”You can change the resolution settings. If SteamVR is running, changes will take effect after restarting.
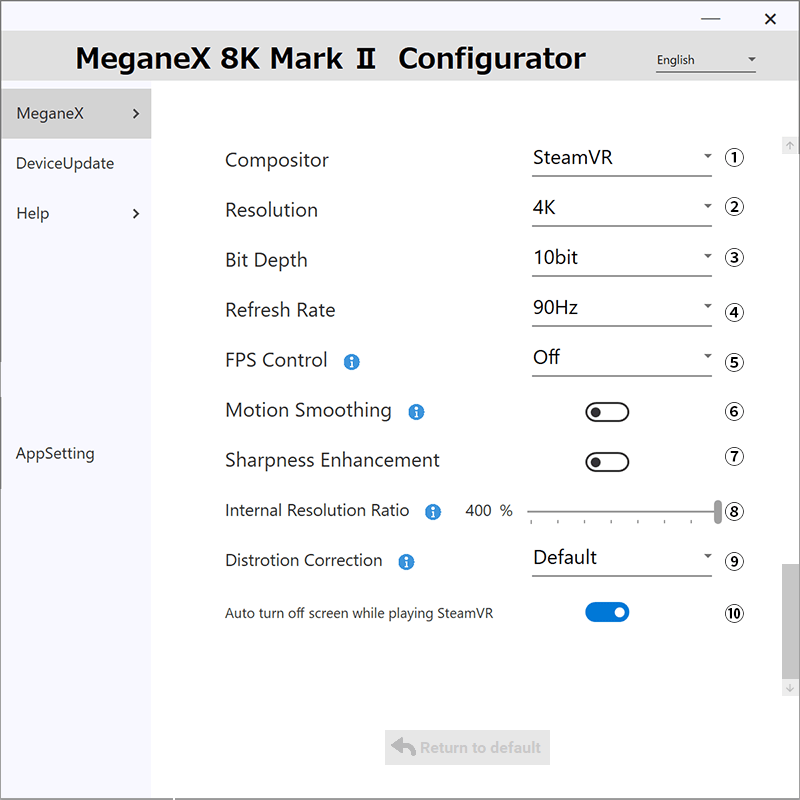
| ① | Compositor | Choose from SteamVR, MeganeX, or None. | |
| ② | Resolution | Choose the resolution per eye from 4K or 2.6K. | |
| ③ | Bit Depth | Choose the bit depth from 10bit or 8bit. | Can be selected when the compositor is set to MeganeX. |
| ④ | Refresh Rate | Choose from 90 / 75. | Can be selected when the compositor is set to MeganeX. |
| ⑤ | FPS Control | Choose from Off / Auto / Fixed. When set to Fixed, choose from 15.0 / 18.0 / 22.5 / 30.0 / 45.0 / 90.0. | Can be selected when the compositor is set to MeganeX. |
| ⑥ | Motion Smoothing | Enables motion smoothing when turned on. | Can be selected when the compositor is set to MeganeX. |
| ⑦ | Sharpness Enhancement | Enhances sharpness when turned on. | Can be selected when the compositor is set to MeganeX. |
| ⑧ | Internal Resolution Ratio | Adjustable from 50% to 400%. | Can be selected when the compositor is set to MeganeX. |
| ⑨ | Distortion Correction | Choose from Default or +1.5mm. If your eyes are farther from the lenses, selecting +1.5mm reduces distortion. Do not change this setting if your eye-to-lens distance is appropriate. | Can be selected when the compositor is set to MeganeX. |
| ⑩ | Auto turn off screen while playing SteamVR | When turned off, the device will not automatically turn off screen while idle. Note: This may increase the risk of OLED burn-in. | Can be selected when the compositor is set to MeganeX. |
7.3 Device Updates
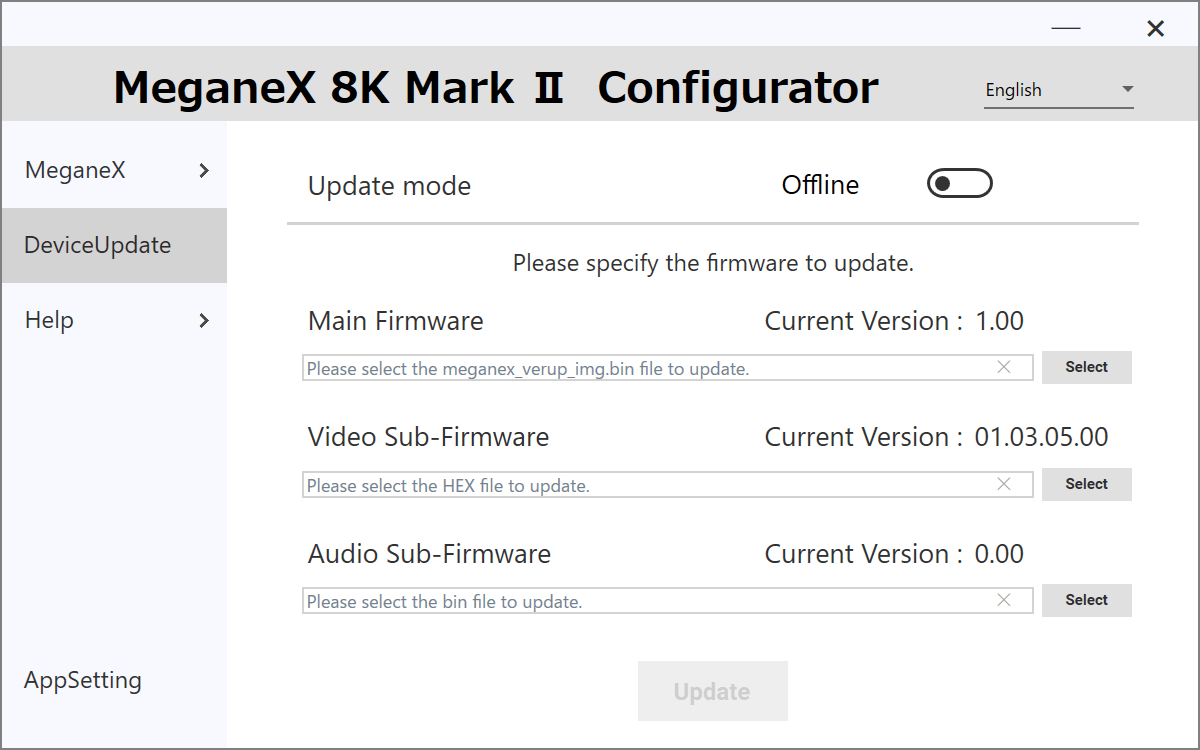
Section titled “7.3 Device Updates”You can update the firmware for MeganeX 8K Mark II. Please update when there is a ● in the top right corner of the device update menu.
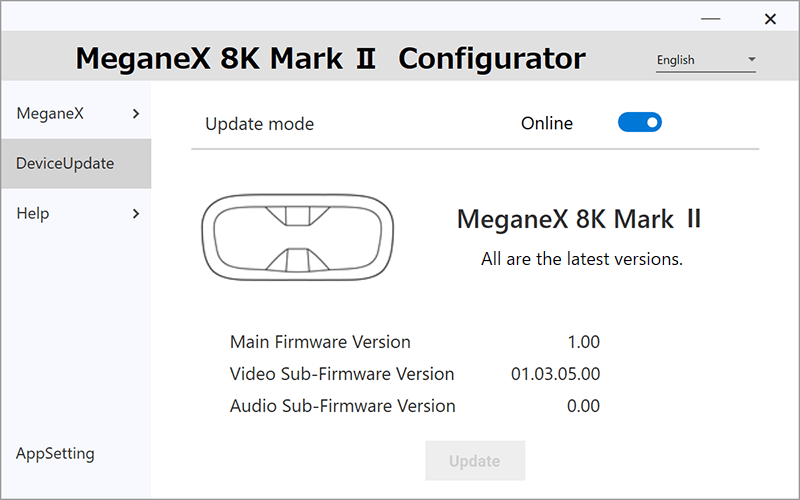
You can also update the firmware by switching to offline update mode, allowing updates even in environments without an internet connection.
Please download the required firmware from the links below:
To update the desired firmware, please follow the steps below:
In the “Main Firmware Update” section, select the emmc folder from the extracted files.
In the “Video Sub-Firmware Update” section, select the downloaded .hex file.
In the “Audio Sub-Firmware Update” section, select the downloaded .bin file.
Click the “Update” button.
You can update multiple firmware components at the same time.
7.4 Help
Section titled “7.4 Help”7.4.1 MeganeX 8K Mark II Self-Diagnosis
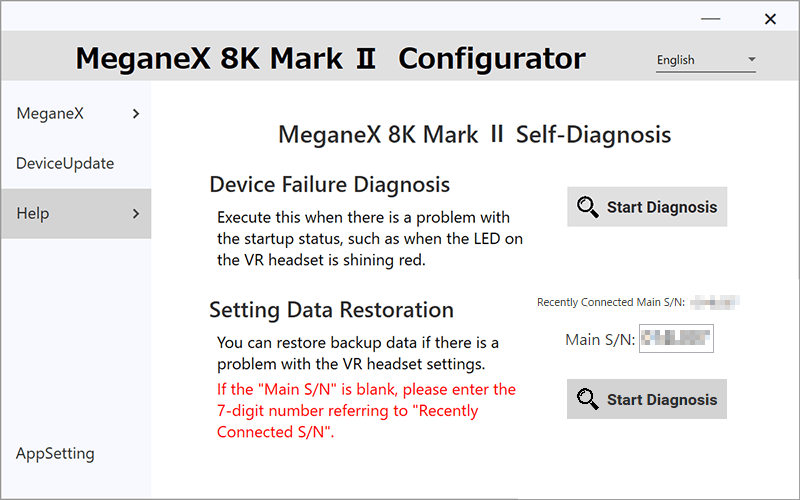
Section titled “7.4.1 MeganeX 8K Mark II Self-Diagnosis”Press the “Start Diagnosis” button. If no issues are found, “There is no abnormal condition in the VR headset.” will be displayed. If an issue is detected, “Device failure detected.” will appear. In that case, please contact us through the inquiry form.
7.4.2 MeganeX 8K Mark II Display Reset
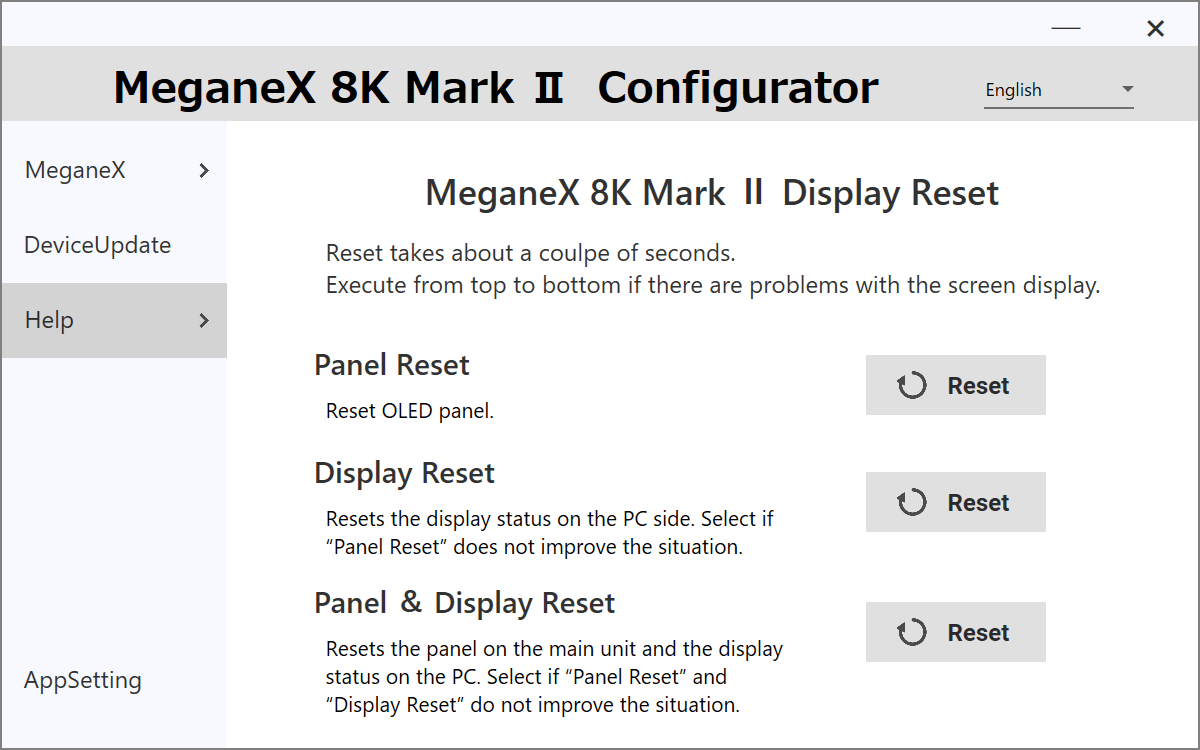
Section titled “7.4.2 MeganeX 8K Mark II Display Reset”Use this option if you encounter problems with the screen display.
*Available with Software version 1.6.1.0 or later, Main Firmware version 1.0.8 or later, and Video Sub Firmware version 01.03.04.00 or later.
7.4.3 SetupGuide
Section titled “7.4.3 SetupGuide”This explains the setup process to make MeganeX 8K Mark II ready for use.
7.4.4 Manual
Section titled “7.4.4 Manual”Links to this manual.
7.4.5 Troubleshooting
Section titled “7.4.5 Troubleshooting”Links to the 13. Troubleshooting section of this manual.
7.4.6 Contact
Section titled “7.4.6 Contact”Links to the Contact webpage.
7.4.7 Log Collection
Section titled “7.4.7 Log Collection”Collects and outputs logs related to communication with MeganeX 8K Mark II. The exported logs are saved in:
“C:\Users\(user name)\AppData\Roaming\MeganeXSuperlight\Log”.
7.5 App Setting
Section titled “7.5 App Setting”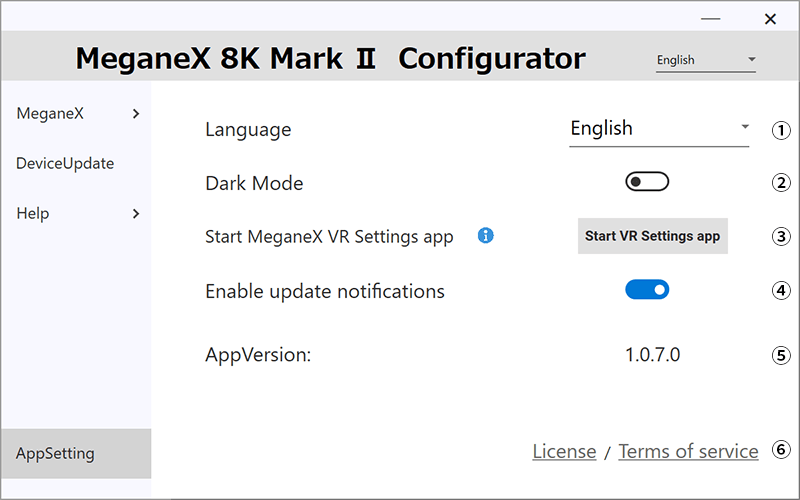
| ① | Language | Choose between English and Japanese. After changing, the MeganeX 8K Mark II Configurator will restart. |
| ② | Dark Mode | When set to On, the screen background will turn black. |
| ③ | Start MeganeX VR Settings app | Launch MeganeX VR Setting |
| ④ | Enable update notifications | When turned off, update notifications will not be shown. |
| ⑤ | AppVersion | Indicate version of the MeganeX 8K Mark II Configurator |
| ⑥ | License / Terms of service | Indicate license of MeganeX 8K Mark II |
8. Functions that can be configured within the VR display
Section titled “8. Functions that can be configured within the VR display”Settings can be configured not only on the PC window but also within the VR display (MeganeX 8K Mark II’s display only).
Adjustments related to video and audio can be made within the VR display.
The following settings and operations can only be performed from the PC window:
- Device Information
- Device Update
- Help
- App Settings
If you are having problems with the display of your MeganeX 8K Mark II, try the 12. FAQ.
8.1 About the MeganeX VR settings app
Section titled “8.1 About the MeganeX VR settings app”8.1.1 Settings for operating the MeganeX VR settings app
Section titled “8.1.1 Settings for operating the MeganeX VR settings app”When using certain controllers, such as the Valve Index controller or FlipVR, specific settings are required to operate the MeganeX VR settings app.
Note: This section explains the key binding setup for adjusting IPD using the up/down movement of the stick.
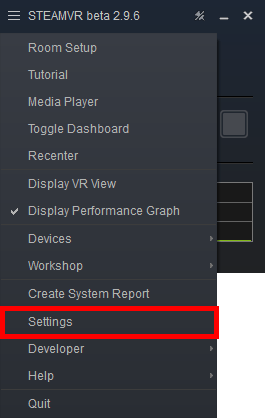
- Open the SteamVR™ menu and select Settings.
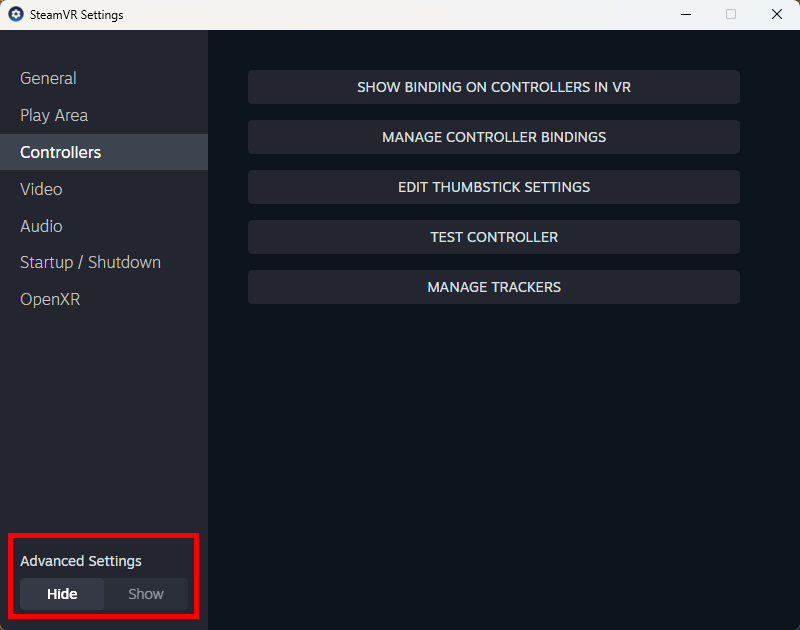
- Display Advanced Settings.
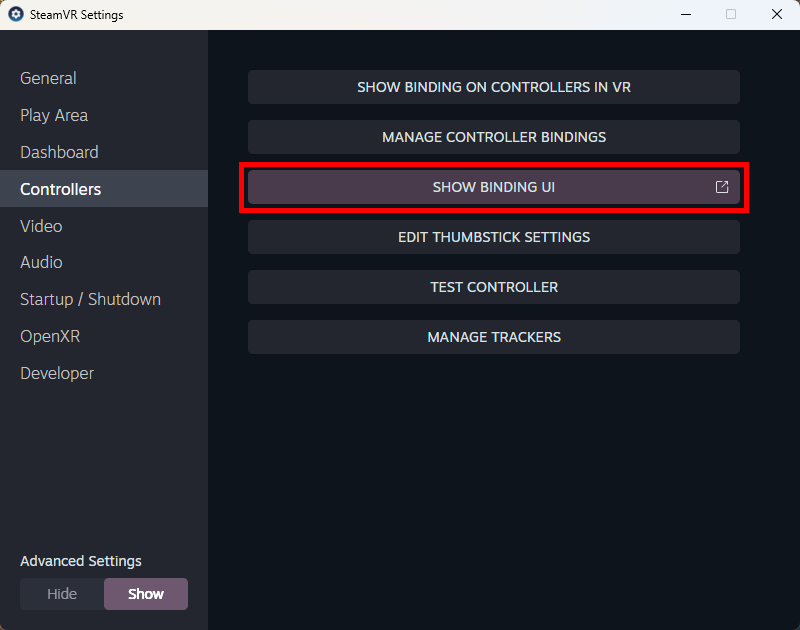
- In Controller, select Show Binding UI.
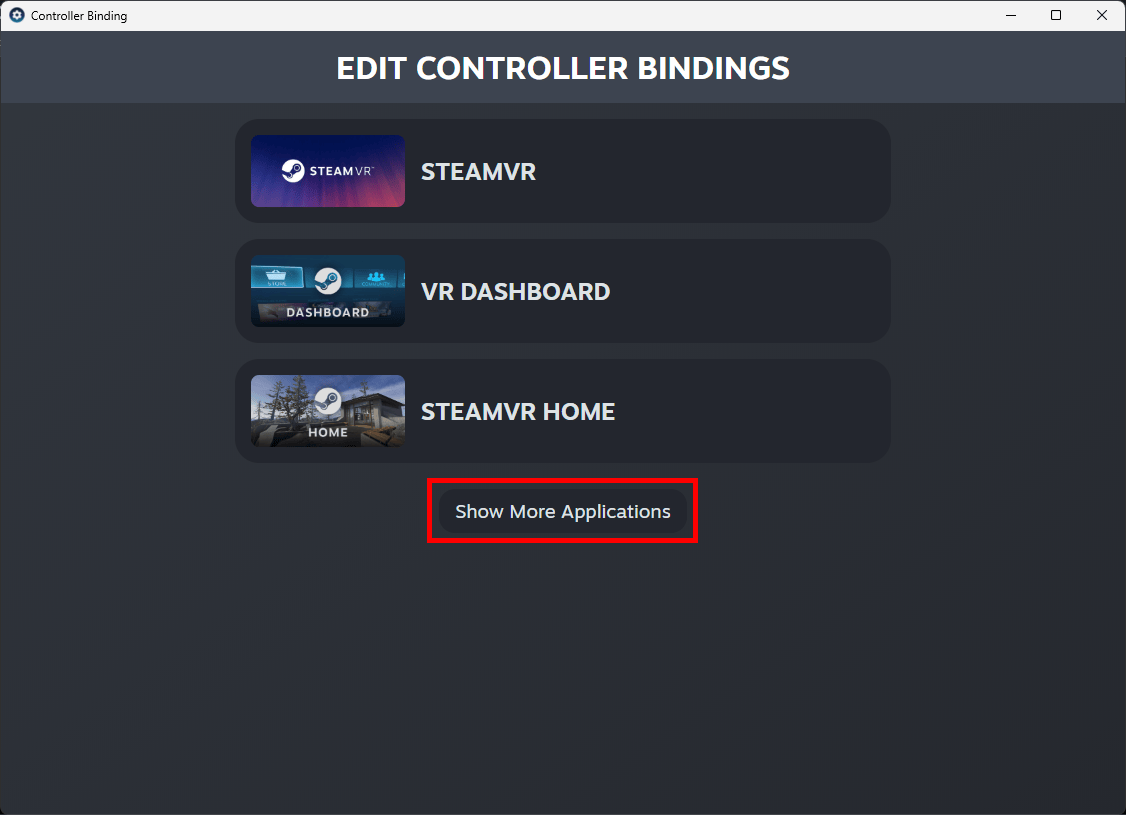
- Select Show more applications.
- Select MEGANEX VR SETTINGS from the list.
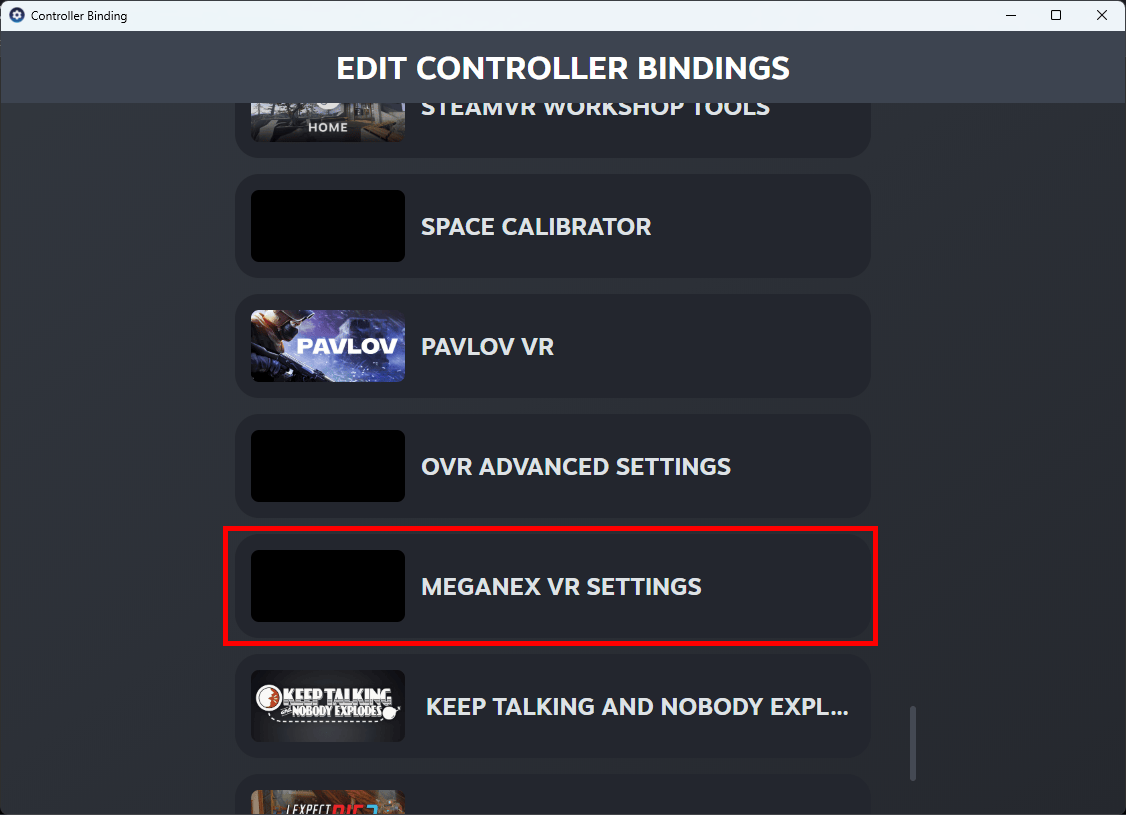
- In Current Binding, select Edit.
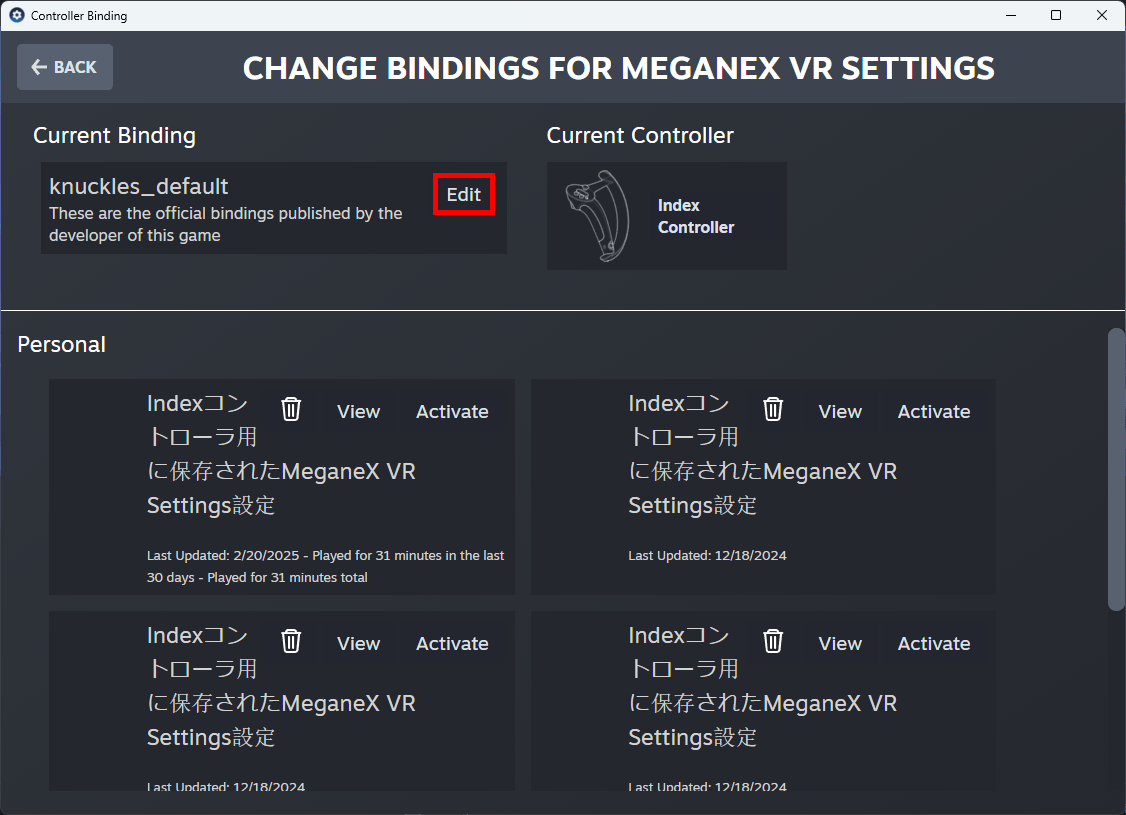
- Add a setting to the controller stick.
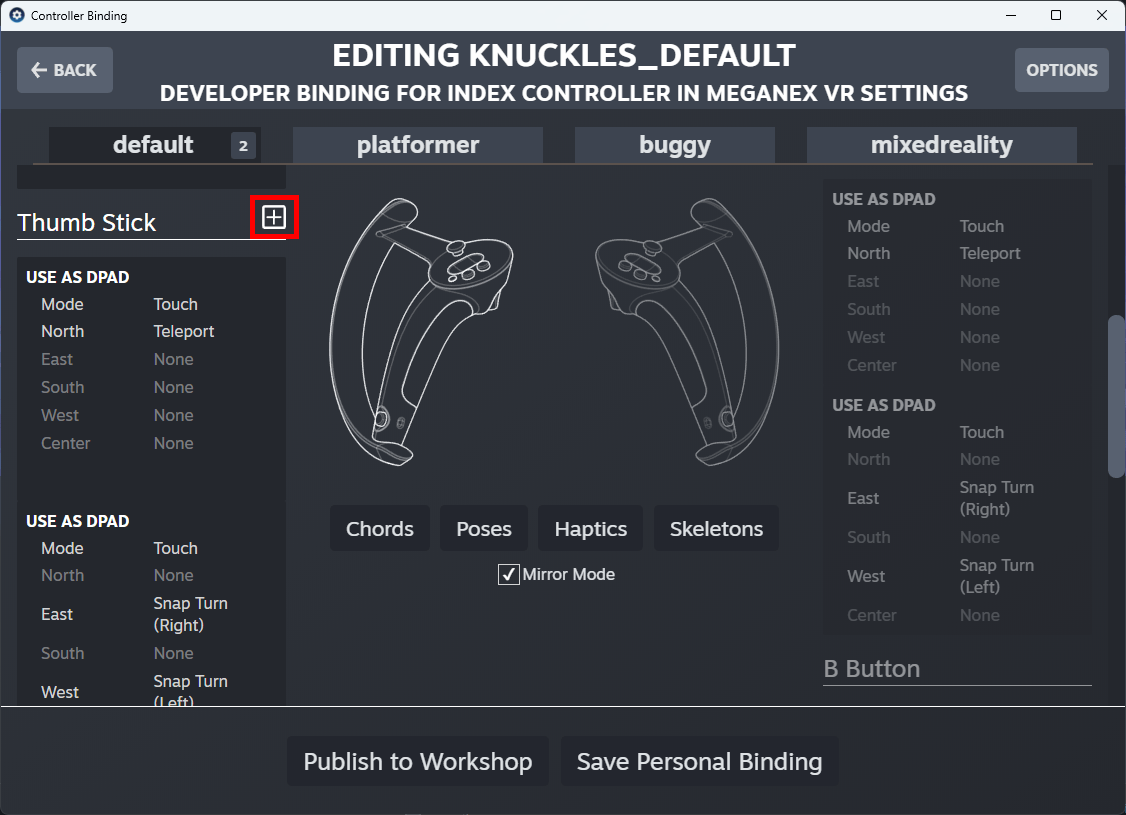
- Select the D-pad.
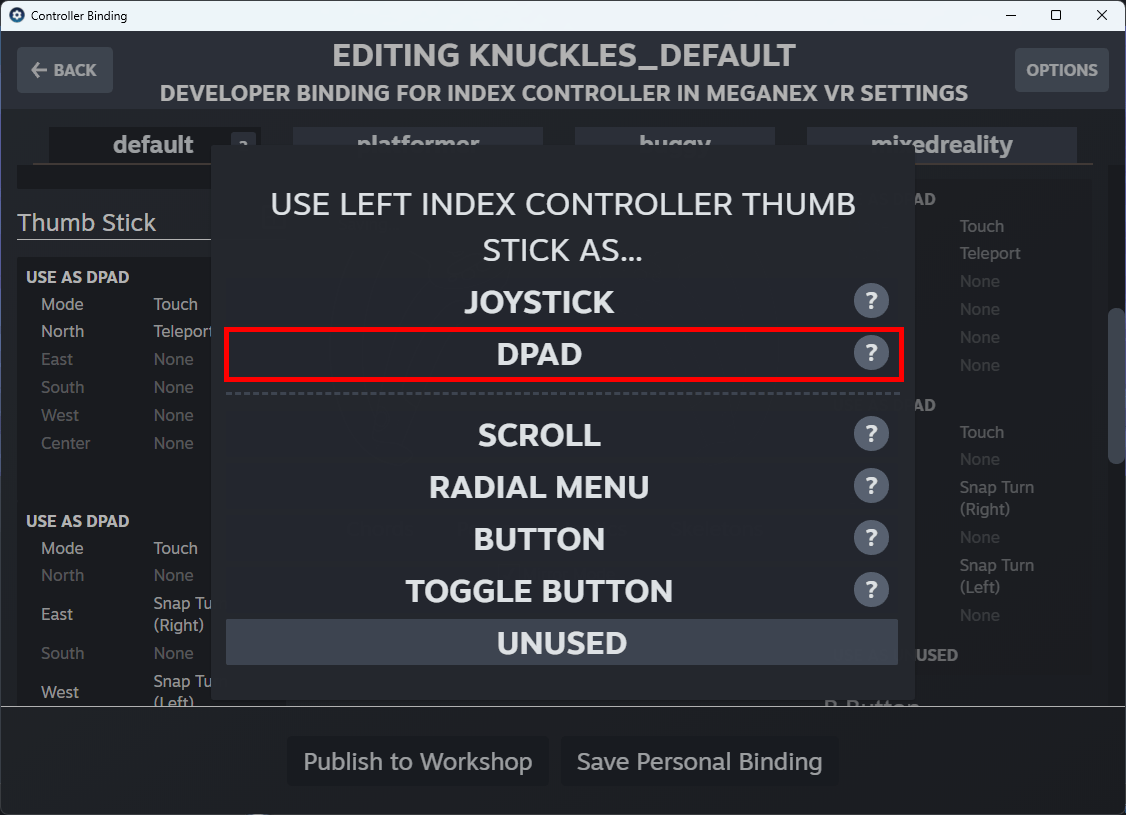
- Select the pen icon and edit.
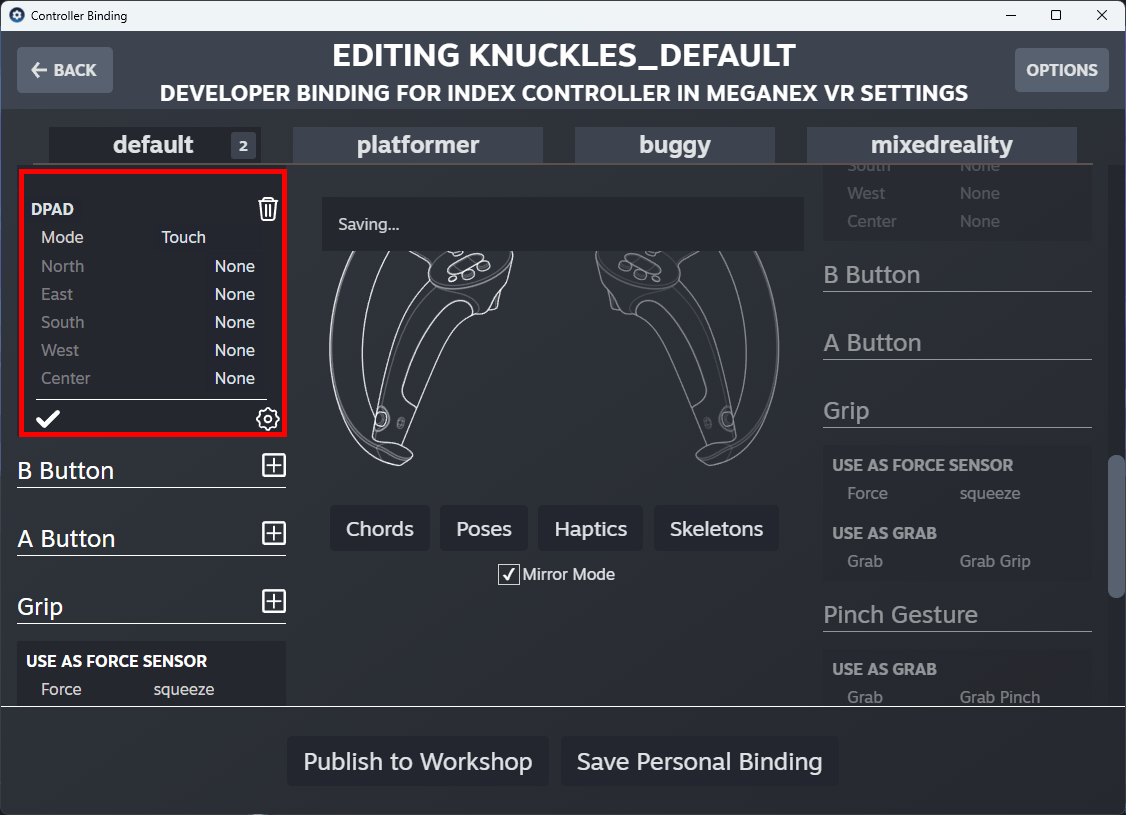
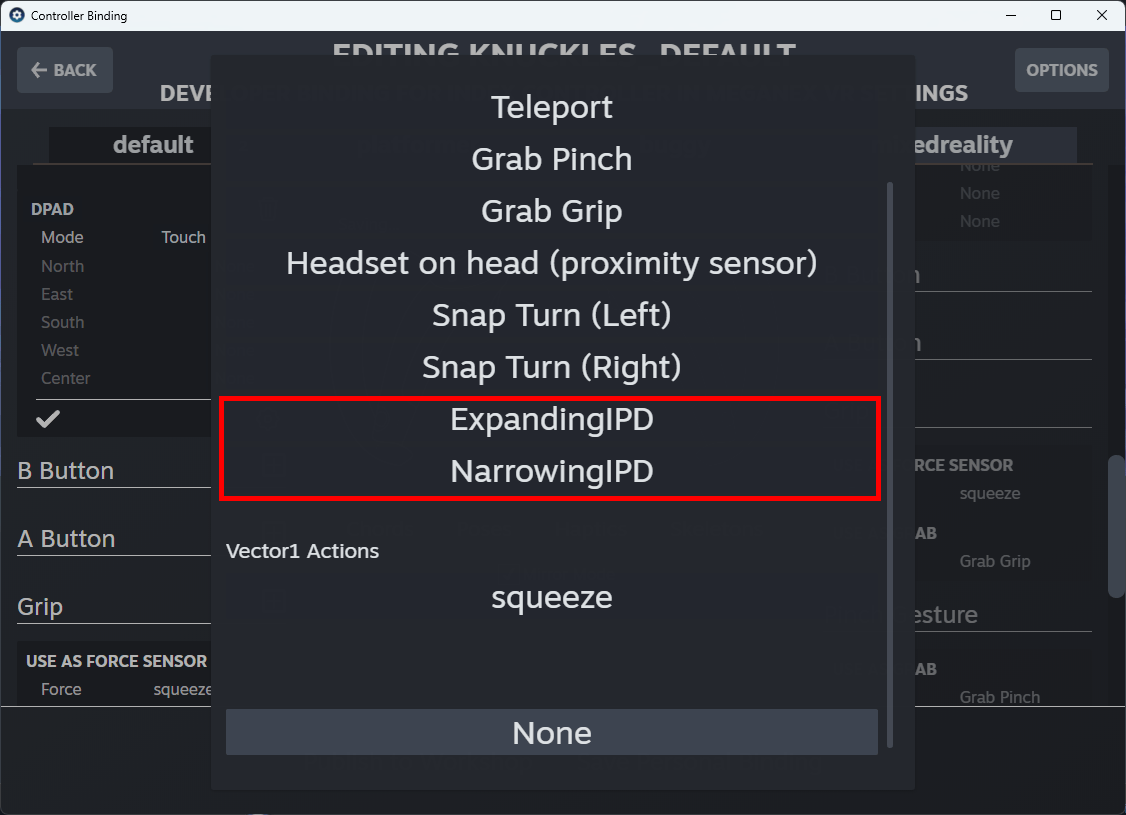
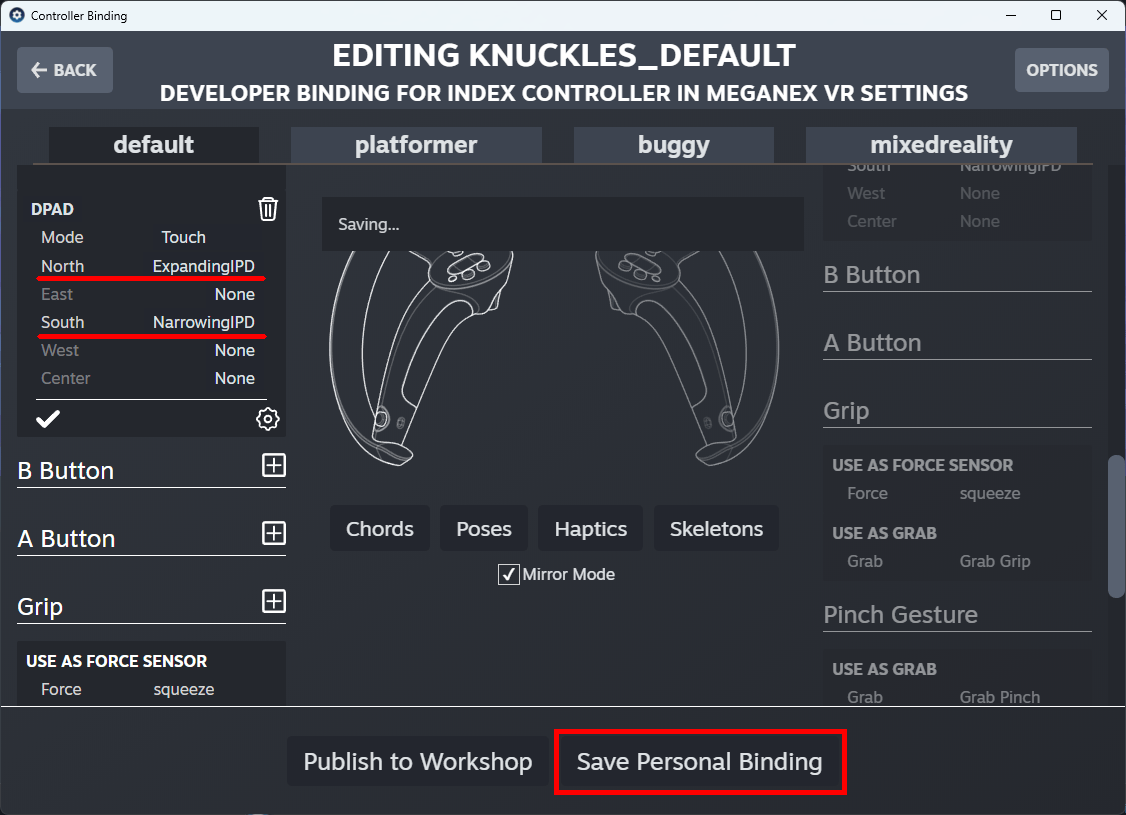
- Assign expandingIPD (increase IPD) to North, and narrowIPD (decrease IPD) to South on the stick.
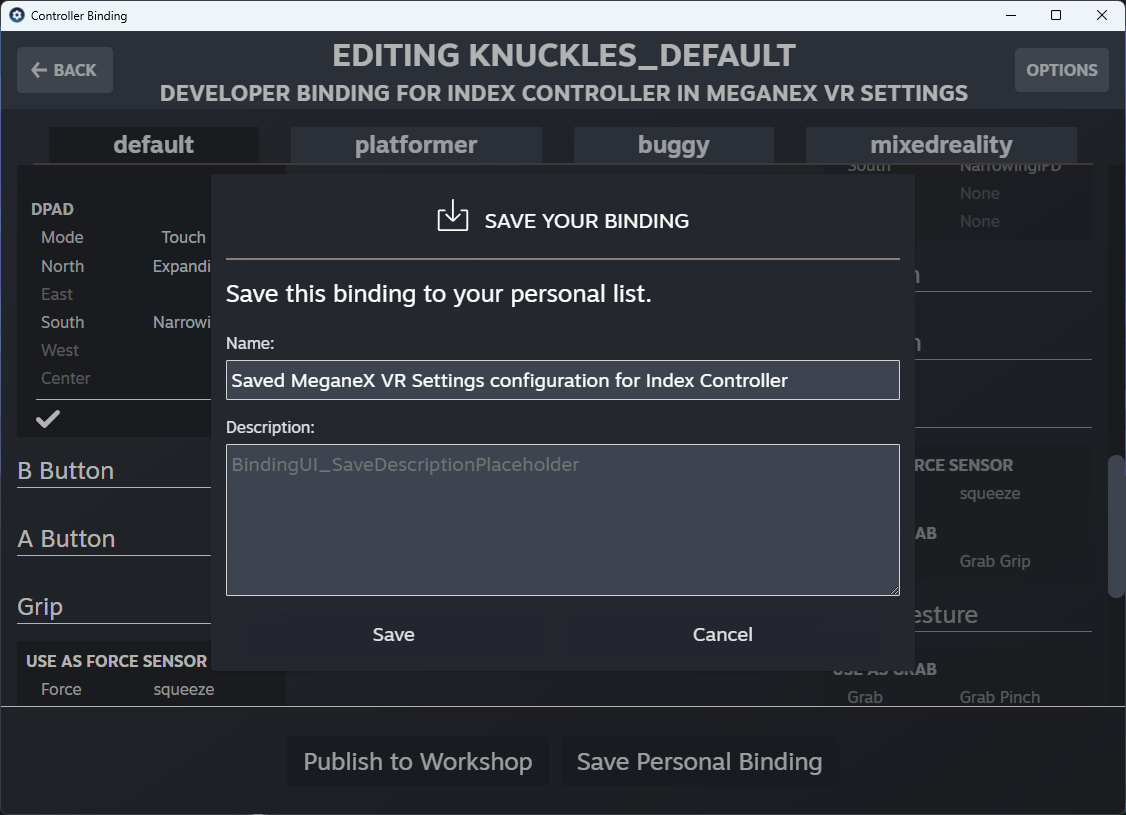
- Select Save Personal Binding.
- Enter a custom name and save.
8.1.2 Launching the MeganeX VR settings app
Section titled “8.1.2 Launching the MeganeX VR settings app”Launch the configuration tool for the MeganeX 8K Mark II Configurator.
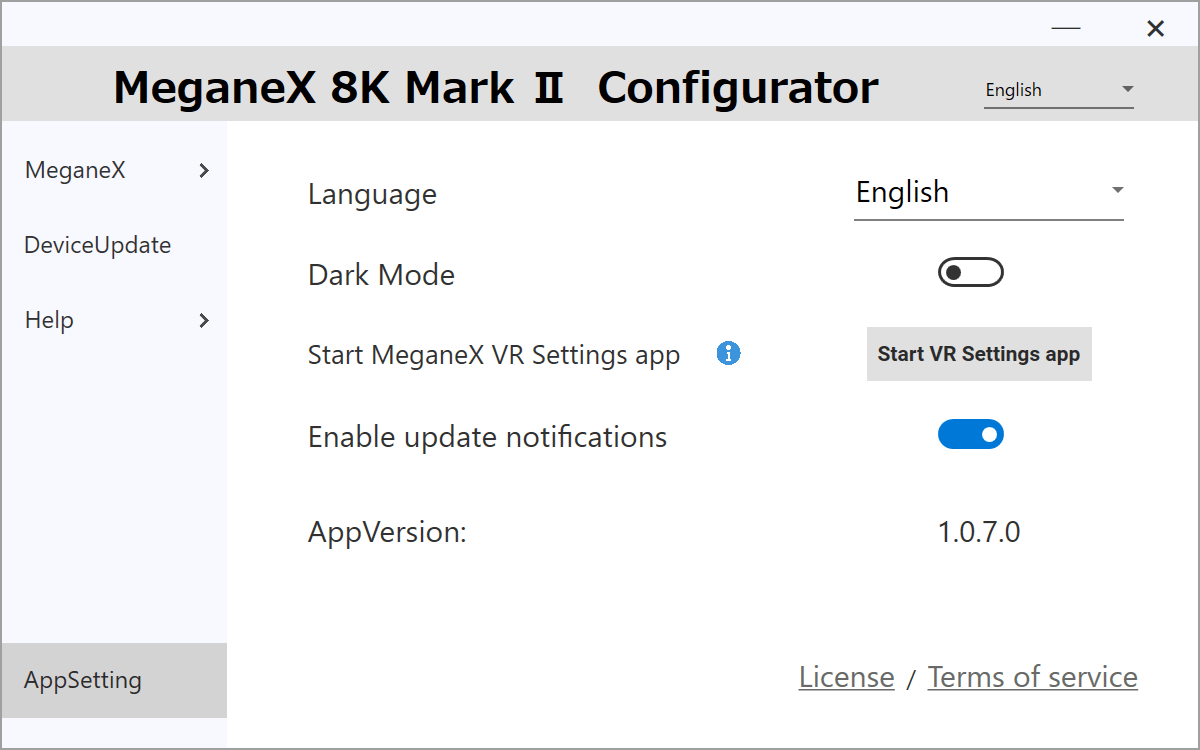
When MeganeX 8K Mark II is connected to MeganeX 8K Mark II Configurator and SteamVR™ is launched, the MeganeX VR settings app will start automatically. (The auto-launch setting for OverlayApp in SteamVR™ must be enabled.)
In this state, you can launch the VR settings screen by selecting the MeganeX VR settings icon from the dashboard.

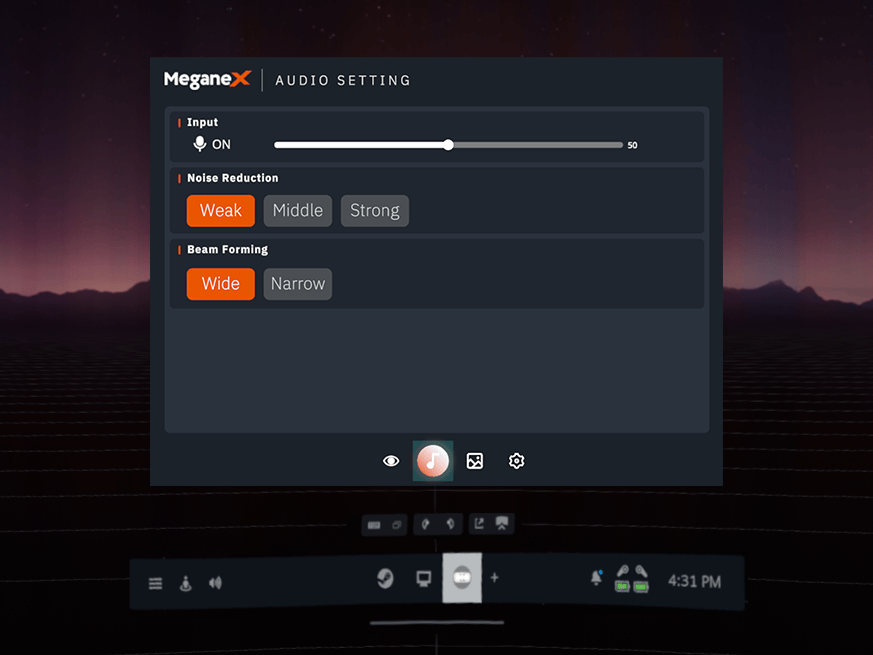
8.2 Audio setting
Section titled “8.2 Audio setting”You can adjust the microphone and headset settings on the MeganeX 8K Mark II. *You can configure the same audio settings as in the MeganeX 8K Mark II Configurator.
8.3 IPD setting
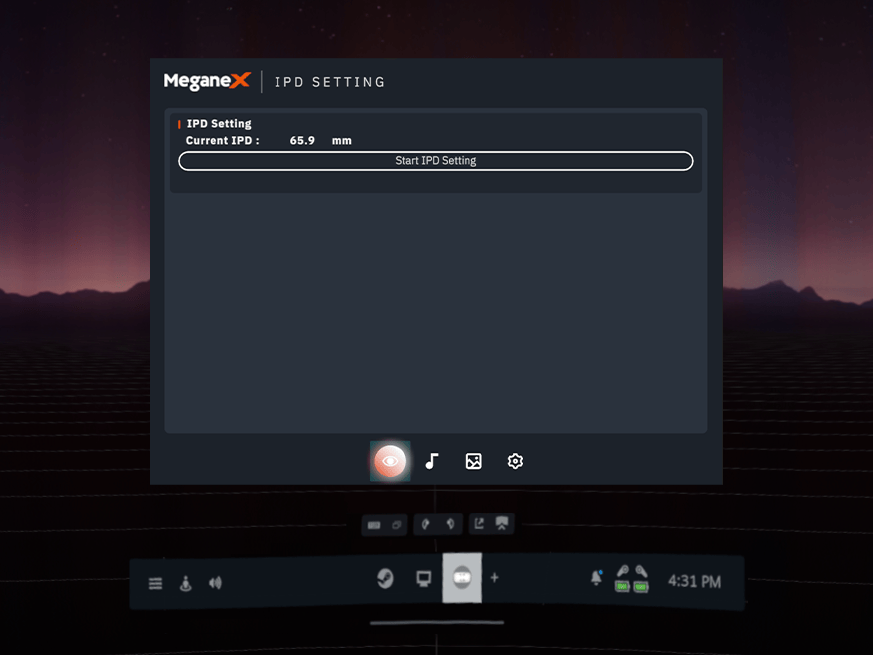
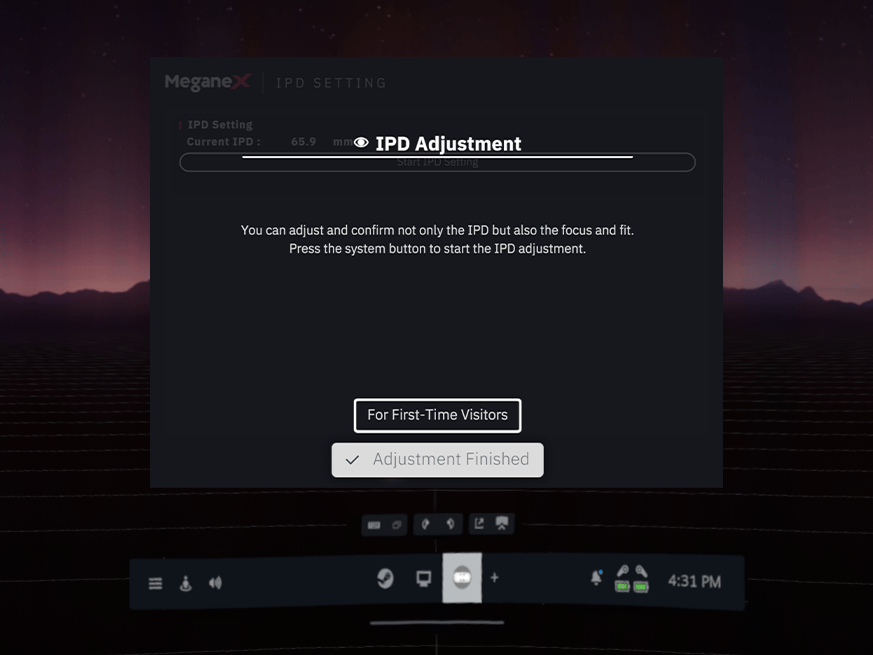
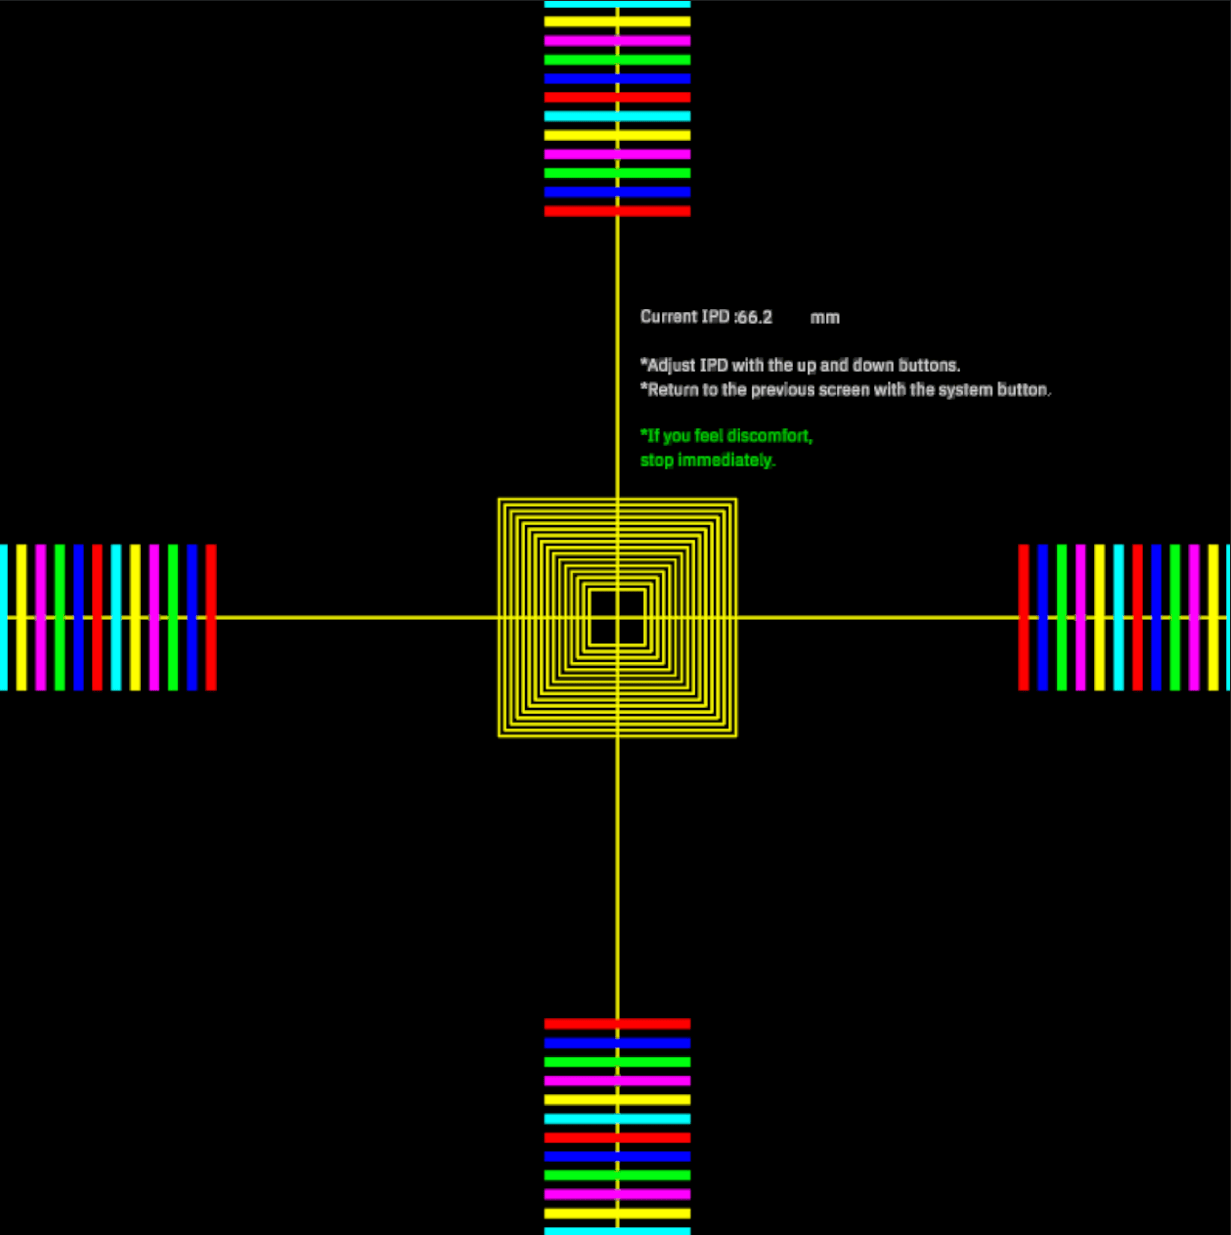
Section titled “8.3 IPD setting”You can adjust the IPD while looking at a test pattern. By selecting “For First-Time Visitors” the screen will switch to an adjustment guide, and a test pattern will be displayed. You can adjust the IPD using the controller stick up and down. Please adjust it until the vertical and horizontal stripes in the test pattern are clearly visible.
8.4 Image setting
Section titled “8.4 Image setting”You can adjust the image settings. The “Details” tab allows for more fine-tuned adjustments.
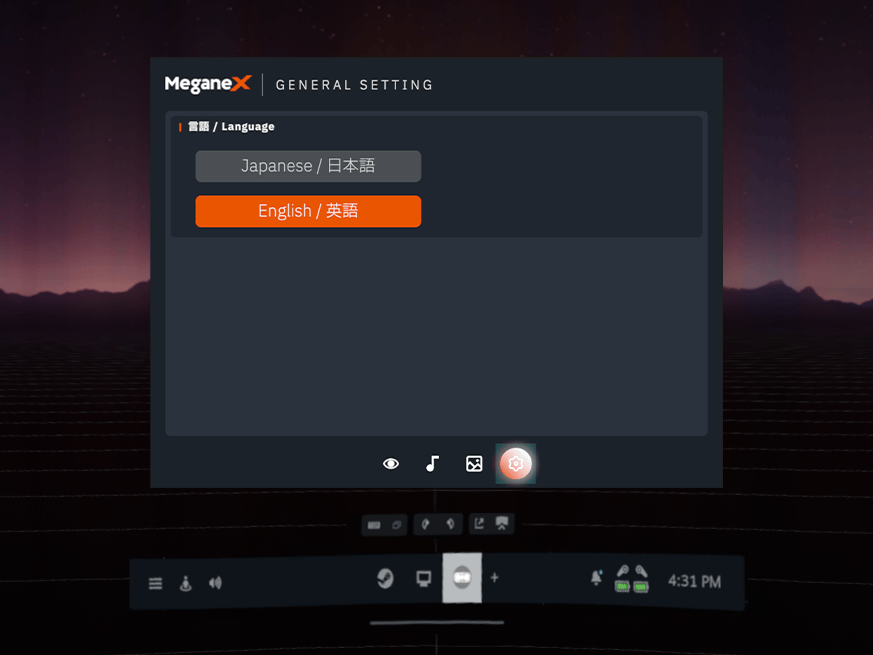
8.5 Language setting
Section titled “8.5 Language setting”You can change the language. This setting takes effect immediately. The MeganeX 8K Mark II Configurator will display a message prompting you to restart, and after the restart, the language settings will be changed.
■Others
Section titled “■Others”9. Usage instructions
Section titled “9. Usage instructions”9.1 Usage and storage instructions
Section titled “9.1 Usage and storage instructions”- Do not place it in direct sunlight or near sources of high heat.
- Do not leave the lenses facing the sun or strong light.
- Do not place it in dusty areas.
- Do not place it in areas with frequent vibrations.
- Do not use or store it in humid areas, such as bathrooms.
9.2 Restrictions on Use
Section titled “9.2 Restrictions on Use”- Use this product only in the countries listed under Safety Precautions / Warranty Card.
9.3 Maintenance
Section titled “9.3 Maintenance”- Wipe the lens with a lens cloth.
- Use a dry, soft cloth to clean the product.
- If the product is heavily soiled, dampen a cloth with water, wring it out thoroughly, and clean the dirt, then wipe it with a dry cloth.
- Avoid using solvents or chemicals such as benzine, thinner, alcohol, or kitchen cleaners, as they may damage the product or cause the paint to peel off.
9.4 Disposal
Section titled “9.4 Disposal”- When disposing of the product, do not dispose of it with general waste (non-burnable waste). Please follow the disposal regulations of your local city, town, or village.
10. Copyright
Section titled “10. Copyright”- Windows is a registered trademark or trademark of Microsoft Corporation in the United States and other countries.
- Other names, company names, product names, etc., mentioned in this document are trademarks or registered trademarks of their respective companies.
11. Specifications
Section titled “11. Specifications”| Product name | MeganeX 8K Mark II |
| Part number | SVP-VGC4B |
| Display | 1.35inch Micro OLED / 10 bit |
| Contrast ratio | 1 million:1 |
| Resolution | Single eye 3552 x 3840 (Both eyes 7104 x 3840 pixels) |
| Gradation | 8bit: 256 levels / 10bit: 1024 levels |
| Color Gamut | DCI-P3 coverage: 95% |
| HDR | Supported by SteamVR™ |
| Refreshing rate | 75Hz / 90Hz |
| Lens | Pancake Lens |
| Inter pupillary distance(IPD) | 58-72 mm(motorized) |
| Focus adjustment | 0D~-7D |
| Weight | 179g *Main unit only |
| How to wear | Forehead pad + Head strap or Handheld adapter |
| Audio input (microphone) | Built-in dual microphones with beamforming |
| Tracking method | 6DoF head tracking with SteamVR tracking Base Station 1.0 or 2.0 is required. |
| Connections | PC side: DisplayPort + USB2.0 Device side: USB Type-C *Use the converter box (included). |
| Enclosure | MeganeX 8K Mark II / Light shade / Forehead pad / Head strap / USB Type-C cable (9.8 ft / 3 m) / USB Type-C cable (3.3 ft / 1 m) / DisplayPort cable / AC adapter / Converter box / X2 dongle (for SteamVR™ controller) / Handheld adapter / Safety precautions / Warranty card |
Operating Conditions
| Operating Temperature | 5~35 °C |
| Storage Temperature | -5~50 °C |
| Relative Humidity | 20~80 % |
| Usage Location | Indoors |
12. FAQ
Section titled “12. FAQ”| Issue | Causes and solutions |
| Can I use it while wearing glasses? | MeganeX 8K Mark II cannot be used while wearing glasses. By ordering custom prescription lenses from VR Optician, you can enjoy sharp, high-quality visuals with perfectly adjusted focus. Prescription Lenses |
| Does it not work with AMD Radeon? | It does not work with the current firmware. *We are considering adding support for it in a future update. |
| Does it work with non-RTX graphics cards (such as the GTX 1660)? | Operation is not guaranteed. It is not supported. For the minimum PC requirements, please refer to 2.2 Items that need to be prepared. |
| The operation is unstable on a laptop. | Please connect it to a power source when using it with a laptop. |
| Sometimes it doesn't work on my laptop. | If the device is not functioning, it may be because the laptop is running on the integrated graphics chip instead of the NVIDIA graphics chip. To resolve this, open the “NVIDIA Control Panel”, go to “Manage 3D Settings”, and set it to run using the High-Performance NVIDIA Processor. However, even on laptops equipped with NVIDIA RTX series graphics cards, many models have external output ports connected to the integrated graphics chip rather than the NVIDIA graphics chip. The device will only work on laptops with external output ports that are directly connected to the NVIDIA graphics chip. *We are unable to provide information on which specific laptop models are configured this way. |
| I bought another USB C cable but the device doesn't work. | DisplayPort Alt Mode requires a USB-C cable that supports HBR3 transmission bandwidth of 32.4 Gbps (8.1 Gbps × 4 lanes) or higher. It does not work with USB3 Gen2 cables or USB4 cables that do not support DisplayPort Alt Mode. |
| The PC fan speed increases and becomes loud. | The PC temperature may be rising. Please turn off the MeganeX 8K Mark II for at least 30 minutes. |
| The screen is blurry and out of focus | Adjust the IPD and forehead pad position. *Compared to other VR headsets, the IPD needs to be adjusted more precisely. The distance between the eyes and the lenses also needs to be closer than with other VR headsets. |
| Can I use the device if PC graphics card has a USB Type-C connector compatible with DisplayPort 1.4/DP ALT mode? | No, direct connection between the USB Type-C of the graphics card and the USB Type-C of the MeganeX 8K Mark II unit is not guaranteed to work. |
| Can I convert the DisplayPort on my graphics card to USB Type-C? | No, it is not possible to use a DisplayPort to USB Type-C conversion cable. You must use a converter box. |
| My laptop only has a mini DisplayPort connector. | You may be able to use a mini DisplayPort to DisplayPort conversion cable that supports DisplayPort Version 1.4, but it will only work with laptops equipped with an NVIDIA RTX series graphics card. In addition, even with laptops equipped with these graphics cards, there are many laptops where the mini DisplayPort terminal is not connected to the NVIDIA graphics chip, but is connected to the built-in graphics chip. A mini DisplayPort to DisplayPort conversion cable can only be used with laptops that have a mini DisplayPort terminal that is directly connected to the NVIDIA graphics chip. *We are unable to provide information on which specific laptop models are configured this way. *The mini DisplayPort to DisplayPort conversion cable has been confirmed to work with SANWA SUPPLY KC-DPM14010. |
| Can I use the device if my laptop has a USB Type-C port that supports DisplayPort 1.4/DP ALT mode? | Direct connection between a laptop's USB Type-C port and the USB Type-C port on the MeganeX 8K Mark II is not covered under the operational guarantee. You may be able to use the device via a USB Type-C to DisplayPort conversion cable connected through the converter box, but it will only work with laptops equipped with an NVIDIA RTX series graphics card. Additionally, even on laptops equipped with these graphics cards, many models have USB Type-C DP ALT mode ports that are not connected to the NVIDIA graphics chip but instead to the integrated graphics chip. A USB Type-C to DisplayPort conversion cable can only be used with laptops that have a DP ALT mode USB Type-C port directly connected to the NVIDIA graphics chip. *We are unable to provide information on which specific laptop models are configured this way. |
| When should I set up the room? | 1, During the initial setup 2, When changing your location |
| Does it have a mode that allows you to see outside when you go beyond the room boundaries? | No, that function does not exist. |
| Is there a pass-through feature? | No, that function does not exist. |
13. Troubleshooting
Section titled “13. Troubleshooting”If the steps below do not resolve the issue, please reach out to us via the inquiry form.
| Issue | Causes and solutions |
| There is noise on the MeganeX 8K Mark II display. | Please try System Reset from 7.1.2 Task Tray |
| One side of the MeganeX 8K Mark II display is not working. | Please try System Reset from 7.1.2 Task Tray |
| The colors on the MeganeX 8K Mark II display look different from normal. | Please try System Reset from 7.1.2 Task Tray |
| The MeganeX 8K Mark II display is doubled. | Please try System Reset from 7.1.2 Task Tray |
| The power won't turn on. | Please unplug the AC adapter of the converter box and the USB Type-C to Type-C cable 3m connected to the MeganeX 8K Mark II, wait for about 10 seconds, then connect again. |
| The status LED on the MeganeX 8K Mark II remains solid blue and does not turn green. | After powering on, the device’s light pattern will change from solid blue→ blinking blue→ solid green. If the light returns to solid blue after blinking, it indicates that the device is not communicating with the PC. Please ensure that the USB Type-A to Type-C cable 1m is properly connected between the converter box and the PC. Additionally, check whether the device is recognized by the MeganeX 8K Mark II Configurator. If it is recognized, try performing a system reset. If it is not recognized, consider using a different USB port on your PC. Please check if the 1m USB Type-A to Type-C cable is properly connected between the converter box and the PC. If it is correctly connected, try using a different USB port on the PC. |
| After turning on the power, the operation status indicator LED continues to flash blue and the device does not start up. | Please check if the USB is properly connected to the PC. |
| There is a lot of noise and distortion in the sound. | If the volume level is set above 50, voices from loud speakers may become distorted. If distortion occurs, set the volume to 50 or lower and adjust the volume within each application. |
| The operation is no longer accepted. | Safety mechanisms may be active. Press the power button on the MeganeX 8K Mark II to turn it off, then turn it back on. If it does not turn off, unplug the AC adapter of the converter box and the USB Type-C to Type-C cable connected to the MeganeX 8K Mark II, wait for about 30 seconds, and then reconnect. |
| The message "The VR headset has shut down because it detected a high temperature condition. Wait for the device to cool and then reconnect the USB cable." was displayed and the power was turned off. | The operating temperature may be outside the 5–35°C range. Turn off the device, wait for a while, and then turn it back on to reset the protection circuit. If the issue persists, unplug the AC adapter of the converter box and the 3m USB Type-C to Type-C cable connected to the MeganeX 8K Mark II. Wait for about 30 seconds, then reconnect. |
| The message "The temperature of the VR headset is high. If the temperature continues to rise, it will automatically shut down." is displayed, and warning sounds are emitted periodically. | The operating temperature may be outside the 5–35°C range. Turn off the device, wait for a while, and then turn it back on to reset the protection circuit. If the issue persists, unplug the AC adapter of the converter box and the 3m USB Type-C to Type-C cable connected to the MeganeX 8K Mark II. Wait for about 30 seconds, then reconnect. |
| The status LED on the MeganeX 8K Mark II is flashing red, and it is not functioning properly. | A hardware malfunction is likely to have occurred, so please contact us through the inquiry form. |
| The self-diagnosis displays the message "Device malfunction detected.” | A hardware malfunction is likely to have occurred, so please contact us through the inquiry form. |
| The headset is not recognized in SteamVR. | ・Check that your PC meets the recommended specifications. ・Check that SteamVR version 1.24.1 or later and NVIDIA graphics driver version 591.44 or later are installed. ・Check that all cables are properly connected. ・If the cables are properly connected and the issue persists, check the MeganeX 8K Mark II Configurator for troubleshooting steps and follow the instructions provided. |
| Head tracking is not enabled. | Please try restarting both the PC and the MeganeX 8K Mark II. |
| The screen frequently grays out or tracking becomes unstable when using the outside-in method. | The base station is not being detected properly by the outside-in compatible adapter. If there are obstacles between the base station and the adapter, the screen may gray out or tracking may become unstable. Please set the Base Station in the recommended position and ensure there are no obstacles. |
| After updating the NVIDIA graphics driver, SteamVR no longer recognizes the MeganeX 8K Mark II. | After updating the NVIDIA graphics driver, connection may fail. Please restart both the PC and the MeganeX 8K Mark II, then try reconnecting to SteamVR. If the issue persists, try reinstalling the MeganeX 8K Mark II Configurator. Additionally, consider rolling back the NVIDIA graphics driver to an older version and test again. |
| The image has been burned in. | Due to the characteristics of OLED, leaving a specific image, such as the microphone icon in VRChat, displayed in the same location for a long period of time may cause image burn-in. This issue is subject to paid repair. Please contact us through the inquiry form for assistance. |
| When displaying high-contrast images, dark or light bands may extend horizontally on the screen. | This is a phenomenon called "crosstalk" that occurs in OLED panel products. It may occur when displaying scenes with high contrast, but it is not a defect of the device. Crosstalk is an inherent characteristic of OLED technology and cannot be completely prevented. This product is designed with an emphasis on contrast performance. |
| The controller is not recognized and cannot be paired. | Please make sure the X2 dongle is connected to the PC. |
| Controller connection is unstable | The X2 dongle communicates over the 2.5GHz band, which may cause interference with USB 3.0 devices (operating in the 2.5GHz range) or Bluetooth devices (operating in the 2.4GHz range), leading to unstable connections. To reduce interference, use a commercially available USB extension cable to position the X2 dongle approximately 1 meter away from the PC. Additionally, if the X2 dongle is placed far from the controller, connection instability may occur. For optimal performance, keep the dongle as close to the controller as possible. |
| The controller is not appearing on the VR screen. | Please check if the controller is connected in SteamVR. Ensure that the outside-in compatible adapter is installed and that the MeganeX 8K Mark II is connected via USB. |
| The room boundary is not visible. | The room boundary will only be displayed when you approach the boundary line. |
| The issue is not resolved through the troubleshooting steps. | Please try restarting the PC, restarting the MeganeX 8K Mark II, and reinstalling the MeganeX 8K Mark II Configurator in addition to the troubleshooting steps. |
| There is an issue with the display on the MeganeX 8K Mark II screen. | Please try System Reset from 7.1.2 Task Tray . If the issue persists, please restart SteamVR™. |
| There is an issue with launching SteamVR. | Please try System Reset from 7.1.2 Task Tray . If the issue persists, please restart SteamVR™. |
| The image remains flickering | Flickering may occur when the GPU load is high. In that case, try lowering the rendering resolution. Additionally, due to the current specifications of SteamVR, there may be brief image disturbances when entering standby mode. This is not a fault of the device. |
| Noise in the microphone during IPD adjustment | Since the IPD adjustment uses a motor, there is a possibility that the motor's drive sound will be picked up by the microphone. |
| Unable to operate MeganeX VR settings properly | Please confirm that the SteamVR controller settings are properly configured. |
| Some functions are not working properly | In order to use the device, MeganeX 8K Mark II Configurator must always be running. It is set to automatically launch in the background when the PC starts. Please check that MeganeX 8K Mark II Configurator is running in the taskbar or system tray. If it is not running, manually start MeganeX 8K Mark II Configurator. In case the issue persists, right-click the system tray icon and select "System Reset.” |
| Error: "The graphics card cannot connect to the HMD display (436)" and SteamVR does not recognize the HMD | 1. Check whether “MeganeX8K_Native” or “MeganeX8KMark2” is listed in the SteamVR add-ons, and confirm that at least one of them is turned on. If both add-ons are turned on, please make sure that “MeganeX8K_Native” is enabled. 2. If neither add-on is listed, uninstall MeganeX 8K Mark II Configurator, then reinstall it. 3. Turn off the power to the converter box, wait 5 seconds, and then turn it back on. 4. Restart your PC and launch SteamVR again. |
For any other inquiries, please contact the Shiftall support center.
14. Release Notes
Section titled “14. Release Notes”14.1 MeganeX 8K Mark II Configurator
Section titled “14.1 MeganeX 8K Mark II Configurator”- 2025/12/26 Version 1.0.9.0
- The URL link has been corrected.
- 2025/12/26 Version 1.0.7.0
- First Edition
14.2 Main Firmware
Section titled “14.2 Main Firmware”Automatic online updates are available. To update manually, please set the update mode to “Offline” from the Device Update menu in the MeganeX 8K Mark II Configurator. To update the main firmware, extract the downloaded folder, select the emmc folder in the main firmware update section, and click the update button.
- 2025/12/26 Version 1.00
- First Edition
14.3 Video Sub Firmware
Section titled “14.3 Video Sub Firmware”Automatic online updates are available. To update manually, please set the update mode to “Offline” from the Device Update menu in the MeganeX 8K Mark II Configurator. To update the Sub Firmware for Display, select the downloaded .hex file in the video sub-firmware update section, and click the update button.
- 2025/12/26 Version 02.00.00.00
- First Edition
14.4 Audio Sub Firmware
Section titled “14.4 Audio Sub Firmware”- 2025/12/26 Version 0.01
- First Edition
The company names, system names, and product names mentioned in this manual, except for Shiftall and MeganeX 8K Mark II, are registered trademarks or trademarks of their respective companies, and we do not hold the rights to them. Additionally, the symbols ”™” and ”®” are generally omitted in the text and figures.
Shiftall Inc., December 2025